Evaluating a Detection Model on the Open Images Dataset
This tutorial demonstrates per-image evaluation of an object detection model on the Open Images dataset that generates:
- true positives & false positives
- per-class average precision (AP)
- mean average precision (mAP)
for each image and adds this information to each Sample in the Dataset.
The steps are broken down as follows:
- Requirements
- Download the test data and ground-truth labels (optional)
- Generate predictions (optional)
- Load the data into FiftyOne
- Prepare the ground-truth for evaluation (optional)
- Evaluate on a per-image granularity
- Explore
Optional steps may not be necessary depending on if you have already downloaded the data or have your own model to evaluate.
This tutorial evaluates a model on Open Images V4 however this code supports later versions of Open Images as well. If using a newer version just make sure to use the appropriate hierarchy file and class label map.
Quickstart: Interactive visualization in under 5 minutes
The following steps demonstrate how to evaluate your own model on a per-image granularity using Tensorflow Object Detection API and then interactively visualize and explore true/false positive detections. If you would simply like to browse a subset of Open Images test set with evaluation on a pre-trained model, instead download this dataset. You can get up and running with just 5 lines of code!
Below is the Python code to load the dataset download and visualize it:
!pip install fiftyone
import fiftyone as fo
from fiftyone import ViewField as F

# Path to the unzipped dataset you downloaded
DATASET_DIR = "/path/to/open-images-v4-test-500"

# Load the dataset
dataset = fo.Dataset.from_dir(DATASET_DIR, fo.types.FiftyOneDataset)

# Open the dataset in the App
session = fo.launch_app(dataset)
# Filter the visible detections by confidence and filter the samples
# to only those with at least one false positive
high_conf_view = (
   dataset
   .filter_labels("true_positives", F("confidence") > 0.4)
   .filter_labels("false_positives", F("confidence") > 0.4)
   .match(F("false_positives.detections").length() > 0)
   .sort_by("open_images_id")
)

session.view = high_conf_view
Requirements
This workflow requires a few Python packages. First, if you haven't already, install FiftyOne:
!pip install fiftyone
Then install the appropriate version of tensorflow depending on whether or not you have a GPU:
!pip install tensorflow
and install other requirements:
!pip install numpy pandas google-api-python-client
Download supporting scripts
This notebook uses a collection of helper scripts and modules. If you downloaded this notebook from the fiftyone-examples repository, you will also need to download the rest of the examples/open_images_evaluation/ sudirectory.
Download the test dataset
All of the data (images, metadata and annotations) can be found on the official Open Images website.
If you are using Open Images V4 you can use the following commands to download all the necessary files.
Download the data
WARNING This is 36GB of data!
!aws s3 --no-sign-request sync s3://open-images-dataset/test open-images-dataset/test
Download the labels and metadata
%%bash

wget https://storage.googleapis.com/openimages/2018_04/test/test-annotations-bbox.csv
wget https://storage.googleapis.com/openimages/2018_04/test/test-annotations-human-imagelabels-boxable.csv
wget https://storage.googleapis.com/openimages/2018_04/class-descriptions-boxable.csv
wget https://storage.googleapis.com/openimages/2018_04/bbox_labels_600_hierarchy.json
(optional) Generate predictions
This section steps through generating predictions using a pre-trained model publically available
on Tensorflow Hub.
The exact model used can be modified simply by changing MODEL_HANDLE below.
Alternative 1: download pre-computed predictions
If you would like to skip the step of generating predictions, simply download this predictions file.
Alternative 2: use your own model
If you have your own model that you would like to evaluate, make sure the outputs are saved to csv in
Tensorflow Object Detection API format.
Output file structure must have a single header row followed by one row per detection as follows:
ImageID,LabelName,Score,XMin,XMax,YMin,YMax
...,...,...,...,...,...,...
...,...,...,...,...,...,...
Example output for two images with two detections each:
ImageID,LabelName,Score,XMin,XMax,YMin,YMax
000026e7ee790996,/m/07j7r,0.1,0.071905,0.145346,0.206591,0.391306
000026e7ee790996,/m/07j7r,0.2,0.439756,0.572466,0.264153,0.435122
000062a39995e348,/m/015p6,0.4,0.205719,0.849912,0.154144,1.000000
000062a39995e348,/m/05s2s,0.5,0.137133,0.377634,0.000000,0.884185
Generate predictions with a Tensorflow Hub pre-trained model
To use a Tensorflow Hub model requires the following packages:
!pip install Pillow tensorflow-hub
Populate the following environment variables and run the inference script.
This script is resumable and saves after every 10 samples are processed by default. It does not process images in batches.
%%bash

IMAGES_DIR=/PATH/TO/IMAGES
OUTPUT_DIR=/PATH/TO/PREDICTIONS

MODEL_HANDLE="https://tfhub.dev/google/faster_rcnn/openimages_v4/inception_resnet_v2/1"
# MODEL_HANDLE="https://tfhub.dev/google/openimages_v4/ssd/mobilenet_v2/1"

python open_images_eval/scripts/inference.py \
    --output_dir ${OUTPUT_DIR} \
    --output_format tf_object_detection_api \
    ${IMAGES_DIR} ${MODEL_HANDLE}
Load the data into FiftyOne
Create a persistent FiftyOne dataset
The following script loads the data into a FiftyOne Dataset. This process copies all labels and metadata to a non-relational database for rapid access and powerful querying, but only paths to the images are stored in the database, not copies of the images themselves!
The dataset is set to persistent so that it remains in the database and can be loaded in a new python process.
%%bash

DATASET_NAME="open-images-v4-test"
IMAGES_DIR=/PATH/TO/IMAGES
BOUNDING_BOXES_EXPANDED=/PATH/TO/test-annotations-bbox_expanded.csv
IMAGE_LABELS_EXPANDED=/PATH/TO/test-annotations-human-imagelabels-boxable_expanded.csv
PREDICTIONS_PATH=/PATH/TO/PREDICTIONS.csv
CLASS_DESCRIPTIONS=/PATH/TO/class-descriptions-boxable.csv

python open_images_eval/scripts/load_data.py \
    --bounding_boxes_path ${BOUNDING_BOXES_EXPANDED} \
    --image_labels_path ${IMAGE_LABELS_EXPANDED} \
    --predictions_path ${PREDICTIONS_PATH} \
    --prediction_field_name "faster_rcnn" \
    --class_descriptions_path ${CLASS_DESCRIPTIONS} \
    --load_images_with_preds \
    --max_num_images 1000 \
    ${DATASET_NAME} ${IMAGES_DIR}
To skip uploading predictions use the following code block. You can always add
predictions later using the function
open_images_eval.error_analysis.load_data.add_open_images_predictions()
%%bash

DATASET_NAME="open-images-v4-test"
IMAGES_DIR=/PATH/TO/IMAGES
BOUNDING_BOXES_EXPANDED=/PATH/TO/test-annotations-bbox_expanded.csv
IMAGE_LABELS_EXPANDED=/PATH/TO/test-annotations-human-imagelabels-boxable_expanded.csv
CLASS_DESCRIPTIONS=/PATH/TO/class-descriptions-boxable.csv

python open_images_eval/scripts/load_data.py \
    --bounding_boxes_path ${BOUNDING_BOXES_EXPANDED} \
    --image_labels_path ${IMAGE_LABELS_EXPANDED} \
    --class_descriptions_path ${CLASS_DESCRIPTIONS} \
    --max_num_images 1000 \
    ${DATASET_NAME} ${IMAGES_DIR}
Visualize the data
Now that we have a Fiftyone Dataset, let's visualize the data before evaluating it:
import fiftyone as fo
from fiftyone import ViewField as F

dataset = fo.load_dataset("open-images-v4-test")

session = fo.launch_app(dataset)
# Filter the visible detections by confidence
session.view = dataset.filter_labels("faster_rcnn", F("confidence") > 0.4)

Prepare the ground-truth for evaluation
Open Images requires "expanding the hierarchy" of the ground-truth labels, for
evaluation. The labels you downloaded only contain leaf node labels. So, for
example, for a bounding box labeled Jaguar, the hierarchy expansion would add
duplicate boxes with labels Carnivore, Mammal and Animal.
Create expanded hierarchy ground-truth labels
The following commands are essentially copied from this tutorial.
%%bash

# TODO: modify these
export TF_MODELS_RESEARCH=PATH/TO/TENSORFLOW/models/research/object_detection
LABELS_DIR=PATH/TO/LABELS

HIERARCHY_FILE=${LABELS_DIR}/bbox_labels_600_hierarchy.json
BOUNDING_BOXES=${LABELS_DIR}/test-annotations-bbox
IMAGE_LABELS=${LABELS_DIR}/test-annotations-human-imagelabels-boxable

python ${TF_MODELS_RESEARCH}/object_detection/dataset_tools/oid_hierarchical_labels_expansion.py \
    --json_hierarchy_file=${HIERARCHY_FILE} \
    --input_annotations=${BOUNDING_BOXES}.csv \
    --output_annotations=${BOUNDING_BOXES}_expanded.csv \
    --annotation_type=1

python ${TF_MODELS_RESEARCH}/object_detection/dataset_tools/oid_hierarchical_labels_expansion.py \
    --json_hierarchy_file=${HIERARCHY_FILE} \
    --input_annotations=${IMAGE_LABELS}.csv \
    --output_annotations=${IMAGE_LABELS}_expanded.csv \
    --annotation_type=2
You should now have two new files in LABELS_DIR:
test-annotations-bbox_expanded.csv
test-annotations-human-imagelabels-boxable_expanded.csv
Evaluate on a per-image granularity
This next script evaluates each image indivually using some wrapper code around the TF Object Detection API evaluation code.
Running evaluation
If you skipped "Prepare the ground-truth for evaluation" be sure to export the TF_MODELS_RESEARCH environment variable.
%%bash

CLASS_LABEL_MAP=${TF_MODELS_RESEARCH}/object_detection/data/oid_v4_label_map.pbtxt

python open_images_eval/scripts/evaluate_model.py \
    --prediction_field_name "faster_rcnn" \
    --iou_threshold 0.5 \
    ${DATASET_NAME} ${CLASS_LABEL_MAP}
Explore
At last! We can now visualize the data. Use this snippet to launch the GUI app and start browsing.
import fiftyone as fo
from fiftyone import ViewField as F

dataset = fo.load_dataset("open-images-v4-test")

session = fo.launch_app(dataset)
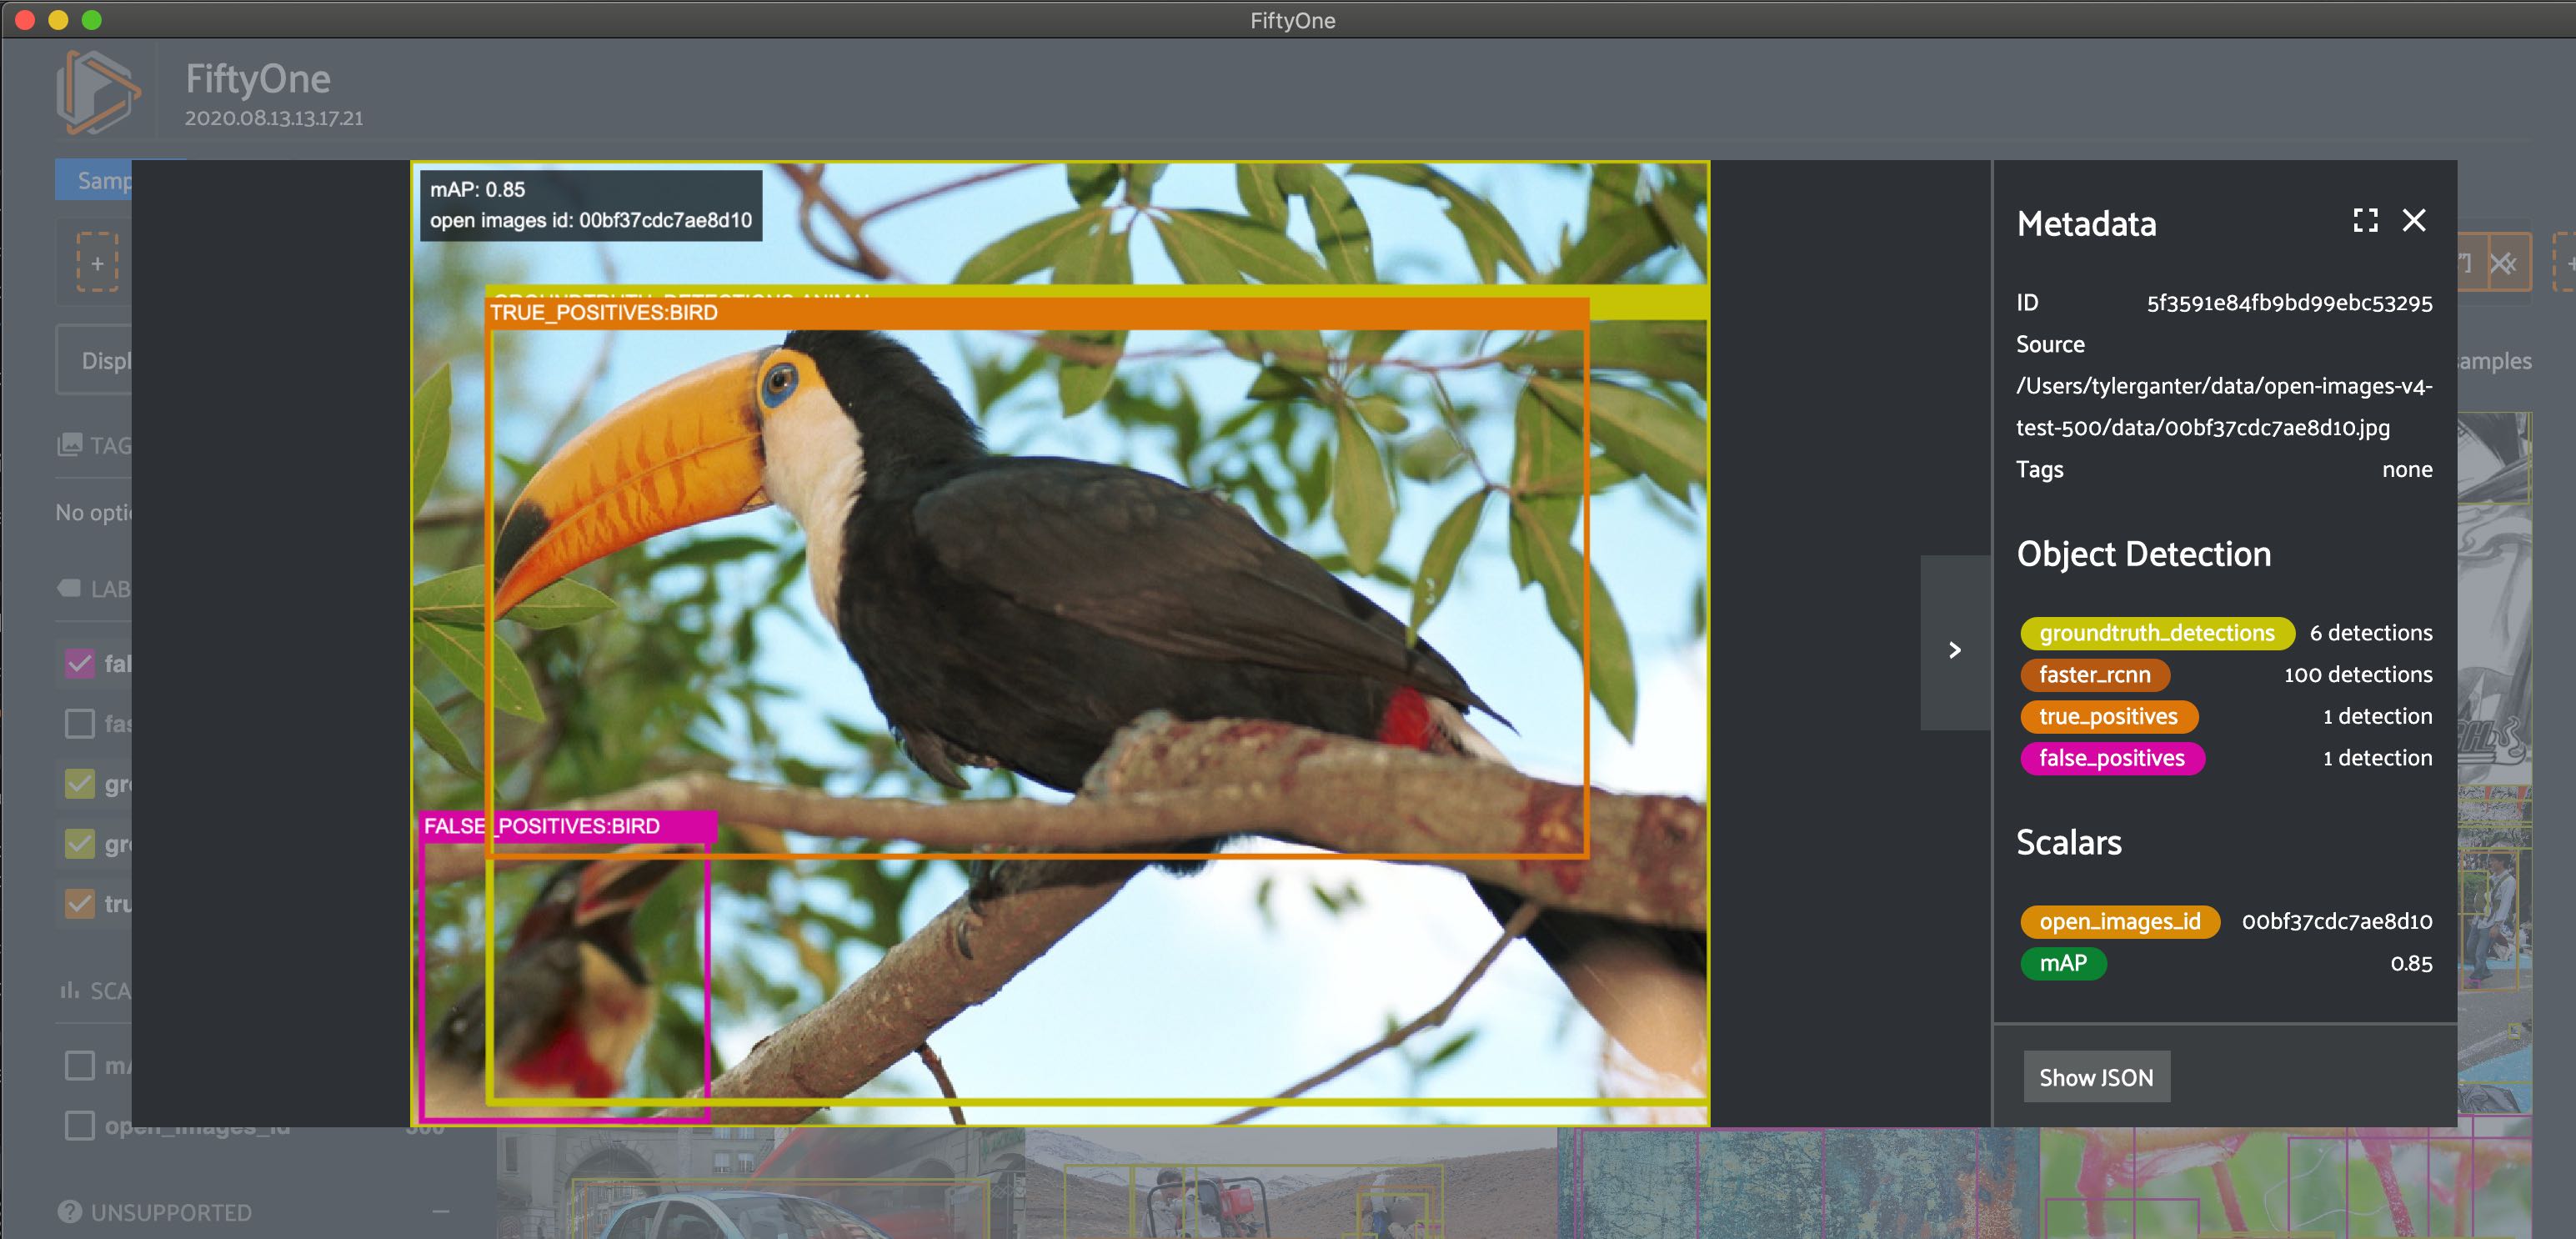
There so many possibilities as far as how to slice and dice this data. Let's start with high confidence predictions (detection.confidence > 0.4):
# Filter the visible detections for high confidence,
# then filter the samples to only those with at least one false positive
high_confidence_view = (
   dataset
   .filter_labels("faster_rcnn_TP", F("confidence") > 0.4)
   .filter_labels("faster_rcnn_FP", F("confidence") > 0.4)
   .match(F("faster_rcnn_FP.detections").length() > 0)
   .sort_by("open_images_id")
)

session.view = high_confidence_view

On the very first image we see a prediction that correctly boxes a bird but is mistakenly marked as a false positive!
Here are a few more ideas for how to view the data:
# Filter the visible detections for medium confidence,
# then filter the samples to only those with at least one false positive
medium_confidence_view = (
   dataset
   .filter_labels("true_positives", (F("confidence") > 0.2) & (F("confidence") < 0.4))
   .filter_labels("false_positives", (F("confidence") > 0.2) & (F("confidence") < 0.4))
   .match(F("false_positives.detections").length() > 0)
   .sort_by("open_images_id")
)

session.view = medium_confidence_view
# Filter the visible detections for ground truth with `Bird` or `Human eye`,
# then filter the samples to only those with at least one ground truth box
bird_eye_view = (
   dataset
   .filter_labels("groundtruth_detections", F("label").is_in(["Bird", "Human eye"]))
   .match(F("groundtruth_detections.detections").length() > 0)
   .sort_by("open_images_id")
)

session.view = bird_eye_view
# Filter the visible detections for small bounding box area,
# then filter the samples to only those with at least one false positive
small_boxes_view = (
   dataset
   .filter_labels("false_positives", bbox_area < 0.01)
   .filter_labels("true_positives", bbox_area < 0.01)
   .match(F("false_positives.detections").length() > 0)
   .sort_by("open_images_id")
)

session.view = small_boxes_view