"Converting CRAFT to TFLite: A Guide to PyTorch-TFLite Conversion"
"Learn how to convert PyTorch pretrained model to TFLite Format"
- toc: true
- branch: master
- badges: true
- comments: true
- hide: false
- categories: [tflite, optimization, onnx, craft, text-detector]
- image: images/flow_resized.png
- author: Tulasi Ram
- permalink : /craft-in-tflite
This is an end-to-end tutorial on how to convert a PyTorch model to TensorFlow Lite (TFLite) using ONNX. Specifically, we will be using the CRAFT model (proposed in this paper) which is essentially a text detector. Above is the overview of what’s covered in the tutorial -
# hide
# - [Brief Overview of Craft Model](#Brief-Overview-of-the-CRAFT-Model):
# - [TFLite Conversion Flow](#Conversion-Flow):
#     -  [PyTorch Model to ONNX Model](#PyTorch-Model-to-ONNX):
#     -  [ONNX Model to TensorFlow SavedModel](#ONNX-Model-to-TensorFlow-SavedModel):
#     -  [TensorFlow SavedModel to TFLite Model](#TensorFlow-SavedModel-to-TFLite):
#         - Dynamic Range Quantization
#         - Float16 Quantization
# - [Running Inference with TFLite Model](#Running-inference-with-TFLite-Models):
# - [Results](#Results)
# - [Conclusion](#CONCLUSION)
Please open the notebooks included in this repository and follow along with this blog post.
Important: You may also directly download already converted TFLite Models from this Repository. Also pre-converted now available in Tensorflow Hub.
Brief Overview of the CRAFT Model
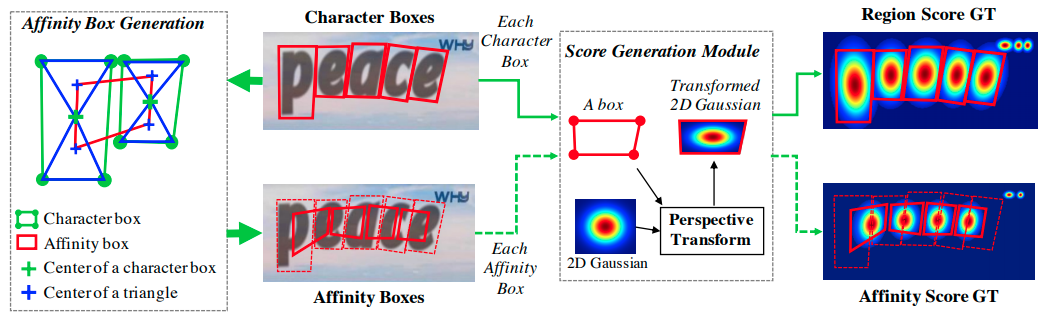
Character Region Awareness for Text Detection in short CRAFT was proposed in this paper and is known for its efficiency as well as precise performance The main principle of CRAFT is to localize the individual character regions and link the detected characters to text instances.
CRAFT produces two scores for each character-character region score and affinity score.
- Character Region Score is used to localize the individual character
- Affinity Score is used to group each character into a single instance.
As we all know in most of the image detectors use VGG16 as feature extractor CRAFT is not an exception for it and for decoding the architecture is similar to UNet.
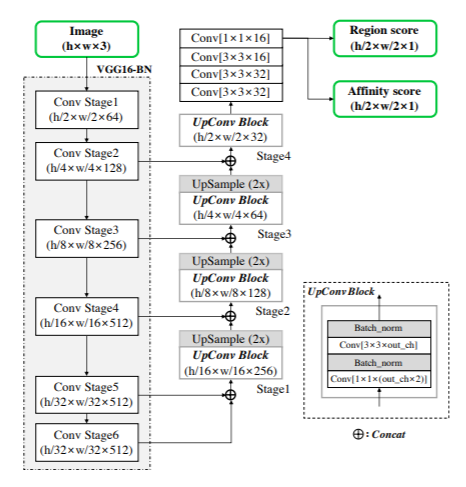
The above diagram is taken from the original paper
TFLite Conversion Flow

Note: Currently, the integer quantization is erroring out and it has been reported to the TensorFlow Lite team.
Update from TFLite team: Currently support for NCHW image format(like those converted from PyTorch) is quite limited at this moment, which caused this issue with full integer quantized model.
You can find the full reply from TensorFlow Lite team here
Clove AI team already provided pre-trained weights we can use for making inference on images. But the framework(PyTorch) is not ideal for mobile applications and also for low latency devices like Raspberry Pi and Fully Integer Devices like Google Coral and MicroControllers.
TensorFlow Lite is a framework that is well suited for running Deep Learning Models on edge devices and mobile devices. Now a days usage of edge devices become popular mainly due to 3 reasons
- Lower Latency
- No requirement of Internet
- Privacy Protection
This is why we first convert these pre-trained weights to TFLite which would be more suitable for low latency devices and mobile applications.
PyTorch Model to ONNX Model
Refer this notebook for complete code details mentioned in this section.
Open Neural Network Exchange in short ONNX is an open format built to represent machine learning models. The best thing about ONNX is interoperability. You can develop in your preferred framework without worrying about downstream inference applications. Exporting the models to ONNX format requires some mandatory parameters:
- Pre-trained Model
- Sample Input
- Path to save the model
- Input and Output Node names
#hide
!pip install onnx
!pip install onnxruntime
!pip install pip install git+https://github.com/onnx/onnx-tensorflow.git


import gdown

import numpy as np

from pathlib import Path
from datetime import datetime


import torch
import torch.nn as nn
import torch.nn.functional as F
import torch
import torch.nn as nn
import torch.nn.functional as F
import torch.nn.init as init
import torch.backends.cudnn as cudnn
from torchvision import models
from torchvision.models.vgg import model_urls
from collections import namedtuple
from collections import OrderedDict
import onnx
import onnxruntime
from onnx_tf.backend import prepare
#hide
def copyStateDict(state_dict):
    if list(state_dict.keys())[0].startswith("module"):
        start_idx = 1
    else:
        start_idx = 0
    new_state_dict = OrderedDict()
    for k, v in state_dict.items():
        name = ".".join(k.split(".")[start_idx:])
        new_state_dict[name] = v
    return new_state_dict

def init_weights(modules):
    for m in modules:
        if isinstance(m, nn.Conv2d):
            init.xavier_uniform_(m.weight.data)
            if m.bias is not None:
                m.bias.data.zero_()
        elif isinstance(m, nn.BatchNorm2d):
            m.weight.data.fill_(1)
            m.bias.data.zero_()
        elif isinstance(m, nn.Linear):
            m.weight.data.normal_(0, 0.01)
            m.bias.data.zero_()
#hide
class vgg16_bn(torch.nn.Module):
    def __init__(self, pretrained=True, freeze=True):
        super(vgg16_bn, self).__init__()
        model_urls['vgg16_bn'] = model_urls['vgg16_bn'].replace('https://', 'http://')
        vgg_pretrained_features = models.vgg16_bn(pretrained=pretrained).features
        self.slice1 = torch.nn.Sequential()
        self.slice2 = torch.nn.Sequential()
        self.slice3 = torch.nn.Sequential()
        self.slice4 = torch.nn.Sequential()
        self.slice5 = torch.nn.Sequential()
        for x in range(12):         # conv2_2
            self.slice1.add_module(str(x), vgg_pretrained_features[x])
        for x in range(12, 19):         # conv3_3
            self.slice2.add_module(str(x), vgg_pretrained_features[x])
        for x in range(19, 29):         # conv4_3
            self.slice3.add_module(str(x), vgg_pretrained_features[x])
        for x in range(29, 39):         # conv5_3
            self.slice4.add_module(str(x), vgg_pretrained_features[x])

        # fc6, fc7 without atrous conv
        self.slice5 = torch.nn.Sequential(
                nn.MaxPool2d(kernel_size=3, stride=1, padding=1),
                nn.Conv2d(512, 1024, kernel_size=3, padding=6, dilation=6),
                nn.Conv2d(1024, 1024, kernel_size=1)
        )

        if not pretrained:
            init_weights(self.slice1.modules())
            init_weights(self.slice2.modules())
            init_weights(self.slice3.modules())
            init_weights(self.slice4.modules())

        init_weights(self.slice5.modules())        # no pretrained model for fc6 and fc7

        if freeze:
            for param in self.slice1.parameters():      # only first conv
                param.requires_grad= False

    def forward(self, X):
        h = self.slice1(X)
        h_relu2_2 = h
        h = self.slice2(h)
        h_relu3_2 = h
        h = self.slice3(h)
        h_relu4_3 = h
        h = self.slice4(h)
        h_relu5_3 = h
        h = self.slice5(h)
        h_fc7 = h
        vgg_outputs = namedtuple("VggOutputs", ['fc7', 'relu5_3', 'relu4_3', 'relu3_2', 'relu2_2'])
        out = vgg_outputs(h_fc7, h_relu5_3, h_relu4_3, h_relu3_2, h_relu2_2)
        return out

class double_conv(nn.Module):
    def __init__(self, in_ch, mid_ch, out_ch):
        super(double_conv, self).__init__()
        self.conv = nn.Sequential(
            nn.Conv2d(in_ch + mid_ch, mid_ch, kernel_size=1),
            nn.BatchNorm2d(mid_ch),
            nn.ReLU(inplace=True),
            nn.Conv2d(mid_ch, out_ch, kernel_size=3, padding=1),
            nn.BatchNorm2d(out_ch),
            nn.ReLU(inplace=True)
        )

    def forward(self, x):
        x = self.conv(x)
        return x
#hide
class CRAFT(nn.Module):
    def __init__(self, pretrained=False, freeze=False):
        super(CRAFT, self).__init__()

        """ Base network """
        self.basenet = vgg16_bn(pretrained, freeze)

        """ U network """
        self.upconv1 = double_conv(1024, 512, 256)
        self.upconv2 = double_conv(512, 256, 128)
        self.upconv3 = double_conv(256, 128, 64)
        self.upconv4 = double_conv(128, 64, 32)

        num_class = 2
        self.conv_cls = nn.Sequential(
            nn.Conv2d(32, 32, kernel_size=3, padding=1), nn.ReLU(inplace=True),
            nn.Conv2d(32, 32, kernel_size=3, padding=1), nn.ReLU(inplace=True),
            nn.Conv2d(32, 16, kernel_size=3, padding=1), nn.ReLU(inplace=True),
            nn.Conv2d(16, 16, kernel_size=1), nn.ReLU(inplace=True),
            nn.Conv2d(16, num_class, kernel_size=1),
        )

        init_weights(self.upconv1.modules())
        init_weights(self.upconv2.modules())
        init_weights(self.upconv3.modules())
        init_weights(self.upconv4.modules())
        init_weights(self.conv_cls.modules())

    def forward(self, x):
        """ Base network """
        sources = self.basenet(x)

        """ U network """
        y = torch.cat([sources[0], sources[1]], dim=1)
        y = self.upconv1(y)

        y = F.interpolate(y, size=sources[2].size()[2:], mode='bilinear', align_corners=False)
        y = torch.cat([y, sources[2]], dim=1)
        y = self.upconv2(y)

        y = F.interpolate(y, size=sources[3].size()[2:], mode='bilinear', align_corners=False)
        y = torch.cat([y, sources[3]], dim=1)
        y = self.upconv3(y)

        y = F.interpolate(y, size=sources[4].size()[2:], mode='bilinear', align_corners=False)
        y = torch.cat([y, sources[4]], dim=1)
        feature = self.upconv4(y)

        y = self.conv_cls(feature)

        return y.permute(0,2,3,1), feature
# hide
# Link to the pretrained model.
# https://drive.google.com/uc?export=download&id=1Jk4eGD7crsqCCg9C9VjCLkMN3ze8kutZ
#hide
pytorch_model = CRAFT()
pytorch_model.load_state_dict(copyStateDict(torch.load('/home/ram/Projects/OCR/craft_tflite/models/craft_mlt_25k.pth', map_location='cpu')))
#net.load_state_dict(copyStateDict(torch.load('.EasyOCR/model/craft_mlt_25k.pth', map_location='cuda')))
#net = torch.nn.DataParallel(net).to('cuda')
#cudnn.benchmark = False
pytorch_model.eval()
print("Model loaded")
#hide
batch_size = 1
# Input to the model
x = torch.randn(batch_size, 3, 224, 224, requires_grad=True)
onnx_runtime_input = x.detach().numpy()
t1 = datetime.now()
torch_out = net(x)
t2 = datetime.now()
print("Time taken for Pytoch model", str(t2-t1))
pytorch_output = torch_out[0].detach().numpy()
print("Output size", torch_out[0].size())
print("Model ran sucesfully")
#hide
shape_dict ={'input' : {0 : 'batch_size',
                       2 : 'width',
                       3 : 'height'},    # variable lenght axes
            'output' : {0 : 'batch_size',
                        1 : 'width',
                        2: 'height'}}
torch.onnx.export(pytorch_model,
                  x,
                  'craft.onnx',
                  opset_version=10,
                  do_constant_folding=True,
                  input_names=['input'],
                  output_names=['output'],
                  dynamic_axes= shape_dict)
Here are some details about the above code snippet -
export()function executes the model and records a trace of operators that are used to compute output.To execute the model we need to provide the input. This value can be random as long as type and dimensions are matched because the export function just runs the model to trace the operators that are being used to compute output.
Exported ONNX model will be of fixed dimension unless specified in the
dynamic_axesparameter. In the above code we specified batch_size, width and height of the image are dynamic and the channels which are not specified in thedynamic_axeswill be fixed according to input dimension.To visualize the exported onnx model you can use this tool.
Once the model is exported, load the model and verify the model structure and confirm whether the model has a valid schema or not.
The below code snippet checks whether the exported onnx model has a valid schema.
onnx_model = onnx.load('craft.onnx')
onnx.checker.check_model(onnx_model)
Expected Output:
Raises Runtime Error if model is not valid. If valid no output.
Compare ONNX output with Pytorch Model Output:
To check whether the exported ONNX model was faulty or not follow these steps:
- Create a Sample Input
- Run pre-trained Pytorch Model and save output
- Run exported ONNX model and save output
- Compare both pytorch output and ONNX model output.
Below is the code snippet required to implement the above steps:
ort_session = onnxruntime.InferenceSession('craft.onnx')
ort_inputs = {ort_session.get_inputs()[0].name:onnx_runtime_input}
ort_outs = ort_session.run(None, ort_inputs)
np.testing.assert_allclose(pytorch_out, ort_outs[0], rtol=1e-03, atol=1e-05)
The above code snippet compares both pytorch model output and onnx model output and errors out if the outputs are not matched with the tolerance mentioned.
It compares the difference between pytorch output and onnx output to
atol+rtol*abs(onnx output)
You can refer to this documentation for more details about this function. If the ONNX conversion was faulty then the assertion statement would have errored out.
Great! We converted to ONNX.
Let’s see how to convert the ONNX model to the TensorFlow SavedModel.
import onnx
from onnx_tf.backend import prepare
onnx_model = onnx.load('craft.onnx')
tf_rep = prepare(onnx_model)
tf_rep.export_graph('craft_tf_graph')
After exporting to TensorFlow graphs we can inspect the graph using the same tool which we used to visualize the onnx model.
Warning: Please refer to the installation instructions for validity of onnx and onnx_tf versions.
A SavedModel contains all the information about the TensorFlow program, along with weights and computation. As we don’t require any extra code to build the model it is very easy to share or deploy TensorFlow saved models.
The file structure of SavedModel craft_tf_graph will be as follows:
craft_tf_graph
   |----  saved_model.pb
       |----  assets
       |----  variables
           |---- variables.data-00000-of-00001
           |---- variables.index
The saved_model.pb contains an actual model and set of named signatures each identifying a function that accepts input tensors and produces output tensors.
The variables directory contains standard checkpoints and assets directory contains files used by tensorflow graph. assets directory is unused in this example as saved model has no requirement of extra files.
To know more about TensorFlow SavedModel please refer to this guide.
You can load the saved model assuming it is Keras saved model. Below is the code snippet to load the saved model:
model = tf.keras.models.load_model('craft_tf_graph')
# or model = tf.saved_model.load('craft_tf_graph')
You can easily convert to the TFLite Model easily from the saved model. But inorder to change any input dimension you can set it by loading the concrete function from the saved model.
Below is the code snippet to set the input shape required for the TFLite format.
concrete_func = model.signatures[tf.saved_model.DEFAULT_SERVING_SIGNATURE_DEF_KEY]
concrete_func.inputs[0].set_shape([None, 3, 800, 600])
TensorFlow SavedModel to TFLite
To convert a TensorFlow model into TensorFlow Lite model can be done from 3 ways:
- From Saved Model
- From Keras Model
- From Concrete Function
You can refer to this blog for various conversion techniques. We will convert to TFLite from concrete function.
Below is the code snippet to load the concrete function into the TFLiteConverter.
converter = tf.lite.TFLiteConverter.from_concrete_functions([concrete_func])
While converting to TFLite we can choose several quantization methods. Refer to this guide for various Post training Quantization techniques.
- Dynamic Range Quantization
- Float16 Quantization
Dynamic Range Quantization
Default Optimization is Dynamic Range Quantization.
converter.optimizations = [tf.lite.Optimize.DEFAULT]
Float16 Quantization
For Float16 all other things remain same we just need to add this line
converter.target_spec.supported_types = [tf.float16]
Convert and Store the Model:
tf_lite_model = converter.convert()
open('craft.tflite', 'wb').write(tf_lite_model)
| Quantization Type | Model Size |
|---|---|
| Dynamic Range | 20MB |
| Float16 | 40MB |
Original PyTorch model size is around 80MB
Running inference with TFLite Models
Refer to this notebook for complete code details mentioned in this section.
Once the TFLite models are generated we need to make sure they are working as expected. So let’s do inference on the real image and check the output.
Run the preprocessing steps mentioned in this notebook before feeding to the tflite model.
Below is the code snippet to run the inference with TFLite model.
interpreter = tf.lite.Interpreter(model_path='craft.tflite')
interpreter.allocate_tensors()
input_details = interpreter.get_input_details()
output_details = interpreter.get_output_details()
input_shape = input_details[0]['shape']
interpreter.set_tensor(input_details[0]['index'], input_data)
interpreter.invoke()
y = interpreter.get_tensor(output_details[0]['index'])
feature =  interpreter.get_tensor(output_details[1]['index'])
After the post-processing steps mentioned in this notebook the output image (with dynamic range quantized model) would look like this alongside with the output of the original model output.
Results
Output with Dynamic Range Quantized Model:

Output with Float16 Quantized Model:

It is clearly evident that the results of Float16 quantized model are better than results of Dynamic Range quantized model but at the cost of model size.
Conclusion
In this post we have covered all the steps required to convert any PyTorch pre-trained model to TFLite format. If you want to use the same notebook for all of the mentioned steps you can use this notebook.
Wondering about how the CRAFT model would perform in the mobile device? Refer to this blog post that compares the CRAFT model with the EAST model w.r.t. many useful metrics such as memory, inference latency, performance and so on.
Acknowledgments:
Thanks to Sayak Paul , Le Viet Gia Khanh(from TFLite team) for their constant guidance.