p5.js in the Jupyter Notebook for custom interactive visualizations
By Jeremy Tuloup - @jtpio - jtp.io - github.com/jtpio
The goal of this notebook is to show how to create custom visualizations in a Jupyter Notebook using p5.js and Jupyter Widgets. We will make use of existing Javascript libraries and integrate them in the notebook with the help of Jupyter Widgets.
The Python Visualization Landscape (2017)
As you can see on the picture below, there are quite many options to plot data using Python!
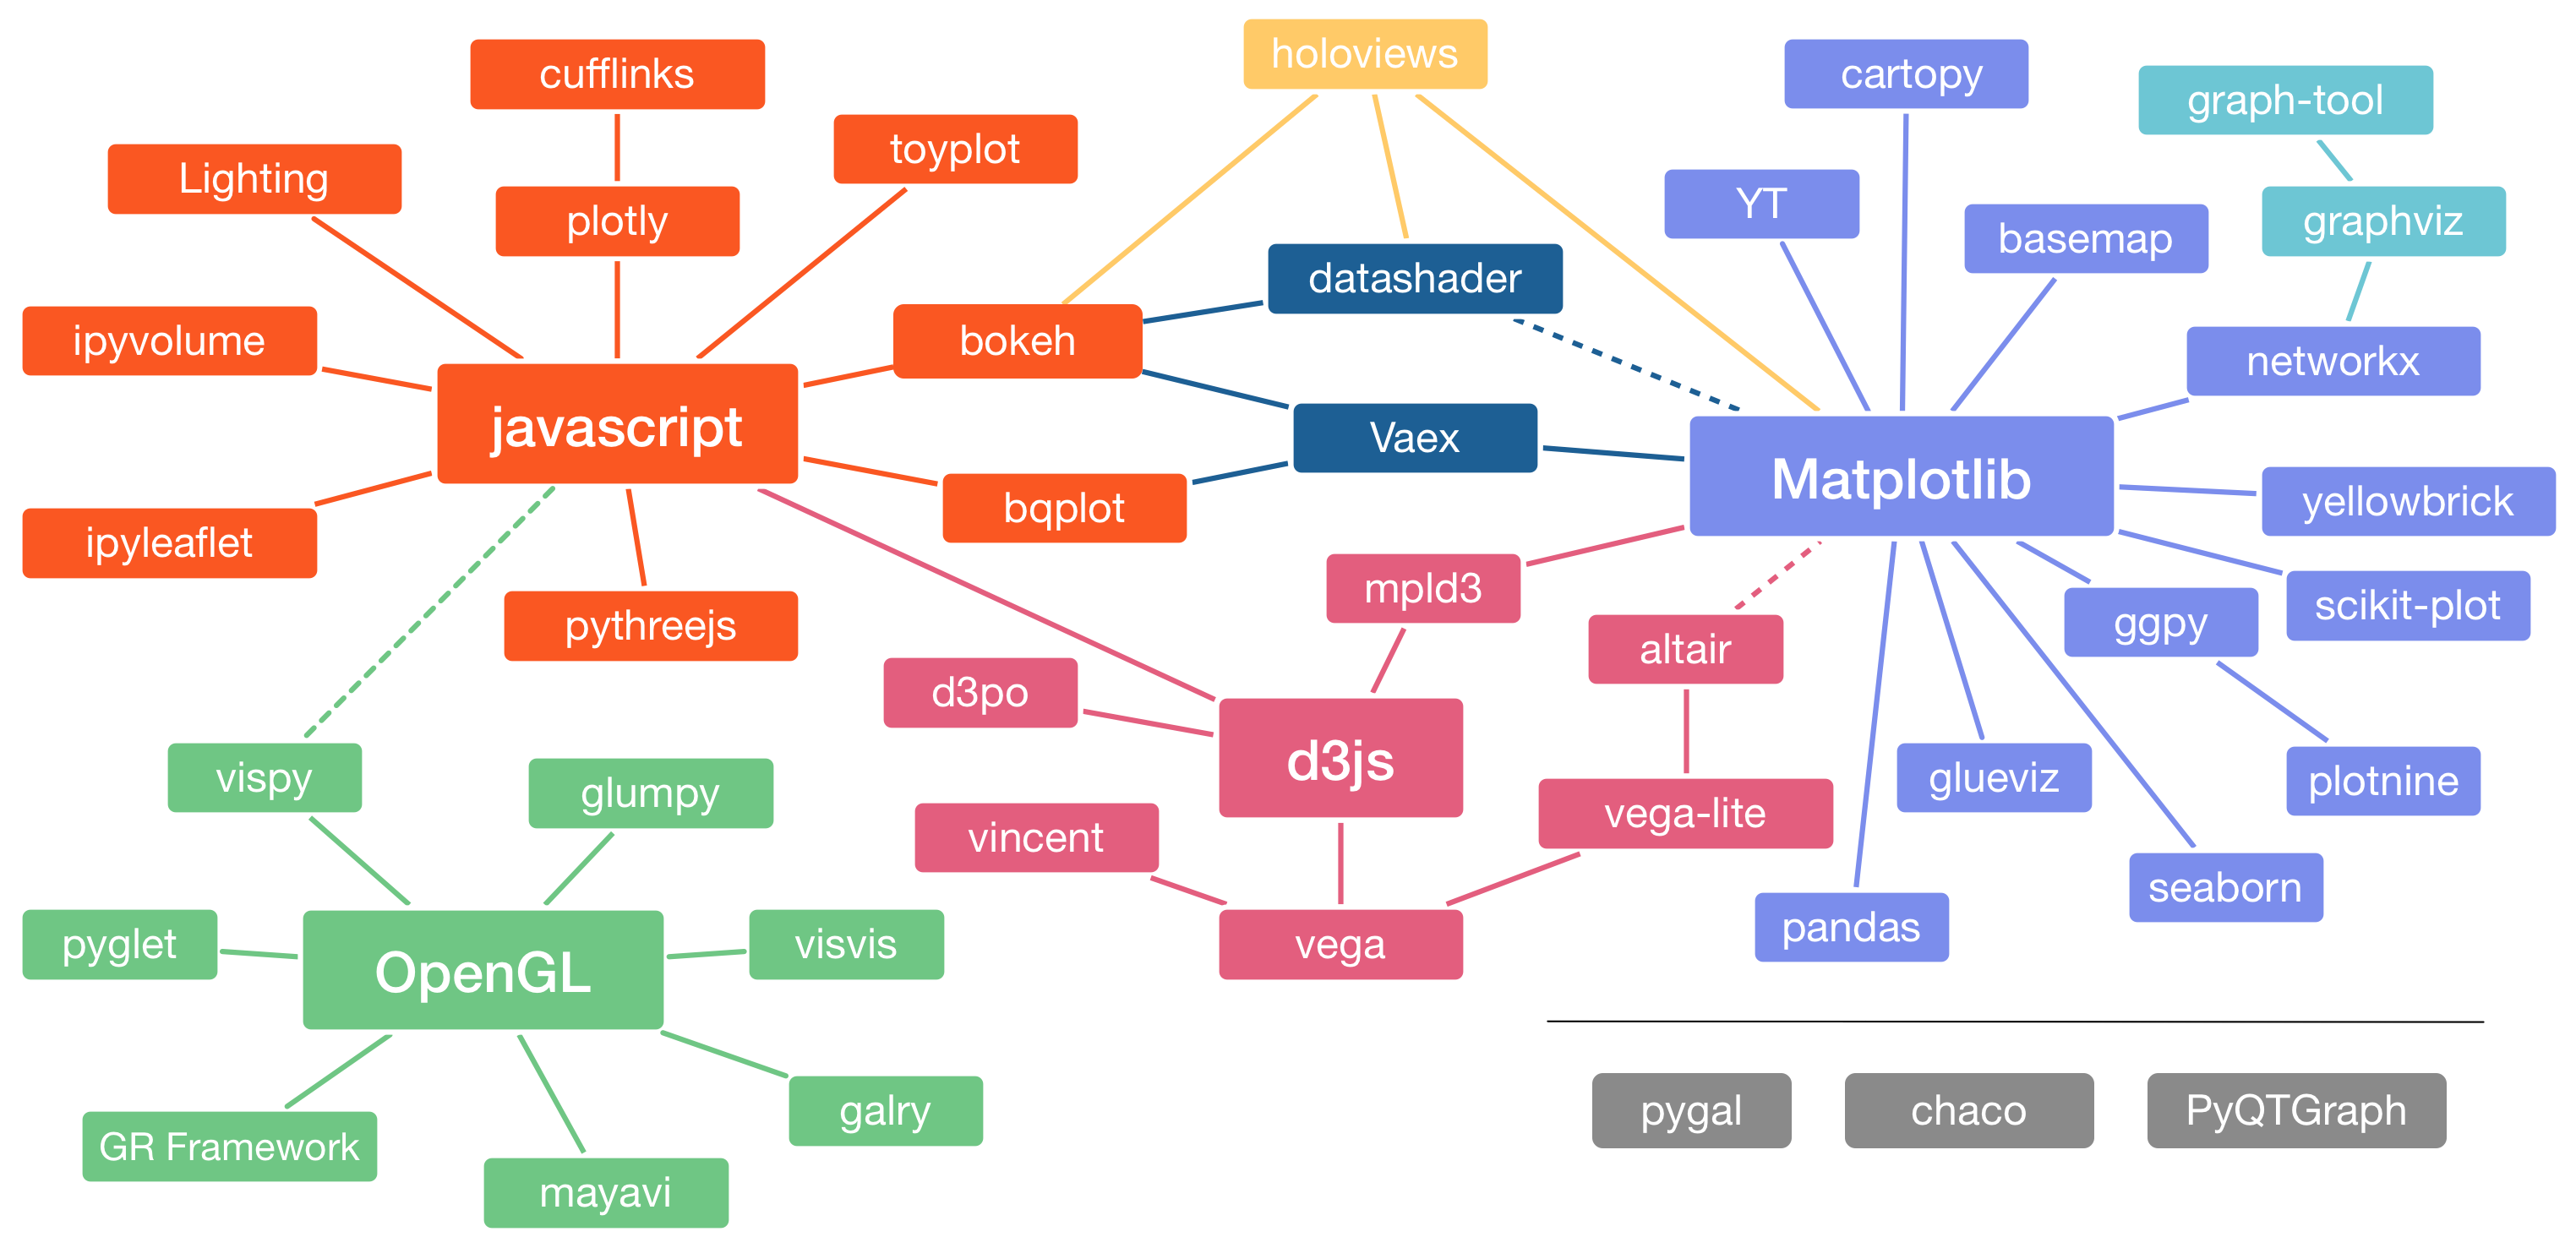
This visualization was created by Nicolas P. Rougier and is based on the talk from Jake VanderPlas at PyCon 2017.
Source:
- Jake VanderPlas: The Python Visualization Landscape PyCon 2017
- Source for the Visualization, by Nicolas P. Rougier
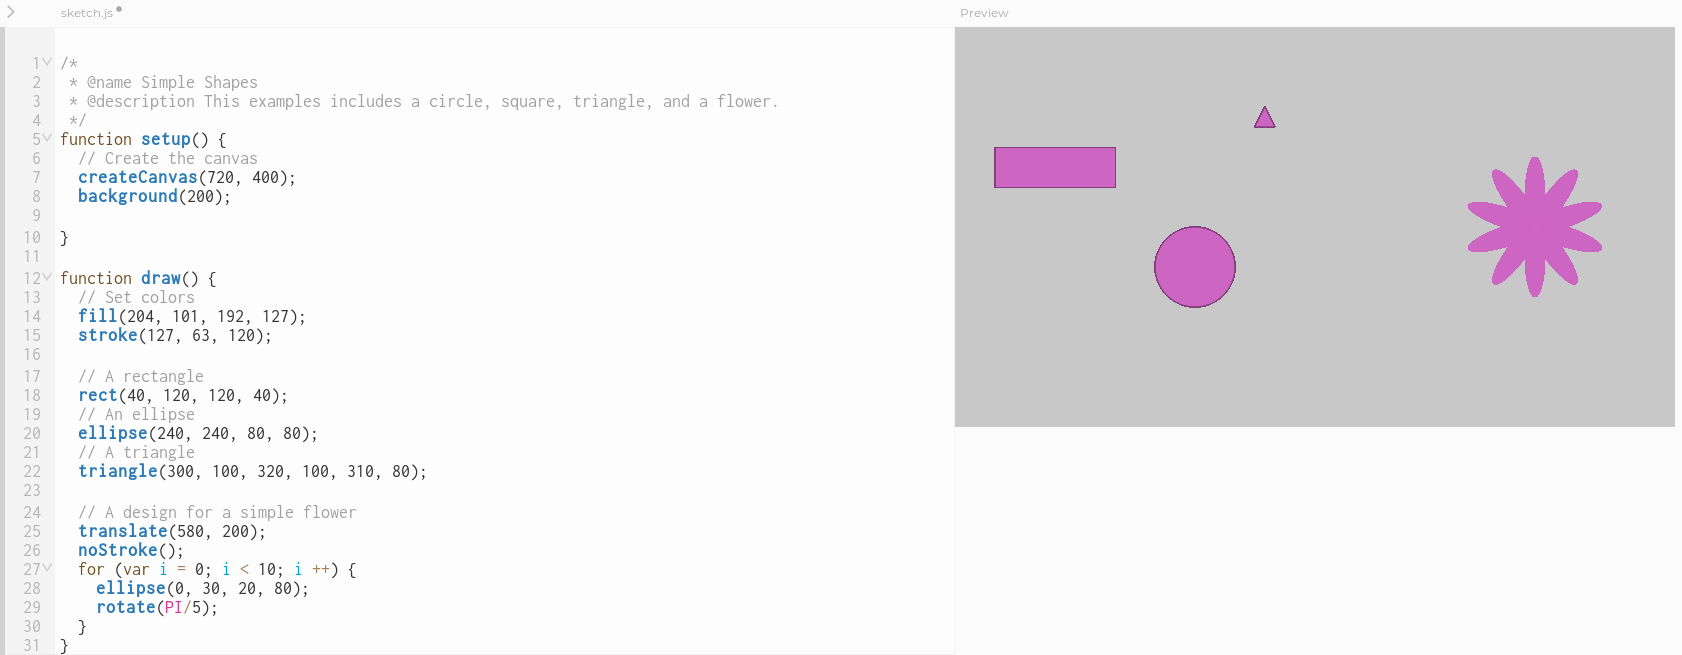
What is p5.js?
From the official website:
p5.js is a JS client-side library for creating graphic and interactive experiences, based on the core principles of Processing.
make coding accessible for artists, designers, educators, and beginners, and reinterprets this for today's web.
There is also on online editor for creating sketches directly in the browser: http://alpha.editor.p5js.org/p5/sketches/S1_gZTpJKIG
Running Javascript code in the Jupyter Notebook
The Jupyter Notebook, like the Python language itself, also comes with batteries included, such as cell magics. One of the cell magics is %%javascript, which lets the user run Javascript code directly in the browser.
As an example, we can define a variable and print its value:
%%javascript

let myVar = 'test'
console.log(myVar)
Nothing is shown on the page and it is normal. console.log prints in the Developer Tools console. Open it and you should see the content of the variable printed (among other things).
The Jupyter Notebook also exposes the element variable in the Input cell which references the Output cell.
%%javascript

element.text('Hello')
Setting up the libraries
Jupyter uses require.js under the hood, and the good thing is that we can use of it for our own purposes.
Using require, we can load the following Javascript libraries:
- p5.js: rendering on the canvas
- lodash: utility library with many high order functions
%%javascript
require.config({
    paths: {
        'p5': 'https://cdnjs.cloudflare.com/ajax/libs/p5.js/0.6.0/p5.min',
        'lodash': 'https://cdnjs.cloudflare.com/ajax/libs/lodash.js/4.17.4/lodash.min'
    }
});
Jupyter Widgets
The Jupyter Widgets library is a handy tool to create interactive components in the notebook, simplifying the data flow between the Python kernel and the Javascript frontend:
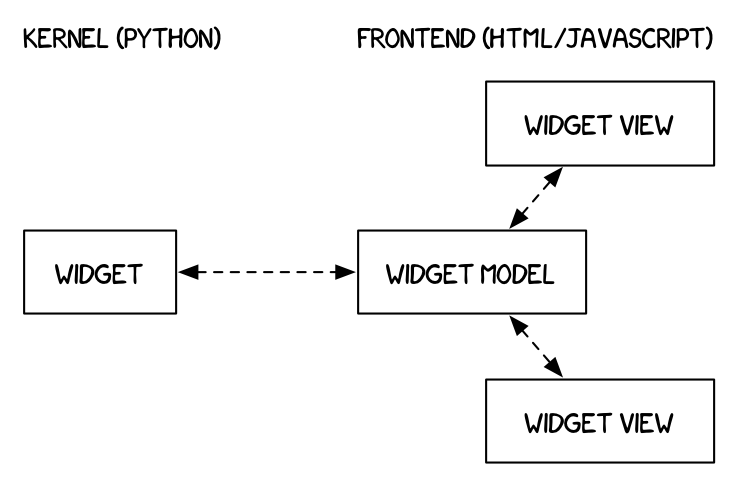
For more information about Jupyter Widgets, please refer to the User Guide.
In this example, we will create several widgets, each widget for a specific purpose. To avoid duplicating code, we will start by defining a few helper functions.
Helper functions
The functions defined under window will be accessible from anywhere in the notebook when using %%javascript cell magic (even in the developer tools console).
%%javascript

window.defineModule = function (name, dependencies, module) {
    // force the recreation of the module
    // (when re-executing a cell)
    require.undef(name);

    define(name, dependencies, module);
};
%%javascript

window.createSketchView = function (name, dependencies, module) {

    require.undef(name);

    define(name,
           ['@jupyter-widgets/base', 'p5', 'lodash'].concat(dependencies),
           (widgets, p5, _, ...deps) => {

        let viewName = `${name}View`;

        let View = widgets.DOMWidgetView.extend({
            initialize: function () {
                this.el.setAttribute('style', 'text-align: center;');
            },

            render: function () {
                // pass the model as the last dependency so it can
                // be accessed in the sketch
                let sketch = module(...deps, this.model);
                setTimeout(() => {
                    this.sketch = new p5(sketch, this.el);
                }, 0);
            },

            remove: function () {
                // stop the existing sketch when the view is removed
                // so p5.js can cancel the animation frame callback and free up resources
                if (this.sketch) {
                    this.sketch.remove();
                    this.sketch = null;
                }
            }
        });

        return {
            [viewName] : View,
        };
    });
}
The defineModule javascript function can now be used to create a module containing a bunch of parameters (for testing).
%%javascript

// Test module defining a few constants, for example purposes
// Such constants should ideally be defined directly in the model
// and directly accessed by the view

defineModule('testModule', [], () => {
    const [W, H] = [500, 500];
    return {W, H};
})
%%javascript

createSketchView('Sketch2D', ['testModule'], (TestModule, model) => {
    return function(p) {
        const {W, H} = TestModule;
        const [CX, CY] = [W / 2, H / 2];

        p.setup = function(){
            p.createCanvas(W, H);
            p.rectMode(p.CENTER);
        }

        p.draw = function () {
            p.background('#ddd');
            p.translate(CX, CY);
            let n = model.get('n_squares');
            _.range(n).forEach(i => {
                p.push();
                p.rotate(p.frameCount / 200 * (i + 1));
                p.fill(i * 5, i * 100, i * 150);
                p.rect(0, 0, 200, 200);
                p.pop();
            });
        }
    };
})
Defining the model
Now the model can be created on the Python side, by defining a class which inherits from widgets.DOMWidget.
The class definition contains a few attributes used to sync data back and forth between the frontend and the backend.
import ipywidgets as widgets
from traitlets import Unicode, Int


class Sketch2D(widgets.DOMWidget):
    _view_name = Unicode('Sketch2DView').tag(sync=True)
    _view_module = Unicode('Sketch2D').tag(sync=True)
    _view_module_version = Unicode('0.1.0').tag(sync=True)
    n_squares = Int(1).tag(sync=True)
sketch_2d = Sketch2D()
sketch_2d
sketch_2d.n_squares = 4
3D Demo
P5.js even supports basic 3D primitives, so let's create a new widget to test that!
%%javascript

createSketchView('Sketch3D', ['testModule'], (Settings, model) => {
    return function(p) {
        const {W, H} = Settings;

        p.setup = function(){
            p.createCanvas(W, H, p.WEBGL);
        }

        p.draw = function () {
            p.background('#ddd');
            let t = p.frameCount;
            let n = model.get('n_cubes');
            p.randomSeed(42);
            _.range(n).forEach(i => {
                const R = 180 //+ 30 * p.sin(t * 0.2 + i);
                const x = R * p.cos(i * p.TWO_PI / n);
                const y = R * p.sin(i* p.TWO_PI / n);
                p.push();
                p.translate(x, y);
                p.fill(p.random(255), p.random(255), p.random(255));
                p.rotateY(t * 0.05 + i);
                p.box(50);
                p.pop();
            });
        }
    };
})
class Sketch3D(widgets.DOMWidget):
    _view_name = Unicode('Sketch3DView').tag(sync=True)
    _view_module = Unicode('Sketch3D').tag(sync=True)
    _view_module_version = Unicode('0.1.0').tag(sync=True)
    n_cubes = Int(4).tag(sync=True)
sketch_3d = Sketch3D()
sketch_3d
sketch_3d.n_cubes = 10
All of this is great! What about looking at a concrete example?
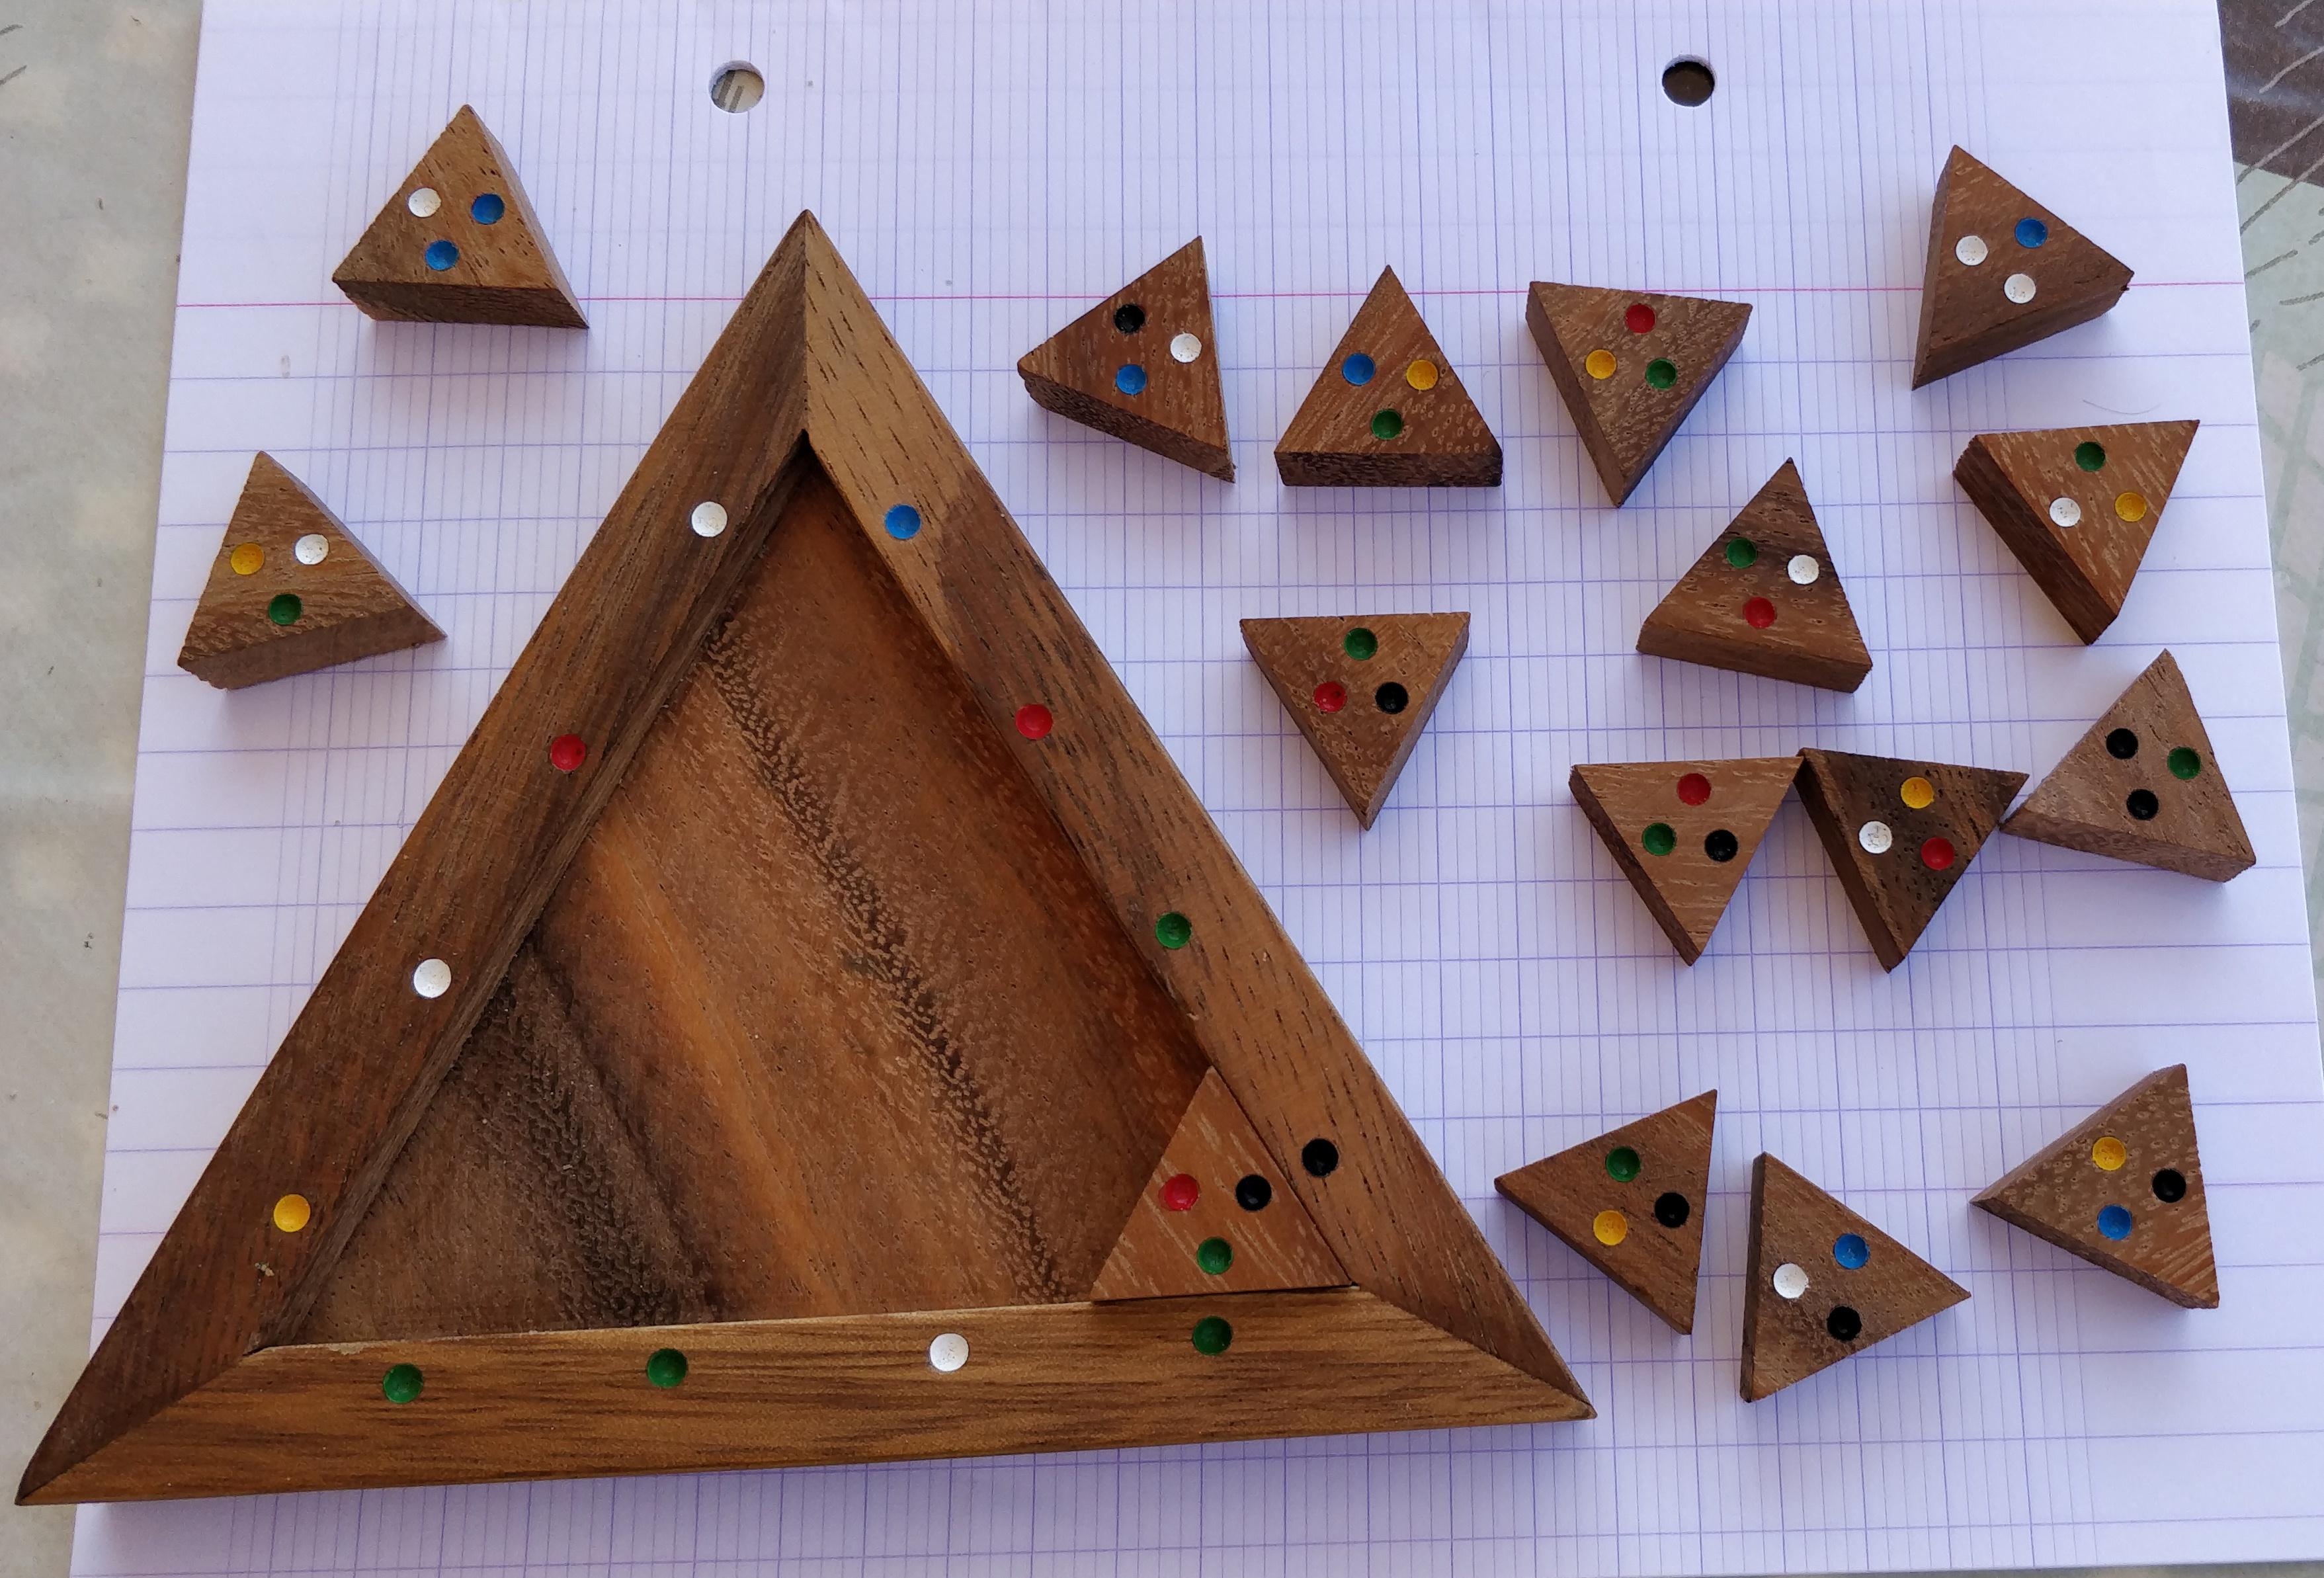
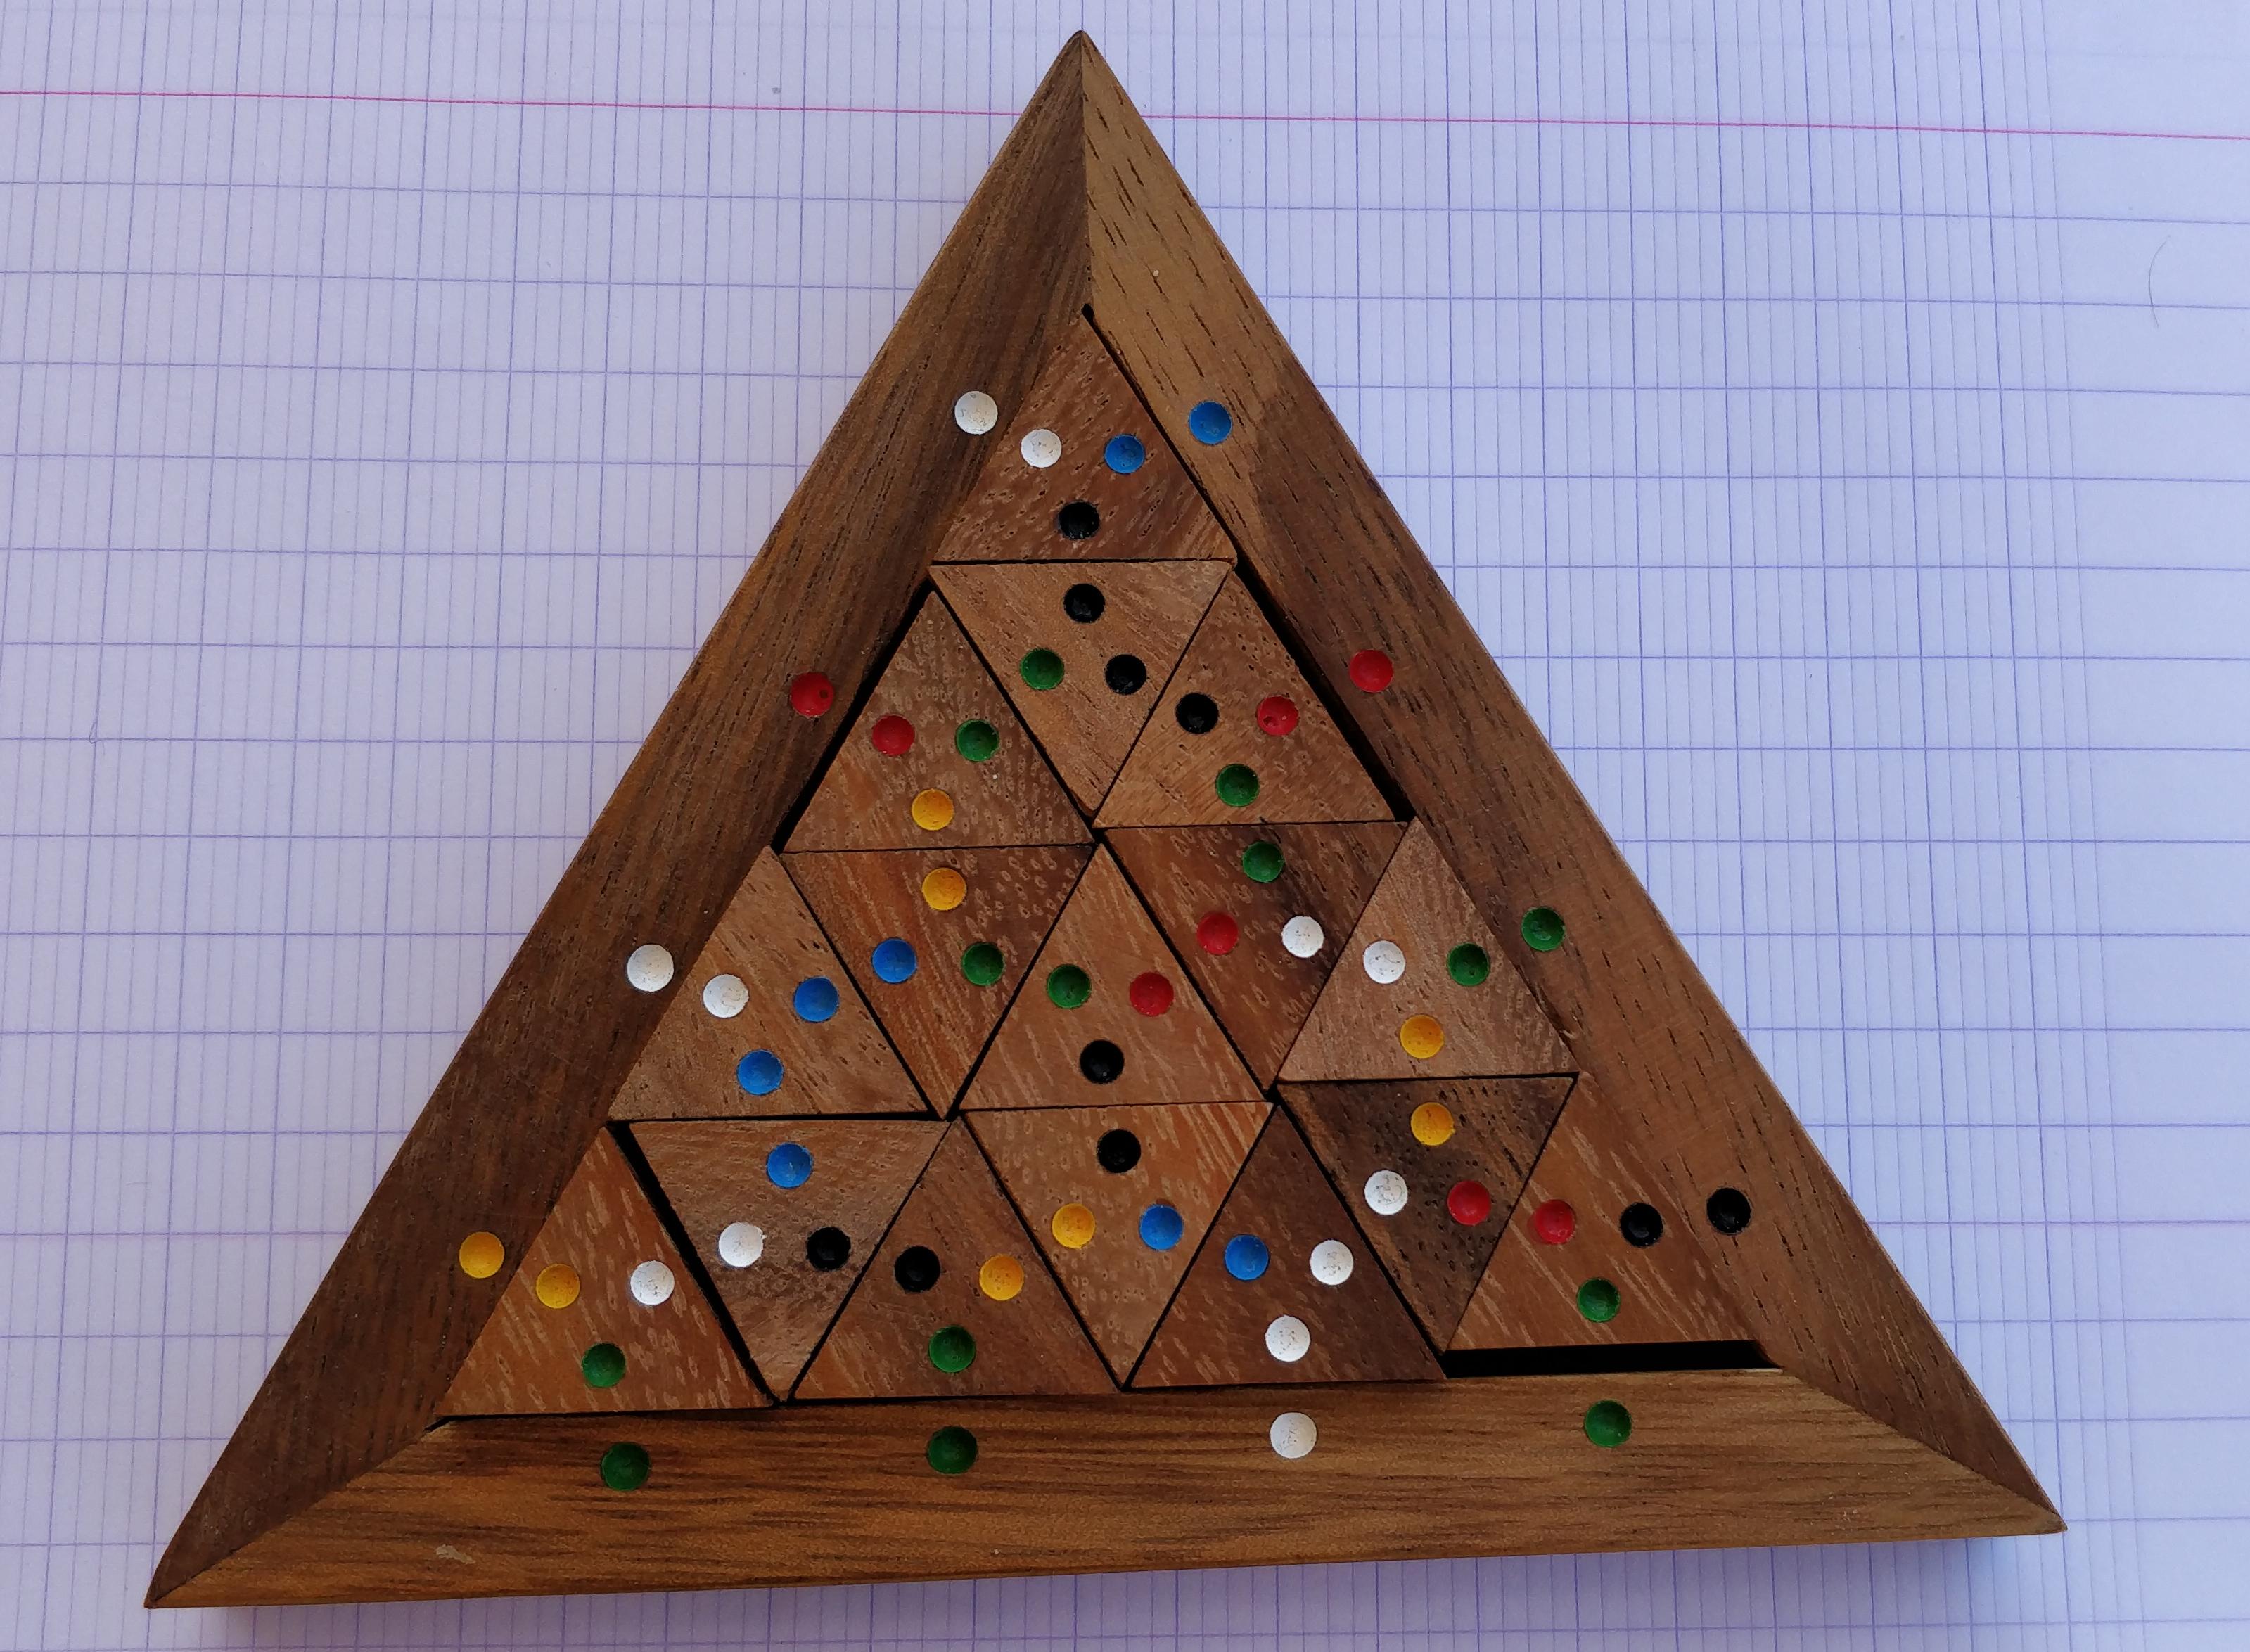
Concrete example with the Bermuda Triangle Puzzle
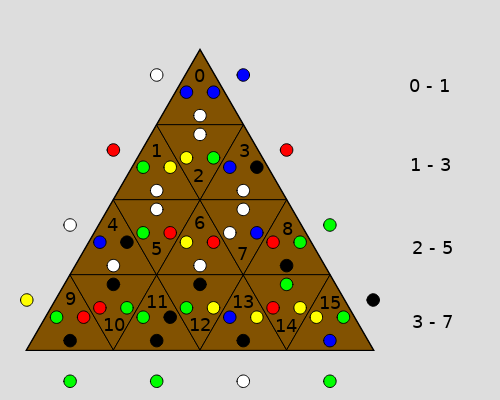
The Bermuda Triangle Puzzle is a wooden puzzle consisting of 1 big triangle and 16 smaller triangles of equal size.
On the edges of the big triangle, there are colored dots, as well as on the edges of the small triangles:
Goal
The 16 triangles all fit inside the big triangle. But the goal of the puzzle is to arrange the triangles in a way so that each adjacent color is the same: red next to red, blue next to blue, and so on....
One thing to notice is that the colors on the edges of the big triangle cannot be moved, but the smaller triangles can be rotated and re-arranged as we want.
How do we solve this?
As usual, there are different approaches:
- One can just take the puzzle and start playing with it. After a while, some patterns may show up but it can become very tedious when trying all combinations.
- Speaking of trying all combinations, it is also possible to brute force the puzzle manually with the wooden pieces, take notes of the configurations that have been tested, and keep iterating. This requires a lot of rigor to not miss any step and start from the beginning.
- Brute-forcing can be fun for a moment, but repetitive after a few minutes. Instead of doing it manually, we write a program that goes through all possibilities and try them one by one, maybe finding more than one solution if more exist. This requires knowing how to approach the problem and define an explicit and efficient search strategy, which can be difficult to find and implement.
- When we don't really know what to do, we can start modelling the puzzle / state, and use stochastic search to find a solution. This requires a set of good building blocks and tools that the stochastic search can rely on. You can find examples of using Simulated Annealing on my blog to solve the Aristotle Number Puzzle and the Nine-Color Cube.
Why a custom visualization?
Although this problem can be solved without having to create any graphics, the output can be very rudimentary. Basically a list of triangles in a given order. And that's it.
Without visualization, it can be difficult to verify the correctness of the solution and understand what is happening under the hood.
That's the whole purpose of this section: being able to solve the problem in Python and visualize the solution, all without leaving the notebook!
Strategy
In this notebook, we will go with the third approach, using a recursive search. To prove that a solution is correct, the best way is to draw it right away, and visually verify the colors match. This is what we would do with the real puzzle.
Since we will already be drawing the puzzle, we can push one step further to make an interactive animation of the search.
Steps:
- Model the puzzle by encoding the colors to numbers and arranging them into lists.
- Define a function, which draws a state on a canvas. A state is defined as the big triangle and a permutation of the 16 small triangles potentially rotated.
- Define a function, which given a list of actions (permutations of triangles, rotation of triangles), animate them on a canvas.
- Define a function that uses the helper to search for the solution, logging each step taken (permutation, rotation) to a list of actions.
- Use the previously defined functions to animated the search and display the final solution.
N_TRIANGLES = 16
IDS = list(range(N_TRIANGLES))
N_COLORS = 6
WHITE, BLUE, YELLOW, GREEN, BLACK, RED = range(N_COLORS)

# list the pieces, turning anti-clockwise for the colors
# The number at the last position of the tuple indicates the number
# of identical pieces (cf photo above)
triangles_count = [
    (WHITE, BLUE, BLUE, 1),
    (WHITE, YELLOW, GREEN, 2),  # 2 of these
    (WHITE, BLACK, BLUE, 2),  # 2 of these
    (WHITE, GREEN, RED, 1),
    (WHITE, RED, YELLOW, 1),
    (WHITE, WHITE, BLUE, 1),
    (BLACK, GREEN, RED, 1),
    (BLACK, RED, GREEN, 2),  # 2 of these
    (BLACK, BLACK, GREEN, 1),
    (BLACK, GREEN, YELLOW, 1),
    (BLACK, YELLOW, BLUE, 1),
    (GREEN, RED, YELLOW, 1),
    (BLUE, GREEN, YELLOW, 1)
]

assert N_TRIANGLES == sum(t[-1] for t in triangles_count)
The triangles were listed correctly, let's unpack them into a flat list.
triangles = tuple([t[:-1] for t in triangles_count for times in range(t[-1])])
print(triangles)

assert N_TRIANGLES == len(triangles)
This is our immutable list of triangles (tuples), that can be indexed with an integer from 0 to 15.
Board
What needs to be done now is to define the board with the fixed colors. Together with the ordered list of triangles, they define the state of the puzzle.
from traitlets import List, Tuple, Dict, validate, default

class Board(widgets.DOMWidget):
    TRIANGLES = List(triangles).tag(sync=True)
    LEFT = Tuple((WHITE, RED, WHITE, YELLOW)).tag(sync=True)
    RIGHT = Tuple((BLUE, RED, GREEN, BLACK)).tag(sync=True)
    BOTTOM = Tuple((GREEN, GREEN, WHITE, GREEN)).tag(sync=True)

    positions = List().tag(sync=True)
    permutation = List([]).tag(sync=True)

    @default('positions')
    def _default_positions(self):
        triangle_id, positions = 0, []
        for row in range(4):
            n_row = 2 * row + 1
            for col in range(n_row):
                flip = (triangle_id + row) % 2
                positions.append({
                    'id': triangle_id,
                    'flip': flip,
                    'row': row,
                    'col': col,
                    'n_row': n_row
                })
                triangle_id += 1
        return positions

    @default('permutation')
    def _default_permutation(self):
        return self.random()

    def random(self):
        return [[i, 0] for i in range(N_TRIANGLES)]
You might wonder what the _default_positions method is really about. What it does is describe where the triangles are positioned by iterating over rows and columns:
By creating a Board we can inspect the value of this property.
b = Board(permutation=[[i, 0] for i in range(N_TRIANGLES)])
b.positions
Drawing the state
We can now reuse the previously defined helpers to create modules and sketches on demand.
%%javascript

// define a list of constant such as the size of the base canvas,
// the size of the triangles, colors...
defineModule('settings', [], () => {
    const ANIM_W = 800;
    const ANIM_H = ANIM_W / 1.6;
    const N_TRIANGLES = 16;
    const COLORS = ['#fff', '#00f', '#ff0', '#0f0', '#000', '#f00'];
    const WOOD_COLOR = '#825201';
    const R = 50;
    const r = R / 2;
    const CR = r / 2;
    const OFFSET_X = R * Math.sqrt(3) * 0.5;
    const OFFSET_Y = 1.5 * R;

    return {ANIM_W, ANIM_H, N_TRIANGLES, WOOD_COLOR, COLORS, R, r, CR, OFFSET_X, OFFSET_Y};
})
With these parameters defined, we can create a triangles module to draw one triangle on the screen.
%%javascript

defineModule('triangles', ['settings'], (settings) => {
    const {COLORS, WOOD_COLOR, R, r, CR, OFFSET_X, OFFSET_Y} = settings;

    function _getPoints(n, startAngle, radius) {
        let points = [];
        const da = 2 * Math.PI / n;
        for (let i = 0; i < n; i++) {
            const angle = startAngle - i * da;
            const x = radius * Math.cos(angle);
            const y = radius * Math.sin(angle);
            points.push(x);
            points.push(y);
        }
        return points;
    }

    return (p) => {
        return {
            getTrianglePoints: _getPoints,
            getTriangleCoordinates: function (flip, row, col) {
                const x = (col - row) * OFFSET_X;
                const y = row * OFFSET_Y + ((flip === 1) ? -R/2 : 0);
                return {x, y};
            },
            drawTriangle: function (colors, x, y, rotation, flip=0) {
                const n = colors.length;

                p.fill(WOOD_COLOR);
                p.push();
                p.translate(x, y);
                p.rotate(-rotation * p.TWO_PI / 3 + flip * p.PI);

                p.triangle(..._getPoints(n, Math.PI / 6, R));

                let circles = _getPoints(n, Math.PI / 2, 1.25 * CR);
                for (let i = 0; i < n; i++) {
                    const xx = circles[2*i];
                    const yy = circles[2*i+1];
                    const color = COLORS[colors[i]];
                    p.fill(color);
                    p.ellipse(xx, yy, CR);
                }
                p.pop();
            }
        };
    };
});
Static Board
Let's start small and focus on drawing a static board. This is were the different modules defined above become useful, as we can now depend on them.
%%javascript

defineModule('staticBoard', ['settings', 'triangles'], (Settings, Triangles) => {
    let {COLORS, R, CR, OFFSET_X, OFFSET_Y} = Settings;

    return (p) => {
        let triangles = Triangles(p);

        function _drawStaticColors (left, right, bottom, positions) {
            for (let {flip, row, col, n_row} of positions) {
                const {x, y} = triangles.getTriangleCoordinates(flip, row, col);
                if (col === 0) {
                    const colorLeft = COLORS[left[row]];
                    const colorRight = COLORS[right[row]];
                    p.fill(colorLeft);
                    p.ellipse(x - OFFSET_X, y - R / 2, CR);
                    p.fill(colorRight);
                    p.ellipse(x + n_row * OFFSET_X, y - R / 2, CR);
                }

                if (row === 3 && col % 2 == 0) {
                    p.fill(COLORS[bottom[parseInt(col / 2, 10)]]);
                    p.ellipse(x, 3.75 * OFFSET_Y, CR);
                }
            }
        }

        function _drawFrame (positions) {
            const {flip, row, col} = positions[6];
            const {x, y} = triangles.getTriangleCoordinates(flip, row, col);
            p.push();
            p.noFill();
            p.stroke(0);
            p.strokeWeight(2);
            p.translate(x, y);
            p.triangle(...triangles.getTrianglePoints(3, Math.PI / 6, 4 * R));
            p.pop();
        }

        function _drawTriangles(permutation, triangle_list, positions) {
            for (let {id, row, col, flip} of positions) {
                const {x, y} = triangles.getTriangleCoordinates(flip, row, col);
                let [a, b, c] = triangle_list[permutation[id][0]];
                let rot = permutation[id][1];
                p.push();
                triangles.drawTriangle([a, b, c], x, y, rot, flip);
                p.pop();
            }
        }

        return {
            drawStaticColors: _drawStaticColors,
            drawFrame: _drawFrame,
            drawTriangles: _drawTriangles
        };
    };
});
Creating the sketch is now just a matter of putting the previous pieces together:
%%javascript

createSketchView('StaticBoard', ['staticBoard'], (StaticBoard, model) => {
    return function(p) {
        const W = 400;
        const H = 400;
        const LEFT = model.get('LEFT');
        const RIGHT = model.get('RIGHT');
        const BOTTOM = model.get('BOTTOM');
        const TRIANGLES = model.get('TRIANGLES');
        let staticBoard = StaticBoard(p);

        p.setup = function() {
            p.createCanvas(W, H);
        }

        p.draw = function () {
            p.background('#ddd');
            p.push();
            p.translate(W / 2, H / 4);
            let permutation = model.get('permutation');
            let positions = model.get('positions');
            staticBoard.drawFrame(positions);
            staticBoard.drawTriangles(permutation, TRIANGLES, positions);
            staticBoard.drawStaticColors(LEFT, RIGHT, BOTTOM, positions);
            p.pop();
        }
    };
})
from random import sample

class StaticBoard(Board):
    _view_name = Unicode('StaticBoardView').tag(sync=True)
    _view_module = Unicode('StaticBoard').tag(sync=True)
    _view_module_version = Unicode('0.1.0').tag(sync=True)

    def __init__(self, **kwargs):
        super().__init__(**kwargs)

    def shuffle(self):
        self.permutation = sample(self.permutation, N_TRIANGLES)
testStaticBoard = StaticBoard()
testStaticBoard
testStaticBoard.shuffle()
We can see that all the pieces are drawn, but they are not placed at the correct positions, which is normal since we haven't even tried to solve the problem yet!
But this is already looking good and this static visualization lets us verify quickly whether or not a solution is valid.
Rotating the triangles
You must have noticed the number 0 as the last element of the triangle tuple when creating a permutation of the Board.
This number can take the values [0, 1, 2] and corresponds to the rotation of a triangle. To make it simple, we order the three colors of the triangles from 0 to 2, with 0 corresponding to the color at the "bottom" of the triangle.
Difficult to visualize? No problem, we can create a new sketch for that purpose!
Since we want to visualize the rotation of the triangle, let's add another library to our toolbet: tween.js. With tween.js, we can create tweens which are convenient helpers to create interpolations between values.
%%javascript

require.config({
    paths: {
        tween: 'https://cdnjs.cloudflare.com/ajax/libs/tween.js/17.1.1/Tween.min'
    }
});
Now let's define a sketch showcasing the use of tween.js with our triangles.
%%javascript

createSketchView('RotateDemo', ['tween', 'triangles'], (Tween, Triangles, model) => {
    const [W, H] = [300, 150];

    return (p) => {
        let obj = { angle: 0 };
        let T = Triangles(p);

        let tweenGroup = new Tween.Group();
        let t = new Tween.Tween(obj, tweenGroup)
                    .to({angle: "+" + (p.TWO_PI / 3)}, 500)
                    .easing(Tween.Easing.Quadratic.InOut)
                    .onStart(() => t.running = true)
                    .onComplete(() => t.running = false)

        function rotate () {
            if (t.running) return;
            t.start();
        }

        model.on('change:rotations', rotate);

        p.setup = function(){
            p.createCanvas(W, H);
        }

        p.draw = function () {
            tweenGroup.update();
            p.background('#ddd');
            p.translate(W / 3, H / 2);
            p.push();
            p.rotate(obj.angle);
            T.drawTriangle([0, 1, 2], 0);
            p.pop();
            p.push();
            p.translate(W / 3, 0);
            p.rotate(-obj.angle);
            T.drawTriangle([3, 4, 5], 0);
            p.pop();
        }
    };
});
class RotateDemo(Board):
    _view_name = Unicode('RotateDemoView').tag(sync=True)
    _view_module = Unicode('RotateDemo').tag(sync=True)
    _view_module_version = Unicode('0.1.0').tag(sync=True)
    rotations = Int(0).tag(sync=True)
The Jupyter Widgets ecosystem already provides cool components such as buttons and slider, that we can leverage and connect to our own widget!
rotate_button = widgets.Button(description="Rotate the triangles")

def on_button_clicked(b):
    rotate_demo.rotations += 1

rotate_button.on_click(on_button_clicked)
rotate_demo = RotateDemo()

widgets.VBox([rotate_button, rotate_demo])
Animated Board
As stated above, the goal is to also create an animation of the solving process.
The purpose is to create an animation that looks like the following:
What we want to visualize is the transition between one state to the next one.
From:
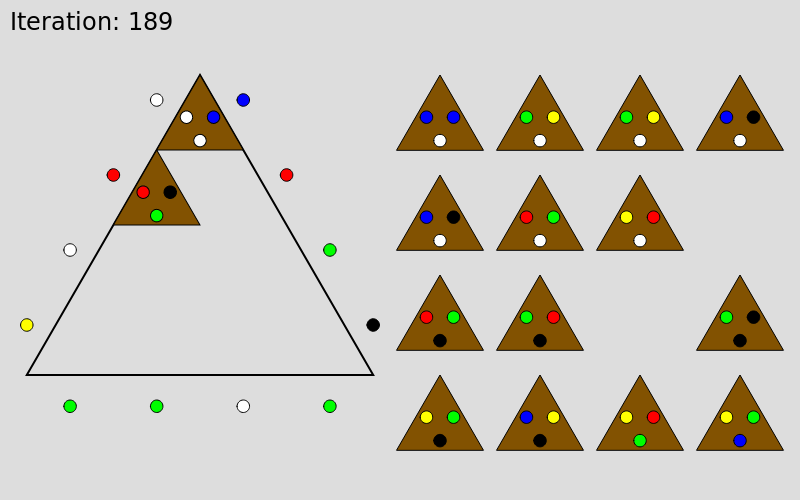
to:
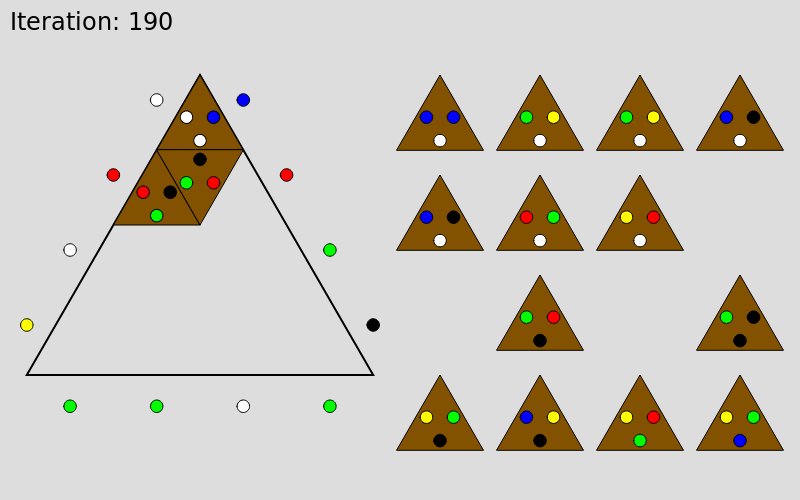
In the end, this will result in creating tweens to interpolate the positions of the triangle at each frame.
Similar to the previous examples, we can define a new module called animatedBoard.
%%javascript

defineModule('animatedBoard',
             ['settings', 'staticBoard', 'triangles', 'tween', 'lodash'],
             (Settings, StaticBoard, Triangles, Tween, _) => {

    const {ANIM_W, ANIM_H, N_TRIANGLES} = Settings;

    return (p, model) => {
        let tweenGroup = new Tween.Group();
        let [it, globalTime, paused] = [0, 0, false];

        let staticBoard = StaticBoard(p);
        let triangles = Triangles(p);

        const TRIANGLES = model.get('TRIANGLES');
        const LEFT = model.get('LEFT');
        const RIGHT = model.get('RIGHT');
        const BOTTOM = model.get('BOTTOM');

        const states = model.get('states');
        const positions = model.get('positions');
        const out = _.range(N_TRIANGLES).map(i => {
            return {
                x: ANIM_W * 0.3 + (i % 4) * 100,
                y: Math.floor(i / 4) * 100,
                r: 0,
                f: 0,
            };
        })
        const pos = positions.map(({flip, row, col}) => {
            const {x, y} = triangles.getTriangleCoordinates(flip, row, col);
            return {x, y, flip};
        });

        // arrays of positions to create the tweens (animations)
        let [start, end] = [_.cloneDeep(out), _.cloneDeep(out)];

        // store the triangles moving at each turn to display them on top of the others
        let moving = [];

        function findPos(triangleId, state) {
            return state.findIndex(e => (e && e[0] === triangleId));
        }

        function transitionState(curr) {
            let [from, to] = [states[curr-1], states[curr]];
            to = to || from;
            _.range(N_TRIANGLES).forEach(i => {

                const [startPos, endPos] = [findPos(i, from), findPos(i, to)];

                // on the board
                if (startPos > -1 && endPos > -1) {
                    _.assign(start[i], {x: pos[startPos].x, y: pos[startPos].y, r: from[startPos][1], f: pos[startPos].flip});
                    _.assign(end[i], {x: pos[endPos].x, y: pos[endPos].y, r: to[endPos][1], f: pos[endPos].flip});
                    return;
                }

                // not in current state but in the next one
                if (startPos < 0 && endPos > -1) {
                    _.assign(start[i], {x: out[i].x, y: out[i].y, r: out[i].r, f: out[i].f});
                    _.assign(end[i], {x: pos[endPos].x, y: pos[endPos].y, r: to[endPos][1], f: pos[endPos].flip});
                    return;
                }

                // in current state but not in the next one, bring back
                if (startPos > -1 && endPos < 0) {
                    _.assign(start[i], {x: pos[startPos].x, y: pos[startPos].y, r: from[startPos][1], f: pos[startPos].flip});
                    _.assign(end[i], {x: out[i].x, y: out[i].y, r: out[i].r, f: out[i].f});
                    return;
                }

                // out, no movement
                if (startPos < 0 && endPos < 0) {
                    _.assign(start[i], {x: out[i].x, y: out[i].y, r: out[i].r, f: out[i].f});
                    _.assign(end[i], start[i]);
                    return;
                }
            });

            moving = [];
            start.forEach((a, i) => {
                const b = end[i];
                if (a.x != b.x || a.y != b.y || a.r != b.r) {
                    moving.push(i);
                    new Tween.Tween(a, tweenGroup)
                        .to({x: b.x, y: b.y, r: b.r, f: b.f}, model.get('speed') * 0.8)
                        .easing(Tween.Easing.Quadratic.InOut)
                        .start(globalTime)
                }
            });
        }

        model.on('change:frame', () => {
            let frame = model.get('frame');
            tweenGroup.removeAll();
            it = Math.max(1, Math.min(frame, states.length - 1));
            transitionState(it);
        });

        return {
            draw: () => {
                tweenGroup.update(globalTime);
                globalTime += Math.min(1000 / p.frameRate(), 33);

                p.fill(0);
                p.textSize(24);
                p.text(`Iteration: ${it}`, 10, 30);

                p.translate(ANIM_W / 4, ANIM_H / 4);

                staticBoard.drawFrame(positions);

                let allTriangles = _.range(N_TRIANGLES);
                let staticTriangles = _.difference(allTriangles, moving);
                [staticTriangles, moving].forEach(bucket => {
                    bucket.forEach(triangleId => {
                        const [a, b, c] = TRIANGLES[triangleId];
                        const {x, y, r, f} = start[triangleId];
                        p.push();
                        triangles.drawTriangle([a, b, c], x, y, r, f);
                        p.pop();
                    });
                });
                staticBoard.drawStaticColors(LEFT, RIGHT, BOTTOM, positions);
            }
        };
    };
});
%%javascript

createSketchView('AnimatedBoard', ['animatedBoard', 'settings'], (AnimatedBoard, Settings, model) => {
    const {ANIM_W, ANIM_H} = Settings;

    return function(p) {
        let board = AnimatedBoard(p, model);

        p.setup = function () {
            p.createCanvas(ANIM_W, ANIM_H);
        }

        p.draw = function () {
            p.background('#ddd');
            board.draw();
        }
    };
});
The model is slightly more advanced compared to the previous ones. It contains a few more attributes as well as a _run method starting the animation upon request (using a Thread from the threading module).
import time
from threading import Thread
from traitlets import Bool, observe

class AnimatedBoard(Board):
    _view_name = Unicode('AnimatedBoardView').tag(sync=True)
    _view_module = Unicode('AnimatedBoard').tag(sync=True)
    _view_module_version = Unicode('0.1.0').tag(sync=True)

    # animation running automatically
    running = Bool(False).tag(sync=True)
    # list of states to animate
    states = List([]).tag(sync=True)
    # current frame (= current iteration)
    frame = Int(0).tag(sync=True)
    # speed of the animation
    speed = Int(1000).tag(sync=True)

    def __init__(self, **kwargs):
        super().__init__(**kwargs)

    def next_frame(self):
        self.frame = min(self.frame + 1, len(self.states))

    def prev_frame(self):
        self.frame = max(0, self.frame - 1)

    @observe('running')
    def _on_running_change(self, change):
        if change['new']:
            # start the animation if going from
            # running == False to running == True
            self._run()

    def _run(self):
        def work():
            while self.running and self.frame < len(self.states):
                # update the frame number according
                # to the speed of the animation
                self.frame += 1
                time.sleep(self.speed / 1000)
            self.running = False

        thread = Thread(target=work)
        thread.start()
Let's create a test AnimatedBoard for testing with arbitrary states.
animated_board = AnimatedBoard(
    permutation=[[i, 0] for i in range(N_TRIANGLES)],
    states=[
        [None] * 16,
        [[7, 0]] + [None] * 15,
        [[7, 1]] + [None] * 15,
        [[7, 2]] + [None] * 15,
        [[7, 2], [0, 0]] + [None] * 14,
        [[7, 2], [0, 1]] + [None] * 14,
        [[7, 2], [0, 2]] + [None] * 14,
    ]
)
animated_board
Now we have a canvas but no control. Let's leverage again the existing Jupyter Widgets library to add a few buttons and sliders that will be linked to the AnimatedBoard widget.
from ipywidgets import Layout, Button, Box, VBox, ToggleButton, IntSlider
from traitlets import link


def create_animation(animated_board):
    items_layout = Layout(flex='flex-stretch', width='auto')

    iteration_slider = IntSlider(max=len(animated_board.states), description='Iteration', layout=Layout(width='100%'))
    speed_slider = IntSlider(min=100, max=5000, step=100, description='Speed (ms)')
    prev_button = Button(description='◄ Previous', button_style='info')
    next_button = Button(description='Next ►', button_style='info')
    play_button = ToggleButton(description='Play / Pause', button_style='success', value=False)

    # interactions
    link((play_button, 'value'), (animated_board, 'running'))
    link((iteration_slider, 'value'), (animated_board, 'frame'))
    link((speed_slider, 'value'), (animated_board, 'speed'))
    speed_slider.value = 2500

    def on_click_next(b):
        animated_board.next_frame()

    def on_click_prev(b):
        animated_board.prev_frame()

    next_button.on_click(on_click_next)
    prev_button.on_click(on_click_prev)

    box_layout = Layout(display='flex', flex_flow='row', align_items='stretch', width='100%')
    items = [play_button, prev_button, next_button, iteration_slider]
    box = VBox([
        Box(children=items, layout=box_layout),
        Box(children=(speed_slider,), layout=box_layout),
        animated_board
    ])
    display(box)
create_animation(animated_board)
Recursive Search
Let's now write the brute-force search using recursion. The overall strategy is to place a triangle and continue placing the following ones until a color mismatches. In that case, the last piece can be removed (backtrack) and replaced by another one.
A board is valid if there are no conflicting colors. Some slots can be missing (marked as None, meaning not placed yet).
from copy import deepcopy


class RecursiveSolver(AnimatedBoard):

    def __init__(self, **kwargs):
        super().__init__(**kwargs)
        self.reset_state()

    def reset_state(self):
        self.board = [None] * N_TRIANGLES
        self.used = [False] * N_TRIANGLES
        self.logs = [deepcopy(self.board)]
        self.it = 0

    def _log(self):
        self.logs.append(deepcopy(self.board))

    def _is_valid(self, i):
        ts = self.TRIANGLES
        permutation, positions = self.board, self.positions[i]
        row, col, n_col = positions['row'], positions['col'], positions['n_row']
        triangle_id, triangle_rotation = permutation[i]

        # on the left edge
        if col == 0 and ts[triangle_id][2-triangle_rotation] != self.LEFT[row]:
            return False

        # on the right edge
        if col == n_col - 1 and ts[triangle_id][1-triangle_rotation] != self.RIGHT[row]:
            return False

        # on the bottom edge
        if row == 3 and col % 2 == 0 and ts[triangle_id][0-triangle_rotation] != self.BOTTOM[col//2]:
            return False

        if col > 0:
            left_pos = i - 1
            left_triangle_id, left_triangle_rotation = permutation[left_pos]

            # normal orientation (facing up)
            if col % 2 == 0 and ts[triangle_id][2-triangle_rotation] != ts[left_triangle_id][2-left_triangle_rotation]:
                return False

            if col % 2 == 1:
                # reverse orientation (facing down)
                # match with left triangle
                if ts[triangle_id][1-triangle_rotation] != ts[left_triangle_id][1-left_triangle_rotation]:
                    return False

                # match with line above
                above_pos = i - (n_col - 1)
                above_triangle_id, above_triangle_rotation = permutation[above_pos]
                if ts[triangle_id][0-triangle_rotation] != ts[above_triangle_id][0-above_triangle_rotation]:
                    return False

        return True

    def _place(self, i):
        self.it += 1
        if i == N_TRIANGLES:
            return True

        for j in range(N_TRIANGLES - 1, -1, -1):
            if self.used[j]:
                # piece number j already used
                continue

            self.used[j] = True

            for rot in range(3):
                # place the piece on the board
                self.board[i] = (j, rot)
                self._log()

                # stop the recursion if the current configuration
                # is not valid or a solution has been found
                if self._is_valid(i) and self._place(i + 1):
                    return True

            # remove the piece from the board
            self.board[i] = None
            self.used[j] = False
            self._log()

        return False

    def solve(self):
        self.reset_state()
        self._place(0)
        return self.board

    def found(self):
        return all(slot is not None for slot in self.board)

    def save_state(self):
        self.permutation = self.board
        self.states = self.logs
The most complicated part is probably the _is_valid method. What it does is checking that all colors match after placing the last triangle. On the following image good connections have been circled in green and the bad connection in red:

We can now run the solver and see whether it can find a solution!
%%time

solver = RecursiveSolver()
res = solver.solve()
if solver.found():
    print('Solution found!')
    print(f'{len(solver.logs)} steps')
    solver.save_state()
else:
    print('No solution found')
solver.permutation
The solution can be visualized using the existing StaticBoard widget.
static_solution = StaticBoard(permutation=solver.permutation)
static_solution
Finally, with the real physical pieces:
But we can also interact with the different steps of the algorithm using the AnimatedBoard:
create_animation(solver)
You can also find a short animation here:
from IPython.display import IFrame

IFrame(src="https://www.youtube.com/embed/lW7mo-9TqEQ?rel=0", width=800, height=500)
Summary
In this notebook, we managed to combine all the core strengths of Javascript, Python and the Jupyter Notebook to create a custom and interactive walkthrough of the resolution of a puzzle.
The core logic and the resolution of the problem can be implemented in Python. On the other hand the rendering and visual feedback can be delegated to Javascript (which excels at it), making once again the best out of the tools at our disposition. Finally, the Jupyter Notebook acts as the glue between the two worlds especially thanks to the wonderful Jupyter Widget library.
What have we learned?
- How to create a Jupyter Widget on the fly in the Jupyter Notebook, and use is to transfer data between Python and Javascript
- Use p5.js to create a custom animation in HTML5 and Javascript
Applications
Such interactive notebooks and the possibility to leverage existing Javascript frameworks can be used in many applications:
- Visual debugging, or visually understanding a complex system
- Teaching and education
- Combine HTML5 / Javascript games with data
Improvements
Even though the end result is quite satisfying, there are a couple of things that can be improved for this workflow:
- The setup code and the animations were tailored for this specific problem and not really designed with reusability in mind. One could built a mini-libraries of such helper functions on the side that can be imported in the notebook (as Python packages or as a packaged Jupyter Widget).
- Does it work in JupyterLab? For security reasons, JupyterLab prevents the execution of Javascript code in a cell (basically what we did in the entire notebook). The way to go with JupyterLab would be to package the widget and deliver it as a proper extension. A much cleaner and production ready strategy than writing everything on the fly in a notebook!
- Depending on where you run the notebook, and most importantly on where the kernel is run, you might notice some jitter and latency in the animation. This is due to the round trip between the client (web browser) and the server (Python kernel), and is further explained in the documentation: https://ipywidgets.readthedocs.io/en/stable/examples/Widget%20Events.html?highlight=link#Linking-widgets-attributes-from-the-client-side. Depending on the application it might or might not be a problem.
References
I underwent quite a lot of research to find an existing library that would fit my needs (low level rendering to draw custom shapes, with interactivity). There are already some projects implementing similar use cases, but all still specific in some way. Here is a list of useful references for a more advanced understanding of the entire ecosystem and know where the Jupyter Widgets fit on the overall picture:
- Jake VanderPlas: The Python Visualization Landscape PyCon 2017
- Drawing from the presentation made by Nicolas P. Rougier: https://github.com/rougier/python-visualization-landscape
- Building a Custom Widget - Hello World - Tutorial
- Sylvain Corlay - Interactive Visualization in Jupyter with Bqplot and Interactive Widgets - PyData London 2016
- pythreejs: Implemented as an Jupyter Widget
- bqplot: Great library for interactive data exploration
- ipyvolume: 3d plotting for Python in the Jupyter notebook
Conclusion
Let's create a pyp5 Python package? ¯\_(ツ)_/¯