import panel as pn
pn.extension('terminal')
When developing applications that are to be used by multiple users and which may process a lot of data it is important to ensure the application is well optimized. Additionally complex applications may have very complex callbacks which are difficult to trace and debug. In this user guide section we will walk you some of the best practices to debug your applications and profile your application to maximize performance.
Caching
The Panel architecture ensures that multiple user sessions can run in the same process and therefore have access to the same global state. This means that we can cache data in Panel's global state object, either by directly assigning to the pn.state.cache dictionary object or by using the pn.state.as_cached helper function.
To assign to the cache manually, simply put the data load or expensive calculation in an if/else block which checks whether the custom key is already present:
if 'data' in pn.state.cache:
    data = pn.state.cache['data']
else:
    pn.state.cache['data'] = data = ... # Load some data or perform an expensive computation
The as_cached helper function on the other hand allows providing a custom key and a function and automatically caching the return value. If provided the args and kwargs will also be hashed making it easy to cache (or memoize) on the arguments to the function:
def load_data(*args, **kwargs):
    return  ... # Load some data

data = pn.state.as_cached('data', load_data, *args, **kwargs)
The first time the app is loaded the data will be cached and subsequent sessions will simply look up the data in the cache, speeding up the process of rendering. If you want to warm up the cache before the first user visits the application you can also provide the --warm argument to the panel serve command, which will ensure the application is initialized as soon as it is launched. If you want to populate the cache in a separate script from your main application you may also provide the path to a setup script using the --setup argument to panel serve. If you want to periodically update the cache look into the ability to schedule tasks.
Layouts
Panel is built on the Bokeh library which was originally written as a plotting library but grew into a more general framework for building data apps and dashboards. This history shows up in some architectural decisions and the main one is the way layouts are handled by Bokeh. Instead of relying on CSS to configure and compute the layouts Bokeh (and therefore Panel) rely on a layout engine which computes the sizes of different components to apply fixed positioning on the page. This works well but is an expensive operation and scales imperfectly the more components are added to a layout. In future, i.e. with the upcoming Bokeh 3.0 and Panel 1.0 releases the layout engine will be replaced with a CSS based framework. Until that time there are a few tricks to apply to avoid the layout engine degrading the performance of your application:
The main approach to avoid bogging down the layout engine is to use Templates and add components as separate "roots" to the page. This means that instead of adding components to a layout like this:
pn.Column(a, b, c, ...)
You add them as separate roots to the template:
template = pn.template.BootstrapTemplate()

template.main.append(a)
template.main.append(b)
template.main.append(c)
Doing this will ensure that the Bokeh.js layout engine considers each component separately and will speed up rendering a lot if a, b and c are deeply nested components.
Throttling
One of the simplest ways to avoid slowing down your application is simply to control how often events from the frontend trigger code execution in Python. Particularly when using sliders this can be a problem. To solve this isssue sliders offer value_throttled parameters which are updated only when the user releases the slider unlike the value parameter which is updated continuously as the slider is dragged. If you are building apps using the reactive pn.bind or pn.depends functions you can depend on the value_throttled parameter directly:
slider = pn.widgets.IntSlider()

def output(value):
    return ...

pn.bind(output, slider.param.value_throttled)
Alternatively you can also ensure that all sliders only update on mouse release if you set pn.config.throttled = True.
Concurrent processing
When deploying a Panel application to be accessed by multiple users they will often access the same server simultaneously. To maintain responsiveness of the application when multiple users are interacting with it at the same time there are multiple approaches to concurrency, each with their own drawbacks and advantages:
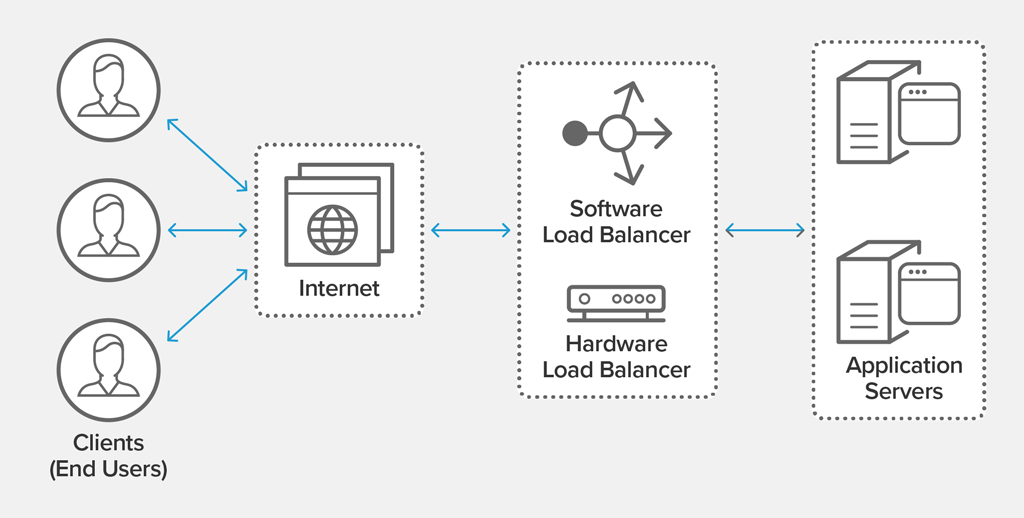
Load balancing: A load balancer launches multiple instances of the Panel application and distributes network traffic between them. This is ensures that users the load is distributed across multiple servers but also requires a lot configuration and resources.Multiple processes: Launches multiple processes on a single machine, effectively load balancing across the processes. Much simpler to set up than a load balancer but you are limited by the compute and memory resources on one machine.Threading: Attempts to distribute processing across multiple threads. Effectiveness depends on the operations being performed, I/O bound and CPU bound operations that release the GIL can easily be made concurrent in this way.AsyncIO: Allows asynchronously processing I/O bound operations. Effective for many concurrent I/O operations but requires rewriting your application and callbacks to make use ofasync/awaitparadigm.
Scaling across processes
Both load balancing and starting multiple processes effectively spin up multiple copies of the same application and distribute the load across the processes. This results in duplication and therefore significantly higher overhead (basically scaling linearly with the number of processes). In applications where you are relying on global state (e.g. the pn.state.cache) this can introduce significant challenges to ensure that application state stays synchronized.
Load balancing
Setting up load balancing is a huge topic dependent on the precise system you are using so we won't go into any specific implementation here. In most cases you set up a reverse proxy (like NGINX) to distribute the load across multiple application servers. If you are using a system like Kubernetes it will also handle spinning up the servers for you and can even do so dynamically depending on the amount of concurrent users to ensure that you are not wasting resources when there are fewer users.
Load balancing is the most complex approach to set up but is guaranteed to improve concurrent usage of your application since different users are not contending for access to the same process or even necessarily the same physical compute and memory resources. At the same time it is more wasteful of resources since it potentially occupies multiple machines and since each process is isolated there is no sharing of cached data or global state.
Multiple processes
Launching a Panel application on multiple processes is a effectively a simpler version of load balancing with many of the same advantages and drawbacks. One major advantage is that it is easy to set up, when deploying your application with panel serve simply configure --num-procs N, where N is the number of processes. Generally choose an N that is no larger than the number of processors on your machine. This still uses significantly more resources since each process has the same overhead and all processes will be contending for the same memory and compute resources. However if your application is single-threaded and you have sufficient memory this is a simple way to make your application scale.
Scaling within a single process
Threading and async are both approaches to speed up processing in Python using concurrency in a single Python process. Since we can't provide a complete primer on either threading or asynchronous processing here, if you are not familiar with these concepts we recommend reading up on them before continuing. Read about threading in Python here and AsyncIO here.
When to use which approach cannot be answered easily and is never completely clear cut. As a general guide however use asyncio can scale almost arbitrarily allowing you to perform thousands or even millions of IO bound operations concurrently, while threading limits you to the number of available threads. In practice this may never actually become relevant so the other main differences are that async coroutines are significantly more lightweight but that you have to carefully consider accessing shared objects across threads. Using async coroutines makes it very clear where concurrency occurs and therefore can make it easier to avoid race conditions and avoid having to think about locking a thread to access shared objects. However, in some situations threading can also be useful for CPU intensive operations where the operation being executed releases the GIL, this includes many NumPy, Pandas and Numba functions.
Threading
Using threading in Panel can either be enabled manually, e.g. by managing your own thread pool and dispatching concurrent tasks to it, or it can be managed by Panel itself by setting the config.nthreads parameter (or equivalently by setting it with pn.extension(nthreads=...). This will start a ThreadPoolExecutor with the specified number of threads (or if set to 0 it will set the number of threads based on your system, i.e. min(32, os.cpu_count() + 4)).
Whenever an event is generated or a periodic callback fires Panel will then automatically dispatch the event to the executor. An event in this case refers to any action generated on the frontend such as the manipulation of a widget by a user or the interaction with a plot. If you are launching an application with panel serve you should enable this option configure this option on the CLI by setting --num-threads.
To demonstrate the effect of enabling threading take this example below:
import panel as pn

pn.extension(nthreads=2)

def button_click(event):
    print('Button clicked for the {event.new}th time.')
    time.sleep(2) # Simulate long running operation
    print('Finished processing {event.new}th click.')

button = pn.widgets.Button(name='Click me!')

button.on_click(button_click)
When we click the button twice successively in a single-threaded context we will see the following output:
> Button clicked for the 1th time.
... 2 second wait
> Finished processing 1th click.
> Button clicked for the 2th time.
... 2 second wait
> Finished processing 2th click.
In a threaded context on the other hand the two clicks will be processed concurrently:
> Button clicked for the 1th time.
> Button clicked for the 2th time.
... 2 second wait
> Finished processing 1th click.
> Finished processing 2th click.
AsyncIO
When using Python>=3.8 you can use async callbacks wherever you would ordinarily use a regular synchronous function. For instance you can use pn.bind on an async function:
import aiohttp

widget = pn.widgets.IntSlider(start=0, end=10)

async def get_img(index):
    async with aiohttp.ClientSession() as session:
        async with session.get(f"https://picsum.photos/800/300?image={index}") as resp:
            return pn.pane.JPG(await resp.read())

pn.Column(widget, pn.bind(get_img, widget))
In this example Panel will invoke the function and update the output when the function returns while leaving the process unblocked for the duration of the aiohttp request.
Similarly you can attach asynchronous callbacks using .param.watch:
widget = pn.widgets.IntSlider(start=0, end=10)

image = pn.pane.JPG()

async def update_img(event):
    async with aiohttp.ClientSession() as session:
        async with session.get(f"https://picsum.photos/800/300?image={event.new}") as resp:
            image.object = await resp.read()

widget.param.watch(update_img, 'value')
widget.param.trigger('value')

pn.Column(widget, image)
In this example Param will await the asynchronous function and the image will be updated when the request completes.
Admin Panel
The /admin panel provides an overview of the current application and provides tools for debugging and profiling. It can be enabled by passing the --admin argument to the panel serve command.
Overview
The overview page provides some details about currently active sessions, running versions and resource usage (if psutil is installed).

Launch Profiler
The launch profiler profiles the execution time of the initialization of a particular application. It can be enabled by setting a profiler using the commandline --profiler option. Available profilers include:
pyinstrument: A statistical profiler with nice visual outputsnakeviz: SnakeViz is a browser based graphical viewer for the output of Python’s cProfile module and an alternative to using the standard library pstats module.
Once enabled the launch profiler will profile each application separately and provide the profiler output generated by the selected profiling engine.

User profiling
In addition to profiling the launch step of an application it is often also important to get insight into the interactive performance of an application. For that reason Panel also provides the pn.io.profile decorator that can be added to any callback and will report the profiling results in the /admin panel. The profile helper takes to arguments, the name to record the profiling results under and the profiling engine to use.
@pn.io.profile('clustering', engine='snakeviz')
def get_clustering(event):
    # some expensive calculation
    ...

widget.param.watch(my_callback, 'value')

The user profiling may also be used in an interactive session, e.g. we might decorate a simple callback with the profile decorator:
import time

slider = pn.widgets.FloatSlider(name='Test')

@pn.depends(slider)
@pn.io.profile('formatting')
def format_value(value):
    time.sleep(1)
    return f'Value: {value+1}'

pn.Row(slider, format_value)
Then we can request the named profile 'formatting' using the pn.state.get_profile function:
pn.state.get_profile('formatting')
Logs
The Logs page provides a detailed breakdown of the user interaction with the application. Additionally users may also log to this logger using the pn.state.log function, e.g. in this example we log the arguments to the clustering function:
def get_clusters(x, y, n_clusters):
    pn.state.log(f'clustering {x!r} vs {y!r} into {n_clusters} clusters.')
    ...
    return ...

The logging terminal may also be used interactively, however you have to ensure that the 'terminal' extension is loaded with pn.extension('terminal'). If the extension is initialized it can be rendered by accessing it on pn.state.log_terminal:
slider = pn.widgets.FloatSlider(name='Test')

@pn.depends(slider)
def format_value(value):
    pn.state.log(f'formatting value {value}')
    return f'Value: {value+1}'

pn.Column(
    pn.Row(slider, format_value),
    pn.state.log_terminal,
    sizing_mode='stretch_both'
)