![]()
A tutorial for the whitebox Python package
This notebook demonstrates the usage of the whitebox Python package for geospatial analysis, which is built on a stand-alone executable command-line program called WhiteboxTools.
- GitHub repo: https://github.com/opengeos/whitebox-python
- WhiteboxTools: https://github.com/jblindsay/whitebox-tools
- WhiteboxGeo: https://www.whiteboxgeo.com
- User Manual: https://www.whiteboxgeo.com/manual/wbt_book/intro.html
- PyPI: https://pypi.org/project/whitebox/
- Documentation: https://whitebox.readthedocs.io
- Binder: https://gishub.org/whitebox-cloud
- Free software: MIT license
Launch this tutorial as an interactive Jupyter Notebook on the cloud - MyBinder.org.
Installation
whitebox supports a variety of platforms, including Microsoft Windows, macOS, and Linux operating systems. Note that you will need to have Python 3.x installed. Python 2.x is not supported. The whitebox Python package can be installed using the following command:
pip install whitebox
If you have installed whitebox Python package before and want to upgrade to the latest version, you can use the following command:
pip install whitebox -U
If you encounter any installation issues, please check Troubleshooting on the whitebox GitHub page and Report Bugs.
%pip install whitebox
About whitebox
import whitebox and call WhiteboxTools()
import whitebox

wbt = whitebox.WhiteboxTools()
Prints the whitebox-tools help...a listing of available commands
print(wbt.help())
Prints the whitebox-tools license
print(wbt.license())
Prints the whitebox-tools version
print("Version information: {}".format(wbt.version()))
Print the help for a specific tool.
print(wbt.tool_help("ElevPercentile"))
Tool names in the whitebox Python package can be called either using the snake_case or CamelCase convention (e.g. lidar_info or LidarInfo). The example below uses snake_case.
import os, pkg_resources

# identify the sample data directory of the package
data_dir = os.path.dirname(pkg_resources.resource_filename("whitebox", 'testdata/'))

# set whitebox working directory
wbt.set_working_dir(data_dir)
wbt.verbose = False

# call whiteboxtools
wbt.feature_preserving_smoothing("DEM.tif", "smoothed.tif", filter=9)
wbt.breach_depressions("smoothed.tif", "breached.tif")
wbt.d_inf_flow_accumulation("breached.tif", "flow_accum.tif")
You can search tools using keywords. For example, the script below searches and lists tools with 'lidar' or 'LAS' in tool name or description.
lidar_tools = wbt.list_tools(['lidar', 'LAS'])
for index, tool in enumerate(lidar_tools):
    print("{} {}: {} ...".format(str(index + 1).zfill(3), tool, lidar_tools[tool][:45]))
List all available tools in whitebox-tools. Currently, whitebox contains 372 tools. More tools will be added as they become available.
all_tools = wbt.list_tools()
for index, tool in enumerate(all_tools):
    print("{} {}: {} ...".format(str(index + 1).zfill(3), tool, all_tools[tool][:45]))
Getting data
This section demonstrates two ways to get data into Binder so that you can test whitebox on the cloud using your own data.
Getting data from direct URLs
If you have data hosted on your own HTTP server or GitHub, you should be able to get direct URLs. With a direct URL, users can automatically download the data when the URL is clicked. For example https://github.com/opengeos/whitebox/raw/master/examples/testdata.zip
Import the following Python libraries and start getting data from direct URLs.
import os
import zipfile
import tarfile
import shutil
import urllib.request
Create a folder named whitebox under the user home folder and set it as the working directory.
work_dir = os.path.join(os.path.expanduser("~"), 'whitebox')
if not os.path.exists(work_dir):
    os.mkdir(work_dir)
os.chdir(work_dir)
print("Working directory: {}".format(work_dir))
Replace the following URL with your own direct URL hosting your data.
url = "https://github.com/opengeos/whitebox/raw/master/examples/testdata.zip"
Download data the from the above URL and unzip the file if needed.
# download the file
zip_name = os.path.basename(url)
zip_path = os.path.join(work_dir, zip_name)

print('Downloading {} ...'.format(zip_name))
urllib.request.urlretrieve(url, zip_path)
print('Downloading done.'.format(zip_name))

# if it is a zip file
if '.zip' in zip_name:
    print("Decompressing {} ...".format(zip_name))
    with zipfile.ZipFile(zip_name, "r") as zip_ref:
        zip_ref.extractall(work_dir)
    print('Decompressing done.')

# if it is a tar file
if '.tar' in zip_name:
    print("Decompressing {} ...".format(zip_name))
    with tarfile.open(zip_name, "r") as tar_ref:
        tar_ref.extractall(work_dir)
    print('Decompressing done.')

print('Data directory: {}'.format(os.path.splitext(zip_path)[0]))
You have successfully downloaded data to Binder. Therefore, you can skip to Using whitebox and start testing whitebox with your own data.
Getting data from Google Drive
Alternatively, you can upload data to Google Drive and then share files publicly from Google Drive. Once the file is shared publicly, you should be able to get a shareable URL. For example, https://drive.google.com/file/d/1xgxMLRh_jOLRNq-f3T_LXAaSuv9g_JnV.
To download files from Google Drive to Binder, you can use the Python package called google-drive-downloader, which can be installed using the following command:
pip install googledrivedownloader requests
Replace the following URL with your own shareable URL from Google Drive.
gfile_url = 'https://drive.google.com/file/d/1xgxMLRh_jOLRNq-f3T_LXAaSuv9g_JnV'
Extract the file id from the above URL.
file_id = gfile_url.split('/')[5]  #'1xgxMLRh_jOLRNq-f3T_LXAaSuv9g_JnV'
print('Google Drive file id: {}'.format(file_id))
Download the shared file from Google Drive.
from google_drive_downloader import GoogleDriveDownloader as gdd

dest_path = './testdata.zip'  # choose a name for the downloaded file
gdd.download_file_from_google_drive(file_id, dest_path, unzip=True)
You have successfully downloaded data from Google Drive to Binder. You can now continue to Using whitebox and start testing whitebox with your own data.
Using whitebox
Here you can specify where your data are located. In this example, we will use DEM.tif, which has been downloaded to the testdata folder.
List data under the data folder.
data_dir = './testdata/'
print(os.listdir(data_dir))
In this simple example, we smooth DEM.tif using a feature preserving denoising algorithm. Then, we fill depressions in the DEM using a depression breaching algorithm. Finally, we calculate flow accumulation based on the depressionless DEM.
import whitebox

wbt = whitebox.WhiteboxTools()
# set whitebox working directory
wbt.set_working_dir(data_dir)
wbt.verbose = False

# call whiteboxtool
wbt.feature_preserving_smoothing("DEM.tif", "smoothed.tif", filter=9)
wbt.breach_depressions("smoothed.tif", "breached.tif")
wbt.d_inf_flow_accumulation("breached.tif", "flow_accum.tif")
Displaying results
This section demonstrates how to display images on Jupyter Notebook. Three Python packages are used here, including matplotlib, imageio, and tifffile. These three packages can be installed using the following command:
pip install matplotlib imageio tifffile
!pip install matplotlib imageio tifffile
Import the libraries.
# comment out the third line (%matplotlib inline) if you run the tutorial in other IDEs other than Jupyter Notebook
import matplotlib.pyplot as plt
import imageio

%matplotlib inline
Display one single image.
raster = imageio.imread(os.path.join(data_dir, 'DEM.tif'))
plt.imshow(raster)
plt.show()
Read images as numpy arrays.
original = imageio.imread(os.path.join(data_dir, 'DEM.tif'))
smoothed = imageio.imread(os.path.join(data_dir, 'smoothed.tif'))
breached = imageio.imread(os.path.join(data_dir, 'breached.tif'))
flow_accum = imageio.imread(os.path.join(data_dir, 'flow_accum.tif'))
Display multiple images in one plot.
fig = plt.figure(figsize=(16, 11))

ax1 = fig.add_subplot(2, 2, 1)
ax1.set_title('Original DEM')
plt.imshow(original)

ax2 = fig.add_subplot(2, 2, 2)
ax2.set_title('Smoothed DEM')
plt.imshow(smoothed)

ax3 = fig.add_subplot(2, 2, 3)
ax3.set_title('Breached DEM')
plt.imshow(breached)

ax4 = fig.add_subplot(2, 2, 4)
ax4.set_title('Flow Accumulation')
plt.imshow(flow_accum)

plt.show()
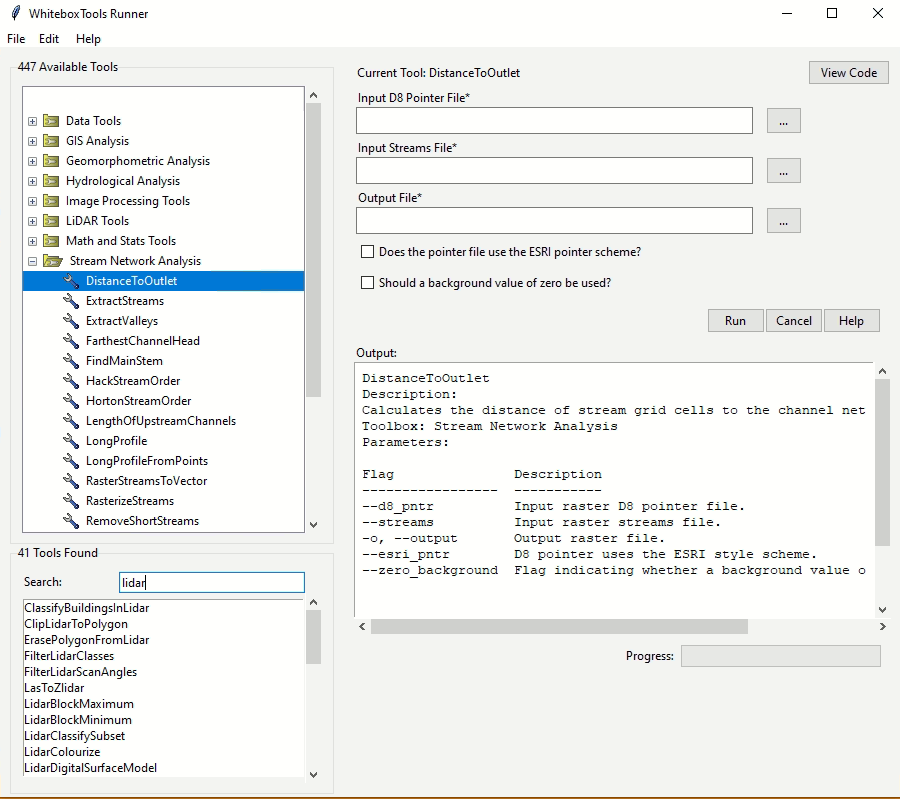
whitebox GUI
WhiteboxTools also provides a Graphical User Interface (GUI) - WhiteboxTools Runner, which can be invoked using the following Python script. Note that the GUI might not work in Jupyter notebooks deployed on the cloud (e.g., MyBinder.org), but it should work on Jupyter notebooks on local computers.
import whitebox
whitebox.Runner()
Citing whitebox
If you use the whitebox Python package for your research and publications, please consider citing the following papers to give Prof. John Lindsay credits for his tremendous efforts in developing Whitebox GAT and WhiteboxTools. Without his work, this whitebox Python package would not exist!
- Lindsay, J. B. (2016). Whitebox GAT: A case study in geomorphometric analysis. Computers & Geosciences, 95, 75-84. http://dx.doi.org/10.1016/j.cageo.2016.07.003
Credits
This interactive notebook is made possible by MyBinder.org. Big thanks to MyBinder.org for developing the amazing binder platform, which is extremely valuable for reproducible research!
This tutorial made use a number of open-source Python packages, including Cookiecutter, numpy, matplotlib, imageio, tifffile, and google-drive-downloader. Thanks to all developers of these wonderful Python packages!
Contact
If you have any questions regarding this tutorial or the whitebox Python package, you can contact me (Qiusheng Wu) at qwu18@utk.edu or https://wetlands.io/#contact