Python 常用模块
Python 模块是实现了某个功能的一堆代码的集合。包含n个.py文件实现一个复杂得功能。
可以把模块理解为乐高积木,你用这些模块组合出一个模型,然后也可以用这个模块加上其他的模块组合成一个新的模型,Python 开发速度快很多受益于Python 有很多功能强大的第三方模块。
模块分为三种:
- 内置模块
- 第三方模块
- 自定义模块
在这里我会竟可能详细介绍到各个模块常用的功能,如果想深入了解具体和最新的内容务必到查看官方文档。
# 单模块,在同一级目录下的
import <模块名>

# 嵌套在文件夹下的
from lib import sa

# 嵌套在多级文件夹下的(lib目录下,test目录下)
from lib.test import sa

# 不同文件夹,重名模块
from lib import com as lib_com
from  src import com as src_com
那么问题来了,导入模块时是根据哪个路径作为基准来进行的呢?即:sys.path
import sys

print(sys.path)
['', '/usr/local/Cellar/python3/3.5.1/Frameworks/Python.framework/Versions/3.5/lib/python35.zip', '/usr/local/Cellar/python3/3.5.1/Frameworks/Python.framework/Versions/3.5/lib/python3.5', '/usr/local/Cellar/python3/3.5.1/Frameworks/Python.framework/Versions/3.5/lib/python3.5/plat-darwin', '/usr/local/Cellar/python3/3.5.1/Frameworks/Python.framework/Versions/3.5/lib/python3.5/lib-dynload', '/usr/local/lib/python3.5/site-packages', '/usr/local/lib/python3.5/site-packages/IPython/extensions', '/Users/lianliang/.ipython']
如果sys.path路径列表没有你想要的路径,可以通过 sys.path.append('路径') 添加。
import sys
import os

project_path = os.path.dirname(os.path.abspath('/Users/lianliang/Desktop/python_notebook/Python 常用模块.ipynb'))
print(project_path)
sys.path.append(project_path)
print(sys.path)
/Users/lianliang/Desktop/python_notebook
['', '/usr/local/Cellar/python3/3.5.1/Frameworks/Python.framework/Versions/3.5/lib/python35.zip', '/usr/local/Cellar/python3/3.5.1/Frameworks/Python.framework/Versions/3.5/lib/python3.5', '/usr/local/Cellar/python3/3.5.1/Frameworks/Python.framework/Versions/3.5/lib/python3.5/plat-darwin', '/usr/local/Cellar/python3/3.5.1/Frameworks/Python.framework/Versions/3.5/lib/python3.5/lib-dynload', '/usr/local/lib/python3.5/site-packages', '/usr/local/lib/python3.5/site-packages/IPython/extensions', '/Users/lianliang/.ipython', '/Users/lianliang/Desktop/python_notebook']
import sys
常用的操作:
sys.argv           # 命令行参数List,第一个元素是程序本身路径
sys.exit(n)        # 退出程序,正常退出时exit(0)
sys.version        # 获取Python解释程序的版本信息
sys.maxint         # 最大的Int值
sys.path           # 返回模块的搜索路径,初始化时使用PYTHONPATH环境变量的值
sys.platform       # 返回操作系统平台名称
sys.stdin          # 输入相关
sys.stdout         # 输出相关
sys.stderror       # 错误相关
os
用于系统级别的操作:
os.getcwd()                 # 获取当前工作目录,即当前python脚本工作的目录路径
os.chdir("dirname")         # 改变当前脚本工作目录;相当于shell下cd
os.curdir                   # 返回当前目录: ('.')
os.pardir                   # 获取当前目录的父目录字符串名:('..')
os.makedirs('dir1/dir2')    # 可生成多层递归目录
os.removedirs('dirname1')   # 若目录为空,则删除,并递归到上一级目录,如若也为空,则删除,依此类推
os.mkdir('dirname')         # 生成单级目录;相当于shell中mkdir dirname
os.rmdir('dirname')         # 删除单级空目录,若目录不为空则无法删除,报错;相当于shell中rmdir dirname
os.listdir('dirname')       # 列出指定目录下的所有文件和子目录,包括隐藏文件,并以列表方式打印
os.remove()                 # 删除一个文件
os.rename("oldname","new")  # 重命名文件/目录
os.stat('path/filename')    # 获取文件/目录信息
os.sep                      # 操作系统特定的路径分隔符,win下为"\\",Linux下为"/"
os.linesep                  # 当前平台使用的行终止符,win下为"\t\n",Linux下为"\n"
os.pathsep                  # 用于分割文件路径的字符串
os.name                     # 字符串指示当前使用平台。win->'nt'; Linux->'posix'
os.system("bash command")   # 运行shell命令,直接显示
os.environ                  # 获取系统环境变量
os.path.abspath(path)       # 返回path规范化的绝对路径
os.path.split(path)         # 将path分割成目录和文件名二元组返回
os.path.dirname(path)       # 返回path的目录。其实就是os.path.split(path)的第一个元素
os.path.basename(path)      # 返回path最后的文件名。如何path以/或\结尾,那么就会返回空值。即os.path.split(path)的第二个元素
os.path.exists(path)        # 如果path存在,返回True;如果path不存在,返回False
os.path.isabs(path)         # 如果path是绝对路径,返回True
os.path.isfile(path)        # 如果path是一个存在的文件,返回True。否则返回False
os.path.isdir(path)         # 如果path是一个存在的目录,则返回True。否则返回False
os.path.join(path1[, path2[, ...]])  # 将多个路径组合后返回,第一个绝对路径之前的参数将被忽略
os.path.getatime(path)      #返回path所指向的文件或者目录的最后存取时间
os.path.getmtime(path)      #返回path所指向的文件或者目录的最后修改时间
import time
# 时间戳,1970年1月1日之后的秒
time.time()
1504597649.343132
# 格式化的字符串
time.strftime('%Y-%m-%d %H:%M:%S')
'2017-09-05 17:00:49'
# 结构化时间,元组包含了:年、日、星期等... time.struct_time    即:time.localtime()
time.localtime()
tuple(time.localtime())
time.struct_time(tm_year=2017, tm_mon=9, tm_mday=5, tm_hour=17, tm_min=1, tm_sec=7, tm_wday=1, tm_yday=248, tm_isdst=0)
(2017, 9, 5, 17, 1, 7, 1, 248, 0)
| 属性 | 含义 | 值 |
|---|---|---|
| tm_year | 4位数年 | 2008 |
| tm_mon | 月 | 1 到 12 |
| tm_mday | 日 | 1 到 31 |
| tm_hour | 小时 | 0 到 23 |
| tm_min | 分钟 | 0 到 59 |
| tm_sec | 秒 | 0 到 61 (60或61 是闰秒) |
| tm_wday | 一周的第几日 | 0到6 (0是周日) |
| tm_yday | 一年的第几日 | 1 到 366(儒略历) |
| tm_isdst | 夏令时 | -1, 0, 1, -1是决定是否为夏令时的旗帜 |
接下来看看常用方法:
# 返回当前系统时间戳
time.time()
1504602078.759796
# 返回当前系统时间
time.ctime()
'Tue Sep 5 17:01:19 2017'
# 将时间转换为字符串格式
time.ctime(time.time()-86400)
'Mon Sep 4 17:01:20 2017'
# 接收时间辍(1970纪元后经过的浮点秒数)并返回格林威治天文时间下的时间元组
time.gmtime(time.time()-86400)
time.struct_time(tm_year=2017, tm_mon=9, tm_mday=4, tm_hour=9, tm_min=1, tm_sec=21, tm_wday=0, tm_yday=247, tm_isdst=0)
# 接收时间辍(1970纪元后经过的浮点秒数)并返回当地时间下的时间元组
time.localtime(time.time()-86400)
time.struct_time(tm_year=2017, tm_mon=9, tm_mday=4, tm_hour=16, tm_min=57, tm_sec=51, tm_wday=0, tm_yday=247, tm_isdst=0)
# 与time.localtime() 功能相反,将struct_time格式转回成时间戳格式
time.mktime(time.localtime())
1504602397.0
# 将struct_time格式转成指定的字符串格式
time.strftime("%Y-%m-%d %H:%M:%S", time.localtime())
'2017-09-05 17:31:56'
# 将struct_time格式转成指定的字符串格式
time.strptime("2017-9-4", "%Y-%m-%d")
time.struct_time(tm_year=2017, tm_mon=9, tm_mday=4, tm_hour=0, tm_min=0, tm_sec=0, tm_wday=0, tm_yday=247, tm_isdst=-1)
# 返回当前的CPU时间。用来衡量不同程序的耗时,比time.time()更有用。
time.clock()
3.243893
#sleep,等待4秒
time.sleep(4)
def procedure():
    time.sleep(2.5)

# measure process time
t0 = time.clock()
procedure()
print(time.clock() - t0, "seconds process time")

# measure wall time
t0 = time.time()
procedure()
print(time.time() - t0, "seconds wall time")
0.0014300000000000423 seconds process time
2.503314971923828 seconds wall time
datetime
import datetime
# 获取当天日期
datetime.date.today()
print(datetime.date.today())
datetime.date(2017, 9, 5)
2017-09-05
# 将时间戳转成日期格式
print(datetime.date.fromtimestamp(time.time()-86400))
2017-09-04
# 获取当前时间,精确到毫秒
current_time = datetime.datetime.now()
print(current_time)
2017-09-05 17:43:32.869855
# 返回struct_time格式
current_time.timetuple()
time.struct_time(tm_year=2017, tm_mon=9, tm_mday=5, tm_hour=17, tm_min=43, tm_sec=32, tm_wday=1, tm_yday=248, tm_isdst=-1)
# 返回当前时间,但指定的值将被替换
current_time.replace(2002, 2, 1)
2002-02-01 17:43:32.869855
# 将字符串转换成日期格式
datetime.datetime.strptime("21/11/06 16:30", "%d/%m/%y %H:%M")
datetime.datetime(2006, 11, 21, 16, 30)
datetime.datetime.now() + datetime.timedelta(days=10) #比现在加10天
datetime.datetime.now() + datetime.timedelta(days=-10) #比现在减10天
datetime.datetime.now() + datetime.timedelta(hours=-10) #比现在减10小时
datetime.datetime.now() + datetime.timedelta(seconds=120) #比现在+120s
datetime.datetime(2017, 9, 15, 18, 10, 5, 733945)
datetime.datetime(2017, 8, 26, 18, 10, 5, 736410)
datetime.datetime(2017, 9, 5, 8, 10, 5, 739484)
datetime.datetime(2017, 9, 5, 18, 12, 5, 741866)
python中时间日期格式化符号:
- %y 两位数的年份表示(00-99)
- %Y 四位数的年份表示(000-9999)
- %m 月份(01-12)
- %d 月内中的一天(0-31)
- %H 24小时制小时数(0-23)
- %I 12小时制小时数(01-12)
- %M 分钟数(00=59)
- %S 秒(00-59)
- %a 本地简化星期名称
- %A 本地完整星期名称
- %b 本地简化的月份名称
- %B 本地完整的月份名称
- %c 本地相应的日期表示和时间表示
- %j 年内的一天(001-366)
- %p 本地A.M.或P.M.的等价符
- %U 一年中的星期数(00-53)星期天为星期的开始
- %w 星期(0-6),星期天为星期的开始
- %W 一年中的星期数(00-53)星期一为星期的开始
- %x 本地相应的日期表示
- %X 本地相应的时间表示
- %Z 当前时区的名称
- %% %号本身
random
生存随机数
import random
random.random()
0.8702062522116073
random.randint(1, 5)
5
random.randrange(1, 5)
2
randint(self, a, b)
Return random integer in range [a, b], including both end points.
randrange(self, start, stop=None, step=1, _int=<class 'int'>)
Choose a random item from range(start, stop[, step]).

This fixes the problem with randint() which includes the
endpoint; in Python this is usually not what you want.
看介绍这两个唯一的区别就是randint包含最后一个数字,randrange不包含。
生成四位随机验证码:
import random
checkcode = ''
for i in range(4):
    current = random.randrange(0,4)
    if current != i:
        # ASCII码中表示26个字母的数字,这里通过随机拿到一个数字生产一个随机字母
        temp = chr(random.randint(65,90))
    else:
        # 这里其实没什么含义,就是0~9各位数字随机再抽一个数字。
        temp = random.randint(0,9)
    checkcode += str(temp)  # 拼接每次生产的随机验证码
print(checkcode)
R4YY
hashlib
用户加密相关操作,代替了md5模块和sha模块,主要提供 SHA1, SHA224, SHA256, SHA384, SHA512 ,MD5 算法
import hashlib
md5加密:
hash = hashlib.md5()
hash.update(bytes('liangxiansen', encoding='utf-8'))
hash.hexdigest()
hash.digest()
'cfdbb07149af95421c669df691fbef2f'
b'\xcf\xdb\xb0qI\xaf\x95B\x1cf\x9d\xf6\x91\xfb\xef/'
sha1加密:
hash = hashlib.sha1()
hash.update(bytes('liangxiansen', encoding='utf-8'))
hash.hexdigest()
hash.digest()
'c085f76a451b740fbcc6981210c933980927e046'
b"\xc0\x85\xf7jE\x1bt\x0f\xbc\xc6\x98\x12\x10\xc93\x98\t'\xe0F"
sha256加密:
hash = hashlib.sha256()
hash.update(bytes('liangxiansen', encoding='utf-8'))
hash.hexdigest()
hash.digest()
'342cb3e7bf3731583173d0fd8b69e6be5dbd663de38c6d06bc1c96c88e5b0a7c'
b'4,\xb3\xe7\xbf71X1s\xd0\xfd\x8bi\xe6\xbe]\xbdf=\xe3\x8cm\x06\xbc\x1c\x96\xc8\x8e[\n|'
sha384加密:
hash = hashlib.sha384()
hash.update(bytes('liangxiansen', encoding='utf-8'))
hash.hexdigest()
hash.digest()
'ddeede7a8da65f88452b06a03fb7369820e0c7e320548df9d81ea6184776fc6b4cc94843baca672b0aa17c24aff270bb'
b'\xdd\xee\xdez\x8d\xa6_\x88E+\x06\xa0?\xb76\x98 \xe0\xc7\xe3 T\x8d\xf9\xd8\x1e\xa6\x18Gv\xfckL\xc9HC\xba\xcag+\n\xa1|$\xaf\xf2p\xbb'
sha512加密:
hash = hashlib.sha512()
hash.update(bytes('liangxiansen', encoding='utf-8'))
hash.hexdigest()
hash.digest()
'bad8745b3e120b270a998fbecad35fc444ca472f107da159d536b93f70b1f68c08cda0be9d8a2305f2ea1efc4d16969d85011de8f021a55ecd1711d6a8646e9b'
b"\xba\xd8t[>\x12\x0b'\n\x99\x8f\xbe\xca\xd3_\xc4D\xcaG/\x10}\xa1Y\xd56\xb9?p\xb1\xf6\x8c\x08\xcd\xa0\xbe\x9d\x8a#\x05\xf2\xea\x1e\xfcM\x16\x96\x9d\x85\x01\x1d\xe8\xf0!\xa5^\xcd\x17\x11\xd6\xa8dn\x9b"
以上加密算法虽然依然非常厉害,但时候存在缺陷,即:通过撞库可以反解。所以,有必要对加密算法中添加自定义key再来做加密。
import hashlib

hash = hashlib.md5(bytes('www.liangxiansen.cn', encoding='utf-8'))
hash.update(bytes('liangxiansen', encoding='utf-8'))
hash.hexdigest()
hash.digest()
'5be4ded703228db7cba551de0f48bbb0'
b'[\xe4\xde\xd7\x03"\x8d\xb7\xcb\xa5Q\xde\x0fH\xbb\xb0'
其实就是做两次hash,用一个只有你自己知道的字符串再去加密一次hash值。
Python 内置还有一个 hmac模块, 它内部对我们创建的 Key 和内容进一步处理然后再加密。
import hmac

hash = hmac.new(bytes('www.liangxiansen.cn',encoding="utf-8"))
hash.update(bytes('liangxiansen',encoding="utf-8"))
print(hash.hexdigest())
12488557134747a02162f81bd0c4f0b4
subprocess
通过Python subprocess 可以使用Linux命令
import subprocess
# 执行命令,返回状态码,执行正常则返回 0,报错返回报错状态吗
subprocess.call(['ls', '-l'])  # 传递一个用于拼接命令的序列
0
这样用感觉很不爽,这不像我们平时使用Linux 命令那样。 可以加 shell=True
subprocess.call("ls -l", shell=True)
0
# 执行命令,返回状态码,执行正常则返回 0, 报错捕捉错误信息
subprocess.check_call("ls -l", shell=True)
0
到这里你可能会感觉subprocess 的 call 方法和 check_call 方法没什么区别啊, OK, 我们接下来看看错误的时候:
from subprocess import CalledProcessError
try:
    subprocess.call("laa -l", shell=True)   # 没有laa这个命令
except CalledProcessError as error:
    print(error)
127
from subprocess import CalledProcessError
try:
    subprocess.check_call("laa -l", shell=True)    # 没有laa这个命令
except CalledProcessError as error:
    print(error)
Command 'laa -l' returned non-zero exit status 127
上面的方法可能我们在执行一些只关注执行结果,不关注输出。有时候我们也是关注输出结果的,可以使用下面的方法:
# 返回命令标准输出,执行失败报异常
whoami = subprocess.check_output('whoami', shell=True)

# 默认放回结果结果是bytes类型,转成string
print(whoami)
print(str(whoami, encoding='utf-8'))
b'lianliang\n'
lianliang
还有一个很牛逼的方法: subprocess.Popen(...)
用于执行复杂的系统命令
参数:
- args:shell命令,可以是字符串或者序列类型(如:list,元组)
- bufsize:指定缓冲。0 无缓冲,1 行缓冲,其他 缓冲区大小,负值 系统缓冲
- stdin, stdout, stderr:分别表示程序的标准输入、输出、错误句柄
- preexec_fn:只在Unix平台下有效,用于指定一个可执行对象(callable object),它将在子进程运行之前被调用
- close_sfs:在windows平台下,如果close_fds被设置为True,则新创建的子进程将不会继承父进程的输入、输出、错误管道。 所以不能将close_fds设置为True同时重定向子进程的标准输入、输出与错误(stdin, stdout, stderr)。
- shell:同上
- cwd:用于设置子进程的当前目录
- env:用于指定子进程的环境变量。如果env = None,子进程的环境变量将从父进程中继承。
- universal_newlines:不同系统的换行符不同,True -> 同意使用 \n
- startupinfo与createionflags只在windows下有效 将被传递给底层的CreateProcess()函数,用于设置子进程的一些属性,如:主窗口的外观,进程的优先级等等
# 执行命令,指定标准输出,标准输入,错误
cmd = subprocess.Popen("pwd", shell=True, stdin=subprocess.PIPE, stdout=subprocess.PIPE, stderr=subprocess.PIPE, universal_newlines=True)
# 读取标准输出
cmd_output = cmd.stdout.read()
print(str(cmd_output, encoding='utf-8'))
/Users/lianliang/Desktop/python_notebook
# 执行命令,指定到运行命令的路径,指定标准输出,标准输入,错误
cmd = subprocess.Popen("pwd", shell=True, cwd='/Users/lianliang', stdin=subprocess.PIPE, stdout=subprocess.PIPE, stderr=subprocess.PIPE, universal_newlines=True)
# 读取标准输出
cmd_output = cmd.stdout.read()
print(str(cmd_output, encoding='utf-8'))
/Users/lianliang
# 执行python3 进入python环境
cmd = subprocess.Popen("python3", stdin=subprocess.PIPE, stdout=subprocess.PIPE, stderr=subprocess.PIPE, universal_newlines=True)
# 通过标准输入,send几条命令(字符串)
cmd.stdin.write("print(1)\n")
cmd.stdin.write("print(2)\n")
cmd.stdin.close()

# 拿到命令输出
cmd_out = cmd.stdout.read()
cmd.stdout.close()
cmd_error = cmd.stderr.read()
cmd.stderr.close()

print(cmd_out)
print(cmd_error)
9
9
1
2
# 执行python3 进入python环境
cmd = subprocess.Popen("python3", stdin=subprocess.PIPE, stdout=subprocess.PIPE, stderr=subprocess.PIPE, universal_newlines=True)
# 通过标准输入,send几条命令(字符串)
cmd.stdin.write("print(1)\n")
cmd.stdin.write("print(2)\n")

# 拿到命令输出
cmd_out = cmd.communicate() # 返回一个元组,第一个元素是标准输出,第二个是错误内容。

print(cmd_out)
9
9
('1\n2\n', '')
# 执行python3 进入python环境
cmd = subprocess.Popen("python3", stdin=subprocess.PIPE, stdout=subprocess.PIPE, stderr=subprocess.PIPE, universal_newlines=True)

# communicate 可以执行命令并拿到结果。
cmd_out = cmd.communicate("print('hello')\nprint(123)") # 返回一个元组,第一个元素是标准输出,第二个是错误内容。

print(cmd_out)
('hello\n123\n', '')
shutil
高级的文件、文件夹、压缩包 处理模块。
import shutil
shutil.copyfileobj(fsrc, fdst, length)
将文件内容拷贝到另一个文件中
shutil.copyfileobj(open('open.file', 'r', encoding='utf-8'), open('new_open.file', 'w', encoding='utf-8'))
out = subprocess.check_output('ls -l open.file new_open.file', shell=True)
print(str(out, encoding='utf-8'))
-rw-r--r--  1 lianliang  staff  23  9  7 16:19 new_open.file
-rw-r--r--  1 lianliang  staff  23  9  5 00:08 open.file
shutil.copyfile(fsrc, fdst)
拷贝文件
shutil.copyfile('open.file', 'new_open.file')
out = subprocess.check_output('ls -l open.file new_open.file', shell=True)
print(str(out, encoding='utf-8'))
'new_open.file'
-rw-r--r--  1 lianliang  staff  23  9  7 16:20 new_open.file
-rw-r--r--  1 lianliang  staff  23  9  5 00:08 open.file
shutil.copy(fsrc, fdst)
拷贝文件和权限
shutil.copy('open.file', 'new_open.file')
out = subprocess.check_output('ls -l open.file new_open.file', shell=True)
print(str(out, encoding='utf-8'))
'new_open.file'
-rw-r--r--  1 lianliang  staff  23  9  7 16:20 new_open.file
-rw-r--r--  1 lianliang  staff  23  9  5 00:08 open.file
shutil.copymode(fsrc, fdst)
仅拷贝权限, 注意不拷贝文件,如果文件不存在将会包异常。内容、组、用户均不变
shutil.copymode('open.file', 'new_open.file')
out = subprocess.check_output('ls -l open.file new_open.file', shell=True)
print(str(out, encoding='utf-8'))
-rw-r--r--  1 lianliang  staff  23  9  7 16:20 new_open.file
-rw-r--r--  1 lianliang  staff  23  9  5 00:08 open.file
shutil.copystat(fsrc, fdst)
仅拷贝状态信息, 包括:mode bits, atime, mtime, flags,注意不拷贝文件,如果文件不存在将会包异常
shutil.copystat('open.file', 'new_open.file')
out = subprocess.check_output('ls -l open.file new_open.file', shell=True)
print(str(out, encoding='utf-8'))
-rw-r--r--  1 lianliang  staff  23  9  5 00:08 new_open.file
-rw-r--r--  1 lianliang  staff  23  9  5 00:08 open.file
如果上面有些操作你看不出有哪些变化, 当执行完 shutil.copystat 后,连唯一有差异的文件创建时间都一致了。
shutil.copy2(fsrc, fdst)
拷贝文件和状态信息
shutil.copy2('open.file', 'new_open.file')
out = subprocess.check_output('ls -l open.file new_open.file', shell=True)
print(str(out, encoding='utf-8'))
'new_open.file'
-rw-r--r--  1 lianliang  staff  23  9  5 00:08 new_open.file
-rw-r--r--  1 lianliang  staff  23  9  5 00:08 open.file
shutil.ignore_patterns(*patterns)
shutil.copytree(src, dst, symlinks=False, ignore=None)
拷贝文件夹和文件夹里面的内容
notebook_ignore = shutil.ignore_patterns('*.pyc', '.DS_Store')
shutil.copytree('/Users/lianliang/Desktop/python_notebook', '/Users/lianliang/Desktop/python_notebook_bak', ignore=notebook_ignore)
'/Users/lianliang/Desktop/python_notebook_bak'
shutil.move(src, dst)
移动文件或文件夹,类型Linux mv命令
shutil.move('/Users/lianliang/Desktop/python_notebook_bak', '/Users/lianliang/Desktop/python_notebook_111')
'/Users/lianliang/Desktop/python_notebook_111'
shutil.rmtree(path, ignore_errors=False, onerror=None)
删除文件夹
shutil.rmtree('/Users/lianliang/Desktop/python_notebook_111')
shutil.make_archive(base_name, format, root_dir=None, base_dir=None, verbose=0, dry_run=0, owner=None, group=None, logger=None)
创建压缩包,并返回文件路径
- base_name: 压缩包的文件名,也可以是压缩包的路径。只是文件名时,则保存至当前目录,否则保存至指定路径,
- format: 压缩包种类,“zip”, “tar”, “bztar”,“gztar”
- root_dir: 要压缩的文件夹路径(默认当前目录)
- owner: 用户,默认当前用户
- group: 组,默认当前组
- logger: 用于记录日志,通常是logging.Logger对象
# 创建tar压缩包,压缩包名称,压缩类型,要压缩的目录
shutil.make_archive('/Users/lianliang/Desktop/notebook', 'gztar', '/Users/lianliang/Desktop/python_notebook_bak')
'/Users/lianliang/Desktop/notebook.tar.gz'
# 创建zip压缩包,压缩包名称,压缩类型,要压缩的目录
shutil.make_archive('/Users/lianliang/Desktop/notebook', 'zip', '/Users/lianliang/Desktop/python_notebook_bak')
'/Users/lianliang/Desktop/notebook.zip'
shutil 对压缩包的处理是调用 zipfile 和 tarfile 两个模块来进行的,详细:
import tarfile
解压缩包:
# 如果你要解压缩包,模式选择‘r’,如果是‘w’会把文件存在的压缩包内里的内容清空
tar = tarfile.open('/Users/lianliang/Desktop/notebook.tar.gz', 'r')
# 查看压缩包里面的文件
tar.getnames()
# 要解压的文件路径要写全
tar.extract('./open.file', '/Users/lianliang/Desktop/')
# 解压所有文件到指定文件夹,如果目标文件夹不存在会创建,不指定路径默认当前路径
tar.extractall('/Users/lianliang/Desktop/aaa/')
创建压缩包:
# 创建压缩包文件'w'模式,如果文件存在会把文件内里的内容清空
tar = tarfile.open('/Users/lianliang/Desktop/notebook.tar.gz', 'w')
# 往压缩包里面添加文件,arcname可以指定文件放到压缩包后的名字。
tar.add('open.file', arcname='open_file.txt')
# 最后需要关闭文件句柄
tar.close()
import zipfile
解压缩包:
# 如果你要解压缩包,模式选择‘r’,如果是‘w’会把原来存在的压缩包内里的内容清空
zfile = zipfile.ZipFile('/Users/lianliang/Desktop/notebook.zip', 'r')
# 查看压缩包里面的文件
zfile.namelist()
# 要解压的文件路径要写全,他这里解压文件和上面tar,有点区别
zfile.extract('open.file', '/Users/lianliang/Desktop/')
# 不解压缩读文件
zfile.read('open.file')
# 解压所有文件到指定文件夹,如果目标文件夹不存在会创建,不指定路径默认当前路径
zfile.extractall('/Users/lianliang/Desktop/aaa/')
['./',
 '.git/',
 '.ipynb_checkpoints/',
 '.gitignore',
 'deepcopy.png',
 'filter-function.png',
 'inside-function.png',
 'lightcopy.png',
 'map-function.png',
 'new_open.file',
 'open.file',
 'Python 内置函数.ipynb',
 'Python 内置函数.slides.html',
 'Python 常用模块.ipynb',
 'Python 数据类型.ipynb',
 'Python 数据类型.slides.html',
 'Python 文件操作.ipynb',
 'Python 文件操作.slides.html',
 'Python 流程控制.ipynb',
 'Python 流程控制.slides.html',
 'Python 输入输出.ipynb',
 'Python 输入输出.slides.html',
 'README.md',
 'sys_path.gif',
 'value1.png',
 'value2.png',
 '位运算.png',
 '初识 Python.ipynb',
 '初识 Python.slides.html',
 '成员运算.png',
 '数学运算.png',
 '比较运算.png',
 '赋值运算.png',
 '身份运算.png',
 '运算优先级.png',
 '逻辑运算.png',
 '.git/hooks/',
 '.git/info/',
 '.git/logs/',
 '.git/objects/',
 '.git/refs/',
 '.git/COMMIT_EDITMSG',
 '.git/config',
 '.git/description',
 '.git/FETCH_HEAD',
 '.git/HEAD',
 '.git/index',
 '.git/hooks/applypatch-msg.sample',
 '.git/hooks/commit-msg.sample',
 '.git/hooks/post-update.sample',
 '.git/hooks/pre-applypatch.sample',
 '.git/hooks/pre-commit.sample',
 '.git/hooks/pre-push.sample',
 '.git/hooks/pre-rebase.sample',
 '.git/hooks/pre-receive.sample',
 '.git/hooks/prepare-commit-msg.sample',
 '.git/hooks/update.sample',
 '.git/info/exclude',
 '.git/logs/refs/',
 '.git/logs/HEAD',
 '.git/logs/refs/heads/',
 '.git/logs/refs/remotes/',
 '.git/logs/refs/heads/master',
 '.git/logs/refs/remotes/origin/',
 '.git/logs/refs/remotes/origin/master',
 '.git/objects/01/',
 '.git/objects/02/',
 '.git/objects/06/',
 '.git/objects/0a/',
 '.git/objects/11/',
 '.git/objects/12/',
 '.git/objects/15/',
 '.git/objects/19/',
 '.git/objects/1a/',
 '.git/objects/1b/',
 '.git/objects/1c/',
 '.git/objects/2a/',
 '.git/objects/2d/',
 '.git/objects/30/',
 '.git/objects/32/',
 '.git/objects/3f/',
 '.git/objects/43/',
 '.git/objects/44/',
 '.git/objects/4f/',
 '.git/objects/57/',
 '.git/objects/59/',
 '.git/objects/5a/',
 '.git/objects/5f/',
 '.git/objects/60/',
 '.git/objects/69/',
 '.git/objects/6d/',
 '.git/objects/6f/',
 '.git/objects/70/',
 '.git/objects/74/',
 '.git/objects/76/',
 '.git/objects/78/',
 '.git/objects/81/',
 '.git/objects/82/',
 '.git/objects/86/',
 '.git/objects/87/',
 '.git/objects/96/',
 '.git/objects/9d/',
 '.git/objects/a1/',
 '.git/objects/a3/',
 '.git/objects/a4/',
 '.git/objects/a7/',
 '.git/objects/a8/',
 '.git/objects/ab/',
 '.git/objects/ae/',
 '.git/objects/b2/',
 '.git/objects/b3/',
 '.git/objects/b9/',
 '.git/objects/ba/',
 '.git/objects/bf/',
 '.git/objects/c8/',
 '.git/objects/cb/',
 '.git/objects/d7/',
 '.git/objects/e0/',
 '.git/objects/e1/',
 '.git/objects/e4/',
 '.git/objects/e7/',
 '.git/objects/e8/',
 '.git/objects/ed/',
 '.git/objects/f2/',
 '.git/objects/f4/',
 '.git/objects/fa/',
 '.git/objects/fb/',
 '.git/objects/fc/',
 '.git/objects/info/',
 '.git/objects/pack/',
 '.git/objects/01/741f56bb1c310781be990d962d845a4bc07846',
 '.git/objects/02/772643c118ee3a7d1d1fcc32dedbadb49ba5d5',
 '.git/objects/06/b5e2771fac9117ae70a722316aeeb92fc94245',
 '.git/objects/0a/46242217d0202acd7ea7cb21feab13ed3abfa7',
 '.git/objects/11/8ef9e7bd3e3a2f5d2ed68b1dd39b774dfdf736',
 '.git/objects/12/b0a4325787e349b44c9aea7dfaf874f44e914e',
 '.git/objects/15/5904933a61cf23552cfb8013135f2b9caa3537',
 '.git/objects/19/79c34071c7730f2b726bd70d75112950032278',
 '.git/objects/1a/b59d86bcdec7dd6d7f9828f6d643c3f471b751',
 '.git/objects/1b/40f8b0c5194594123db439ea25afef347179cc',
 '.git/objects/1c/9e94dfe05556ab3b3de5836e0f023039d66771',
 '.git/objects/1c/b2bc1d73a17da33634f211cdf5a19055b45d2f',
 '.git/objects/2a/9c7011b792be51363c52cd298f40608290052f',
 '.git/objects/2d/c7fd0a270eae0145f03cccd01e771bdad8012b',
 '.git/objects/30/1f4e1974bf4590e40eda6cf6cd10224a7a662d',
 '.git/objects/32/332e62a0bc70f00e7e1c075f9464995e2e1e79',
 '.git/objects/3f/c1ffbbbbbf20df0cf0acba4c6c559012fb997c',
 '.git/objects/43/f1c687dc36e09b22473ad1e1b89e5abf77d1de',
 '.git/objects/44/2444cf886de4a70cd3937a22eb4a41838d253e',
 '.git/objects/4f/5b7bdf31733dabc4b39f974787c22421b43059',
 '.git/objects/57/ebeeb901544ccee542272fc695a1168070b96f',
 '.git/objects/59/f0728e17693c3046c7e6a36588e64c5f34e681',
 '.git/objects/5a/fd42d5475f0677ac6c8616143ade904cb8dca0',
 '.git/objects/5f/d6d4ac3f901494402973c5b92e648bdf733408',
 '.git/objects/60/c9481ec2eed2cafc234855c9c056758717c73a',
 '.git/objects/69/d4567ae8a431537ae51db7c65c776f25cb03dc',
 '.git/objects/6d/0dd2b198dc4ddd1c47becbe11eb1de3cb1c81b',
 '.git/objects/6d/ad413fa17c2a1e0be1c121b47dd94e0b0ef759',
 '.git/objects/6f/bc46d5daaad5c6c7bc83ebf6eeba5275a255b6',
 '.git/objects/70/a4f4a2726d5fa1d1319ebdc4ed4e7bf6a57120',
 '.git/objects/74/bbf6519cc448367cc0d3a16c9bf8306ba19248',
 '.git/objects/76/b98ef8098aac1973b116c0ec510900af5776f8',
 '.git/objects/78/19afb7187feb43730618527f5e1cef73694cbd',
 '.git/objects/81/d72747d458c649d8055308c63610ea8d2fa0e4',
 '.git/objects/82/64166f32930b6a25816cd9e7a4615dc8e2c423',
 '.git/objects/86/c572ae813f39e0bc36c8624bf4947758b3b03e',
 '.git/objects/87/31eb2449ca0a88c5c440f82120cb81775683ba',
 '.git/objects/96/9e51c5c51f5d1a367a58a98c596ffdc658c9ee',
 '.git/objects/96/c0ddf434d1ef65a33c9780e3c16e7066b0a8ff',
 '.git/objects/9d/ff8824420a41d65189eaf874a916364a26de92',
 '.git/objects/a1/4754c8556346239d5939331b28414238b532e2',
 '.git/objects/a3/a420bcc4b6a676db3d6942e733e517fd9c41cd',
 '.git/objects/a4/1909e5372b3072aaa04150676cacf30e14931b',
 '.git/objects/a7/7b9d1c3e16922c7082aa1d1f0de86227fa37ae',
 '.git/objects/a7/d3a128a788620b05a25ef08f6ff929dcaed2b8',
 '.git/objects/a8/8dd9b612d863cd4dfdc92f0df072654dad764e',
 '.git/objects/ab/31b5edd6a064dad6766d1350a020c2c23795a6',
 '.git/objects/ae/c776c01ebbfe5976282b56580640957f55d282',
 '.git/objects/b2/79da3c85c115fd78a68b58e21fc986c3f22b80',
 '.git/objects/b2/8982bcaa00f352ef4eedf32868cd9495b0084e',
 '.git/objects/b3/204256abe92d2261707be56f1300127c460662',
 '.git/objects/b9/0f5d54034ccfe32129b481de5da3845eeae762',
 '.git/objects/ba/502d573dab7d51505a8c80a1ea584792d6b567',
 '.git/objects/bf/5ba2190a0df732eda816d2de841a0a24a170fd',
 '.git/objects/c8/31b2723c6113790539cf352eb0eb06c01551f0',
 '.git/objects/cb/19df22366a741c4cd5a887caf90a06adba7358',
 '.git/objects/d7/c10da266ae300cfc566c49df55016a153d9188',
 '.git/objects/e0/c3141e23171afa2bcf39f47029513253248890',
 '.git/objects/e1/369b67dacbb437ba27a519005a329a8e7e8c31',
 '.git/objects/e4/26b2a948da3a0059ca5246102964feaa7862a9',
 '.git/objects/e7/0ab90dbdc58f9263507b624a58c6a8d8efad23',
 '.git/objects/e7/ff59934a22269d5b261dec9555e735d3fe3e27',
 '.git/objects/e8/afb26430aa2859631cfbbe2fbf614b53ff68ac',
 '.git/objects/ed/13c57c5aaed05947241c8e0b9c8a51b479ed13',
 '.git/objects/f2/2eaffe400dbc2bc1014f27519c14d5fec5e55c',
 '.git/objects/f4/67765015f63039a4e244ef56d3510d6dc3221a',
 '.git/objects/fa/fb15defbb22d9b23e5384c431f9db1da73268a',
 '.git/objects/fb/949f40f1edd9b59cd0380653d2cbcfc53166bd',
 '.git/objects/fb/de4d6b8faed378031b69d5a2e1cd782ab3ed44',
 '.git/objects/fc/695251eccc8172ce6f50d840cd4d82767c3591',
 '.git/refs/heads/',
 '.git/refs/remotes/',
 '.git/refs/tags/',
 '.git/refs/heads/master',
 '.git/refs/remotes/origin/',
 '.git/refs/remotes/origin/master',
 '.ipynb_checkpoints/Python 内置函数-checkpoint.ipynb',
 '.ipynb_checkpoints/Python 常用模块-checkpoint.ipynb',
 '.ipynb_checkpoints/Python 数据类型-checkpoint.ipynb',
 '.ipynb_checkpoints/Python 文件操作-checkpoint.ipynb',
 '.ipynb_checkpoints/Python 流程控制-checkpoint.ipynb',
 '.ipynb_checkpoints/初识 Python-checkpoint.ipynb']
'/Users/lianliang/Desktop/open.file'
b'9999\n1\nthis is new word'
创建压缩包:
# 创建压缩包文件'w'模式,如果文件存在会把文件内里的内容清空
zfile = zipfile.ZipFile('/Users/lianliang/Desktop/notebook.zip', 'w')
# 往压缩包里面添加文件,arcname可以指定文件放到压缩包后的名字。
zfile.write('open.file', arcname='open_file.txt')
zfile.writestr('open_file.txt', 'aaa')
# 最后需要关闭文件句柄
zfile.close()
<ZipInfo filename='open_file.txt' filemode='-rw-r--r--' file_size=23>
help(zipfile)
Help on module zipfile:

NAME
    zipfile - Read and write ZIP files.

MODULE REFERENCE
    http://docs.python.org/3.5/library/zipfile

    The following documentation is automatically generated from the Python
    source files.  It may be incomplete, incorrect or include features that
    are considered implementation detail and may vary between Python
    implementations.  When in doubt, consult the module reference at the
    location listed above.

DESCRIPTION
    XXX references to utf-8 need further investigation.

CLASSES
    builtins.Exception(builtins.BaseException)
        BadZipFile
        LargeZipFile
    builtins.object
        ZipFile
            PyZipFile
        ZipInfo

    class BadZipFile(builtins.Exception)
     |  Common base class for all non-exit exceptions.
     |
     |  Method resolution order:
     |      BadZipFile
     |      builtins.Exception
     |      builtins.BaseException
     |      builtins.object
     |
     |  Data descriptors defined here:
     |
     |  __weakref__
     |      list of weak references to the object (if defined)
     |
     |  ----------------------------------------------------------------------
     |  Methods inherited from builtins.Exception:
     |
     |  __init__(self, /, *args, **kwargs)
     |      Initialize self.  See help(type(self)) for accurate signature.
     |
     |  __new__(*args, **kwargs) from builtins.type
     |      Create and return a new object.  See help(type) for accurate signature.
     |
     |  ----------------------------------------------------------------------
     |  Methods inherited from builtins.BaseException:
     |
     |  __delattr__(self, name, /)
     |      Implement delattr(self, name).
     |
     |  __getattribute__(self, name, /)
     |      Return getattr(self, name).
     |
     |  __reduce__(...)
     |      helper for pickle
     |
     |  __repr__(self, /)
     |      Return repr(self).
     |
     |  __setattr__(self, name, value, /)
     |      Implement setattr(self, name, value).
     |
     |  __setstate__(...)
     |
     |  __str__(self, /)
     |      Return str(self).
     |
     |  with_traceback(...)
     |      Exception.with_traceback(tb) --
     |      set self.__traceback__ to tb and return self.
     |
     |  ----------------------------------------------------------------------
     |  Data descriptors inherited from builtins.BaseException:
     |
     |  __cause__
     |      exception cause
     |
     |  __context__
     |      exception context
     |
     |  __dict__
     |
     |  __suppress_context__
     |
     |  __traceback__
     |
     |  args

    BadZipfile = class BadZipFile(builtins.Exception)
     |  Common base class for all non-exit exceptions.
     |
     |  Method resolution order:
     |      BadZipFile
     |      builtins.Exception
     |      builtins.BaseException
     |      builtins.object
     |
     |  Data descriptors defined here:
     |
     |  __weakref__
     |      list of weak references to the object (if defined)
     |
     |  ----------------------------------------------------------------------
     |  Methods inherited from builtins.Exception:
     |
     |  __init__(self, /, *args, **kwargs)
     |      Initialize self.  See help(type(self)) for accurate signature.
     |
     |  __new__(*args, **kwargs) from builtins.type
     |      Create and return a new object.  See help(type) for accurate signature.
     |
     |  ----------------------------------------------------------------------
     |  Methods inherited from builtins.BaseException:
     |
     |  __delattr__(self, name, /)
     |      Implement delattr(self, name).
     |
     |  __getattribute__(self, name, /)
     |      Return getattr(self, name).
     |
     |  __reduce__(...)
     |      helper for pickle
     |
     |  __repr__(self, /)
     |      Return repr(self).
     |
     |  __setattr__(self, name, value, /)
     |      Implement setattr(self, name, value).
     |
     |  __setstate__(...)
     |
     |  __str__(self, /)
     |      Return str(self).
     |
     |  with_traceback(...)
     |      Exception.with_traceback(tb) --
     |      set self.__traceback__ to tb and return self.
     |
     |  ----------------------------------------------------------------------
     |  Data descriptors inherited from builtins.BaseException:
     |
     |  __cause__
     |      exception cause
     |
     |  __context__
     |      exception context
     |
     |  __dict__
     |
     |  __suppress_context__
     |
     |  __traceback__
     |
     |  args

    class LargeZipFile(builtins.Exception)
     |  Raised when writing a zipfile, the zipfile requires ZIP64 extensions
     |  and those extensions are disabled.
     |
     |  Method resolution order:
     |      LargeZipFile
     |      builtins.Exception
     |      builtins.BaseException
     |      builtins.object
     |
     |  Data descriptors defined here:
     |
     |  __weakref__
     |      list of weak references to the object (if defined)
     |
     |  ----------------------------------------------------------------------
     |  Methods inherited from builtins.Exception:
     |
     |  __init__(self, /, *args, **kwargs)
     |      Initialize self.  See help(type(self)) for accurate signature.
     |
     |  __new__(*args, **kwargs) from builtins.type
     |      Create and return a new object.  See help(type) for accurate signature.
     |
     |  ----------------------------------------------------------------------
     |  Methods inherited from builtins.BaseException:
     |
     |  __delattr__(self, name, /)
     |      Implement delattr(self, name).
     |
     |  __getattribute__(self, name, /)
     |      Return getattr(self, name).
     |
     |  __reduce__(...)
     |      helper for pickle
     |
     |  __repr__(self, /)
     |      Return repr(self).
     |
     |  __setattr__(self, name, value, /)
     |      Implement setattr(self, name, value).
     |
     |  __setstate__(...)
     |
     |  __str__(self, /)
     |      Return str(self).
     |
     |  with_traceback(...)
     |      Exception.with_traceback(tb) --
     |      set self.__traceback__ to tb and return self.
     |
     |  ----------------------------------------------------------------------
     |  Data descriptors inherited from builtins.BaseException:
     |
     |  __cause__
     |      exception cause
     |
     |  __context__
     |      exception context
     |
     |  __dict__
     |
     |  __suppress_context__
     |
     |  __traceback__
     |
     |  args

    class PyZipFile(ZipFile)
     |  Class to create ZIP archives with Python library files and packages.
     |
     |  Method resolution order:
     |      PyZipFile
     |      ZipFile
     |      builtins.object
     |
     |  Methods defined here:
     |
     |  __init__(self, file, mode='r', compression=0, allowZip64=True, optimize=-1)
     |      Open the ZIP file with mode read 'r', write 'w', exclusive create 'x',
     |      or append 'a'.
     |
     |  writepy(self, pathname, basename='', filterfunc=None)
     |      Add all files from "pathname" to the ZIP archive.
     |
     |      If pathname is a package directory, search the directory and
     |      all package subdirectories recursively for all *.py and enter
     |      the modules into the archive.  If pathname is a plain
     |      directory, listdir *.py and enter all modules.  Else, pathname
     |      must be a Python *.py file and the module will be put into the
     |      archive.  Added modules are always module.pyc.
     |      This method will compile the module.py into module.pyc if
     |      necessary.
     |      If filterfunc(pathname) is given, it is called with every argument.
     |      When it is False, the file or directory is skipped.
     |
     |  ----------------------------------------------------------------------
     |  Methods inherited from ZipFile:
     |
     |  __del__(self)
     |      Call the "close()" method in case the user forgot.
     |
     |  __enter__(self)
     |
     |  __exit__(self, type, value, traceback)
     |
     |  __repr__(self)
     |      Return repr(self).
     |
     |  close(self)
     |      Close the file, and for mode 'w', 'x' and 'a' write the ending
     |      records.
     |
     |  extract(self, member, path=None, pwd=None)
     |      Extract a member from the archive to the current working directory,
     |      using its full name. Its file information is extracted as accurately
     |      as possible. `member' may be a filename or a ZipInfo object. You can
     |      specify a different directory using `path'.
     |
     |  extractall(self, path=None, members=None, pwd=None)
     |      Extract all members from the archive to the current working
     |      directory. `path' specifies a different directory to extract to.
     |      `members' is optional and must be a subset of the list returned
     |      by namelist().
     |
     |  getinfo(self, name)
     |      Return the instance of ZipInfo given 'name'.
     |
     |  infolist(self)
     |      Return a list of class ZipInfo instances for files in the
     |      archive.
     |
     |  namelist(self)
     |      Return a list of file names in the archive.
     |
     |  open(self, name, mode='r', pwd=None)
     |      Return file-like object for 'name'.
     |
     |  printdir(self, file=None)
     |      Print a table of contents for the zip file.
     |
     |  read(self, name, pwd=None)
     |      Return file bytes (as a string) for name.
     |
     |  setpassword(self, pwd)
     |      Set default password for encrypted files.
     |
     |  testzip(self)
     |      Read all the files and check the CRC.
     |
     |  write(self, filename, arcname=None, compress_type=None)
     |      Put the bytes from filename into the archive under the name
     |      arcname.
     |
     |  writestr(self, zinfo_or_arcname, data, compress_type=None)
     |      Write a file into the archive.  The contents is 'data', which
     |      may be either a 'str' or a 'bytes' instance; if it is a 'str',
     |      it is encoded as UTF-8 first.
     |      'zinfo_or_arcname' is either a ZipInfo instance or
     |      the name of the file in the archive.
     |
     |  ----------------------------------------------------------------------
     |  Data descriptors inherited from ZipFile:
     |
     |  __dict__
     |      dictionary for instance variables (if defined)
     |
     |  __weakref__
     |      list of weak references to the object (if defined)
     |
     |  comment
     |      The comment text associated with the ZIP file.
     |
     |  ----------------------------------------------------------------------
     |  Data and other attributes inherited from ZipFile:
     |
     |  fp = None

    class ZipFile(builtins.object)
     |  Class with methods to open, read, write, close, list zip files.
     |
     |  z = ZipFile(file, mode="r", compression=ZIP_STORED, allowZip64=True)
     |
     |  file: Either the path to the file, or a file-like object.
     |        If it is a path, the file will be opened and closed by ZipFile.
     |  mode: The mode can be either read 'r', write 'w', exclusive create 'x',
     |        or append 'a'.
     |  compression: ZIP_STORED (no compression), ZIP_DEFLATED (requires zlib),
     |               ZIP_BZIP2 (requires bz2) or ZIP_LZMA (requires lzma).
     |  allowZip64: if True ZipFile will create files with ZIP64 extensions when
     |              needed, otherwise it will raise an exception when this would
     |              be necessary.
     |
     |  Methods defined here:
     |
     |  __del__(self)
     |      Call the "close()" method in case the user forgot.
     |
     |  __enter__(self)
     |
     |  __exit__(self, type, value, traceback)
     |
     |  __init__(self, file, mode='r', compression=0, allowZip64=True)
     |      Open the ZIP file with mode read 'r', write 'w', exclusive create 'x',
     |      or append 'a'.
     |
     |  __repr__(self)
     |      Return repr(self).
     |
     |  close(self)
     |      Close the file, and for mode 'w', 'x' and 'a' write the ending
     |      records.
     |
     |  extract(self, member, path=None, pwd=None)
     |      Extract a member from the archive to the current working directory,
     |      using its full name. Its file information is extracted as accurately
     |      as possible. `member' may be a filename or a ZipInfo object. You can
     |      specify a different directory using `path'.
     |
     |  extractall(self, path=None, members=None, pwd=None)
     |      Extract all members from the archive to the current working
     |      directory. `path' specifies a different directory to extract to.
     |      `members' is optional and must be a subset of the list returned
     |      by namelist().
     |
     |  getinfo(self, name)
     |      Return the instance of ZipInfo given 'name'.
     |
     |  infolist(self)
     |      Return a list of class ZipInfo instances for files in the
     |      archive.
     |
     |  namelist(self)
     |      Return a list of file names in the archive.
     |
     |  open(self, name, mode='r', pwd=None)
     |      Return file-like object for 'name'.
     |
     |  printdir(self, file=None)
     |      Print a table of contents for the zip file.
     |
     |  read(self, name, pwd=None)
     |      Return file bytes (as a string) for name.
     |
     |  setpassword(self, pwd)
     |      Set default password for encrypted files.
     |
     |  testzip(self)
     |      Read all the files and check the CRC.
     |
     |  write(self, filename, arcname=None, compress_type=None)
     |      Put the bytes from filename into the archive under the name
     |      arcname.
     |
     |  writestr(self, zinfo_or_arcname, data, compress_type=None)
     |      Write a file into the archive.  The contents is 'data', which
     |      may be either a 'str' or a 'bytes' instance; if it is a 'str',
     |      it is encoded as UTF-8 first.
     |      'zinfo_or_arcname' is either a ZipInfo instance or
     |      the name of the file in the archive.
     |
     |  ----------------------------------------------------------------------
     |  Data descriptors defined here:
     |
     |  __dict__
     |      dictionary for instance variables (if defined)
     |
     |  __weakref__
     |      list of weak references to the object (if defined)
     |
     |  comment
     |      The comment text associated with the ZIP file.
     |
     |  ----------------------------------------------------------------------
     |  Data and other attributes defined here:
     |
     |  fp = None

    class ZipInfo(builtins.object)
     |  Class with attributes describing each file in the ZIP archive.
     |
     |  Methods defined here:
     |
     |  FileHeader(self, zip64=None)
     |      Return the per-file header as a string.
     |
     |  __init__(self, filename='NoName', date_time=(1980, 1, 1, 0, 0, 0))
     |      Initialize self.  See help(type(self)) for accurate signature.
     |
     |  __repr__(self)
     |      Return repr(self).
     |
     |  ----------------------------------------------------------------------
     |  Data descriptors defined here:
     |
     |  CRC
     |
     |  comment
     |
     |  compress_size
     |
     |  compress_type
     |
     |  create_system
     |
     |  create_version
     |
     |  date_time
     |
     |  external_attr
     |
     |  extra
     |
     |  extract_version
     |
     |  file_size
     |
     |  filename
     |
     |  flag_bits
     |
     |  header_offset
     |
     |  internal_attr
     |
     |  orig_filename
     |
     |  reserved
     |
     |  volume

    error = class BadZipFile(builtins.Exception)
     |  Common base class for all non-exit exceptions.
     |
     |  Method resolution order:
     |      BadZipFile
     |      builtins.Exception
     |      builtins.BaseException
     |      builtins.object
     |
     |  Data descriptors defined here:
     |
     |  __weakref__
     |      list of weak references to the object (if defined)
     |
     |  ----------------------------------------------------------------------
     |  Methods inherited from builtins.Exception:
     |
     |  __init__(self, /, *args, **kwargs)
     |      Initialize self.  See help(type(self)) for accurate signature.
     |
     |  __new__(*args, **kwargs) from builtins.type
     |      Create and return a new object.  See help(type) for accurate signature.
     |
     |  ----------------------------------------------------------------------
     |  Methods inherited from builtins.BaseException:
     |
     |  __delattr__(self, name, /)
     |      Implement delattr(self, name).
     |
     |  __getattribute__(self, name, /)
     |      Return getattr(self, name).
     |
     |  __reduce__(...)
     |      helper for pickle
     |
     |  __repr__(self, /)
     |      Return repr(self).
     |
     |  __setattr__(self, name, value, /)
     |      Implement setattr(self, name, value).
     |
     |  __setstate__(...)
     |
     |  __str__(self, /)
     |      Return str(self).
     |
     |  with_traceback(...)
     |      Exception.with_traceback(tb) --
     |      set self.__traceback__ to tb and return self.
     |
     |  ----------------------------------------------------------------------
     |  Data descriptors inherited from builtins.BaseException:
     |
     |  __cause__
     |      exception cause
     |
     |  __context__
     |      exception context
     |
     |  __dict__
     |
     |  __suppress_context__
     |
     |  __traceback__
     |
     |  args

FUNCTIONS
    is_zipfile(filename)
        Quickly see if a file is a ZIP file by checking the magic number.

        The filename argument may be a file or file-like object too.

DATA
    ZIP_BZIP2 = 12
    ZIP_DEFLATED = 8
    ZIP_LZMA = 14
    ZIP_STORED = 0
    __all__ = ['BadZipFile', 'BadZipfile', 'error', 'ZIP_STORED', 'ZIP_DEF...

FILE
    /usr/local/Cellar/python3/3.5.1/Frameworks/Python.framework/Versions/3.5/lib/python3.5/zipfile.py
import sys
sys.path
['',
 '/usr/local/Cellar/python3/3.5.1/Frameworks/Python.framework/Versions/3.5/lib/python35.zip',
 '/usr/local/Cellar/python3/3.5.1/Frameworks/Python.framework/Versions/3.5/lib/python3.5',
 '/usr/local/Cellar/python3/3.5.1/Frameworks/Python.framework/Versions/3.5/lib/python3.5/plat-darwin',
 '/usr/local/Cellar/python3/3.5.1/Frameworks/Python.framework/Versions/3.5/lib/python3.5/lib-dynload',
 '/usr/local/lib/python3.5/site-packages',
 '/usr/local/lib/python3.5/site-packages/IPython/extensions',
 '/Users/lianliang/.ipython']
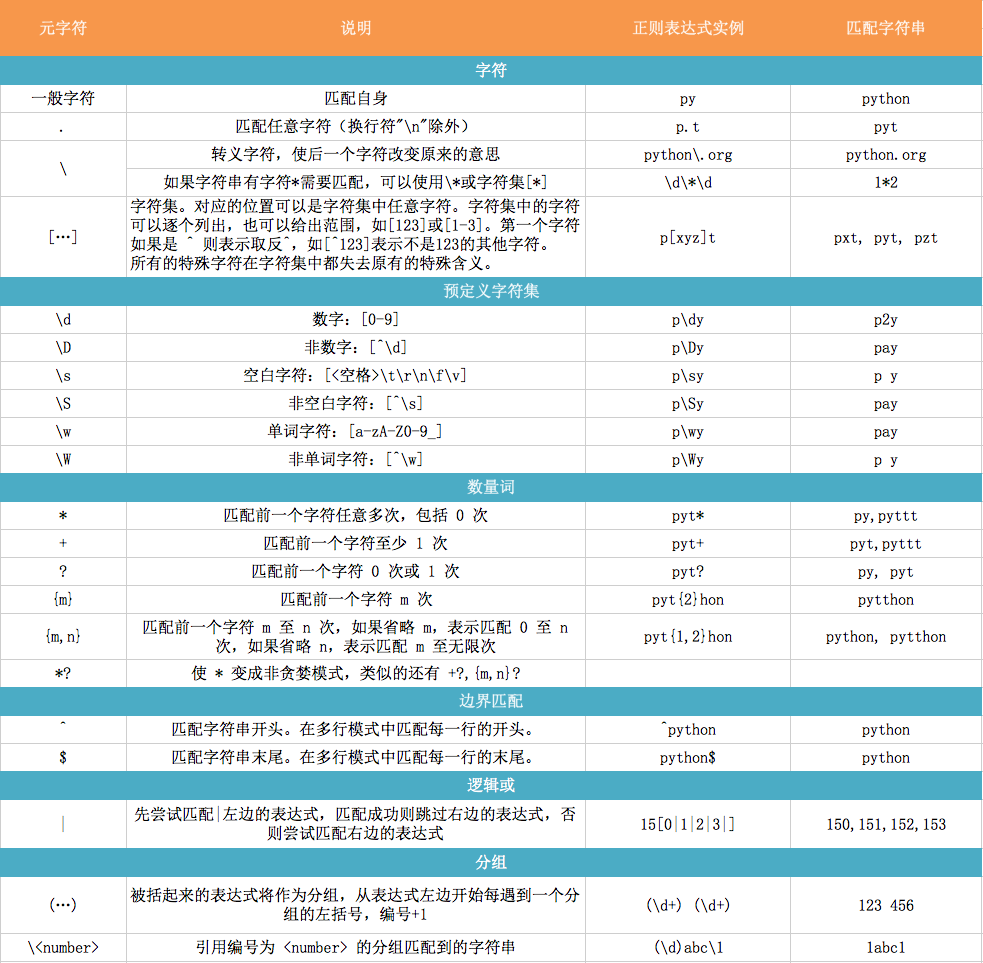
re 正则表达式
python中re模块提供了正则表达式相关操作
import re
** match: **
match,方法用于查找字符串的头部,匹配成功返回一个对象,未匹配成功返回None,可以使用分组
match(pattern, string, flags=0)
pattern: 正则模型
string : 要匹配的字符串
falgs : 匹配模式
X VERBOSE Ignore whitespace and comments for nicer looking RE's. I IGNORECASE Perform case-insensitive matching. M MULTILINE "^" matches the beginning of lines (after a newline) as well as the string. "$" matches the end of lines (before a newline) as well as the end of the string. S DOTALL "." matches any character at all, including the newline.
A ASCII For string patterns, make \w, \W, \b, \B, \d, \D match the corresponding ASCII character categories (rather than the whole Unicode categories, which is the default). For bytes patterns, this flag is the only available behaviour and needn't be specified.
L LOCALE Make \w, \W, \b, \B, dependent on the current locale. U UNICODE For compatibility only. Ignored for string patterns (it is the default), and forbidden for bytes patterns.
# 无分组
import re
pattern = re.compile("th\w+")
m = pattern.match("there are some things...")
print(m)           # 返回一个Match 对象
print(m.group())   # 获取匹配到的完整内容
print(m.groups())  # 获取分组内容
print(m.start())   # 获取匹配的到字符串起始索引位置
print(m.end())     # 获取匹配的到字符串起始索引位置
print(m.span())    # 获取匹配的到字符串索引坐标元祖

# 有分组
pattern = re.compile("t(h\w+)")  # 写法稍有不一样,需要分组的用()括号抱起来,然后最后匹配的可以取完整的,也可以取括号里面的
m = pattern.match("there are some things...")
print(m)           # 返回一个Match 对象
print(m.group())   # 获取匹配到的完整内容
print(m.groups())  # 获取分组内容
print(m.start())   # 获取匹配的到字符串起始索引位置
print(m.end())     # 获取匹配的到字符串起始索引位置
print(m.span())    # 获取匹配的到字符串索引坐标元祖
<_sre.SRE_Match object; span=(0, 5), match='there'>
there
()
0
5
(0, 5)
<_sre.SRE_Match object; span=(0, 5), match='there'>
there
('here',)
0
5
(0, 5)
import re
pattern = re.compile("th\w+")
m = pattern.match("there are some things...", 15, 20)  # 设置匹配位置,从字符串哪个索引还是匹配,返回匹配都的第一个
print(m)
<_sre.SRE_Match object; span=(15, 21), match='things'>
import re
pattern = re.compile(r'([a-z]+) ([a-z]+)', re.I)  # re.I 表示忽略大小写
m = pattern.match('Hello World Wide Web')
print(m)
m.group(0)   # 返回匹配成功的整个子串
m.span(0)    # 返回匹配成功的整个子串的索引
m.group(1)   # 返回第一个分组匹配成功的子串
m.span(1)    # 返回第一个分组匹配成功的子串的索引
m.group(2)   # 返回第二个分组匹配成功的子串
m.span(1)    # 返回第二个分组匹配成功的子串
m.groups()   # 等价于 (m.group(1), m.group(2), ...)
<_sre.SRE_Match object; span=(0, 11), match='Hello World'>
'Hello World'
(0, 11)
'Hello'
(0, 5)
'World'
(0, 5)
('Hello', 'World')
** search: **
search,方法用于查找字符串的任何位置,它也是一次匹配,只要找到了一个匹配的结果就返回,而不是查找所有匹配的结果,未匹配成功返回None, 可以使用分组
search(pattern, string, flags=0)
- pattern: 正则模型
- string : 要匹配的字符串
- falgs : 匹配模式
import re
pattern = re.compile('\d+')  # 这里如果使用 match 方法则不匹配
m = pattern.search('number: 12 34 56 78')
m.group()
'12'
import re

# 将正则表达式编译成 Pattern 对象
pattern = re.compile('\d+')

# 使用 search() 查找匹配的子串,不存在匹配的子串时将返回 None
# 这里使用 match() 无法成功匹配
m = pattern.search('hello 123456 789')

if m:
    # 获得分组信息
    print('matching string:', m.group())
    print('position:',m.span())
matching string: 123456
position: (6, 12)
** findall: **
上面的 match 和 search 方法都是一次匹配,只要找到了一个匹配的结果就返回。然而,在大多数时候,我们需要搜索整个字符串,获得所有匹配的结果。这时候后就需要使用 findall 方法, 可以使用分组
import re

pattern = re.compile('\d+')   # 查找数字
result1 = pattern.findall('hello 123456 789')
result2 = pattern.findall('one1two2three3four4')

print(result1)
print(result2)
['123456', '789']
['1', '2', '3', '4']
** sub: **
sub,替换匹配成功的指定位置字符串
sub(pattern, repl, string, count=0, flags=0)
- pattern: 正则模型
- repl : 要替换的字符串或可执行对象
- string : 要匹配的字符串
- count : 指定匹配个数
- flags : 匹配模式
import re

p = re.compile('(\w+) (\w+)')
s = 'hello 123, hello 456'

def func(m):
    return 'hi' + ' ' + m.group(2)

p.sub('hello world', s)  # 使用 'hello world' 替换 'hello 123' 和 'hello 456'
p.sub('\2 \1', s)        # 引用分组
p.sub(func, s)
p.sub(func, s, 1)         # 最多替换一次
'hello world, hello world'
'\x02 \x01, \x02 \x01'
'hi 123, hi 456'
'hi 123, hello 456'
** split: **
split 方法按照能够匹配的子串将字符串分割后返回列表
import re

p = re.compile('[\s\,\;]+')
p.split('a,b;; c   d')
['a', 'b', 'c', 'd']
python 序列化
Python中用于序列化的两个模块
- json 用于【字符串】和 【python基本数据类型】 间进行转换
- pickle 用于【python特有的类型】 和 【python基本数据类型】间进行转换
Json模块提供了四个功能:dumps、dump、loads、load
pickle模块提供了四个功能:dumps、dump、loads、load
import json
dic = {'k1': 'v1'}
print(dic, type(dic))
{'k1': 'v1'} <class 'dict'>
# 将python基本数据类型转化成字符串形式
result = json.dumps(dic)
print(result, type(result))
{"k1": "v1"} <class 'str'>
s1 = '{"k1": "123"}'   # 通过json.loads反序列化,字符串一定要使用双引号("),因为在其语言中单引号是字符,双引号是字符串
# 将字符串形式转换成python的基本数据类型
dic = json.loads(s1)
print(dic, type(dic))
{'k1': '123'} <class 'dict'>
json.dump(dic, open('test.json', 'w'))   # 写入文件
json.load(open('test.json', 'r'))        # 从文件读出
import pickle

li = [11, 22, 33]
r = pickle.dumps(li)
print(r)
b'\x80\x03]q\x00(K\x0bK\x16K!e.'
result = pickle.loads(r)
print(result)
[11, 22, 33]
pickle.dump(li, open('db', 'wb'))  # 写到文件
pickle.load(open('db', 'rb'))      # 从文件中载入
configparser
configparser 用于处理特定格式的文件(*.ini),其本质上是利用open来操作文件。
print(open('config.ini', 'r').read())
# 注释1
; 注释2

[section1]
k1 = v1
k2:v2

[section2]
k1 = v1
1、获取所有节点
import configparser

config = configparser.ConfigParser()
config.read('config.ini', encoding='utf-8')
sections = config.sections()
print(sections)
['config.ini']
['section1', 'section2']
2、获取指定节点下所有的键值对
import configparser

config = configparser.ConfigParser()
config.read('config.ini', encoding='utf-8')
key_value = config.items('section1')
print(key_value)
['config.ini']
[('k1', 'v1'), ('k2', 'v2')]
3、获取指定节点下所有的键
import configparser

config = configparser.ConfigParser()
config.read('config.ini', encoding='utf-8')
options = config.options('section1')
print(options)
['config.ini']
['k1', 'k2']
4、获取指定节点下指定key的值
import configparser

config = configparser.ConfigParser()
config.read('config.ini', encoding='utf-8')
value= config.get('section1', 'k1')
print(value)
['config.ini']
v1
5、检查、删除、添加节点
import configparser

config = configparser.ConfigParser()
config.read('config.ini', encoding='utf-8')


# 检查
section = config.has_section('section1')
print(section)

# 添加节点
config.add_section("section10")
config.write(open('config.ini', 'w+'))

# 删除节点
config.remove_section("section1")
config.write(open('config.ini', 'w+'))
['config.ini']
True
True
print(open('config.ini', 'r').read())
[section2]
k1 = v1

[section10]
6、检查、删除、设置指定组内的键值对
import configparser

config = configparser.ConfigParser()
config.read('config.ini', encoding='utf-8')


# 检查
option = config.has_option('section1', 'k1')
print(option)

# 删除节点
config.remove_option("section1", 'k1')
config.write(open('config.ini', 'w'))

# 设置
config.set("section1", 'k10', '10000')
config.write(open('config.ini', 'w'))
['config.ini']
True
True
print(open('config.ini', 'r').read())
[section1]
k2 = v2
k10 = 10000

[section2]
k1 = v1
XML
XML是实现不同语言或程序之间进行数据交换的协议,XML文件格式如下:
print(open('data.xml', 'r').read())
<data>
    <country name="Liechtenstein">
        <rank updated="yes">2</rank>
        <year>2023</year>
        <gdppc>141100</gdppc>
        <neighbor direction="E" name="Austria" />
        <neighbor direction="W" name="Switzerland" />
    </country>
    <country name="Singapore">
        <rank updated="yes">5</rank>
        <year>2026</year>
        <gdppc>59900</gdppc>
        <neighbor direction="N" name="Malaysia" />
    </country>
    <country name="Panama">
        <rank updated="yes">69</rank>
        <year>2026</year>
        <gdppc>13600</gdppc>
        <neighbor direction="W" name="Costa Rica" />
        <neighbor direction="E" name="Colombia" />
    </country>
</data>
1、解析XML
from xml.etree import ElementTree as ET

############ 解析方式一 ############

# 打开文件,读取XML内容
str_xml = open('data.xml', 'r').read()

# 将字符串解析成xml特殊对象,root代指xml文件的根节点
root = ET.XML(str_xml)


############ 解析方式二 ############

# 直接解析xml文件
tree = ET.parse("data.xml")

# 获取xml文件的根节点
root = tree.getroot()
2、操作XML
XML格式类型是节点嵌套节点,对于每一个节点均有以下功能,以便对当前节点进行操作:
由于 每个节点 都具有以上的方法,并且在上一步骤中解析时均得到了root(xml文件的根节点),so 可以利用以上方法进行操作xml文件。
a、 遍历XML文档的所有内容:
### 操作

# 顶层标签
print(root.tag)


# 遍历XML文档的第二层
for child in root:
    # 第二层节点的标签名称和标签属性
    print(child.tag, child.attrib)
    # 遍历XML文档的第三层
    for i in child:
        # 第二层节点的标签名称和内容
        print(i.tag, i.text)
data
country {'name': 'Liechtenstein'}
rank 2
year 2023
gdppc 141100
neighbor None
neighbor None
country {'name': 'Singapore'}
rank 5
year 2026
gdppc 59900
neighbor None
country {'name': 'Panama'}
rank 69
year 2026
gdppc 13600
neighbor None
neighbor None
### 操作

# 顶层标签
print(root.tag)


# 遍历XML中所有的year节点
for node in root.iter('year'):
    # 节点的标签名称和内容
    print(node.tag, node.text)
data
year 2023
year 2026
year 2026
b、修改节点内容:
由于修改的节点时,均是在内存中进行,其不会影响文件中的内容。所以,如果想要修改,则需要重新将内存中的内容写到文件。
from xml.etree import ElementTree as ET

############ 解析方式一 ############

# 打开文件,读取XML内容
str_xml = open('data.xml', 'r').read()

# 将字符串解析成xml特殊对象,root代指xml文件的根节点
root = ET.XML(str_xml)

############ 操作 ############

# 顶层标签
print(root.tag)

# 循环所有的year节点
for node in root.iter('year'):
    # 将year节点中的内容自增一
    new_year = int(node.text) + 1
    node.text = str(new_year)

    # 设置属性
    node.set('name', 'Kevin')
    node.set('age', '18')
    # 删除属性
    del node.attrib['name']


############ 保存文件 ############
tree = ET.ElementTree(root)
tree.write("new.xml", encoding='utf-8')
data
print(open('new.xml', 'r').read())
<data>
    <country name="Liechtenstein">
        <rank updated="yes">2</rank>
        <year age="18">2024</year>
        <gdppc>141100</gdppc>
        <neighbor direction="E" name="Austria" />
        <neighbor direction="W" name="Switzerland" />
    </country>
    <country name="Singapore">
        <rank updated="yes">5</rank>
        <year age="18">2027</year>
        <gdppc>59900</gdppc>
        <neighbor direction="N" name="Malaysia" />
    </country>
    <country name="Panama">
        <rank updated="yes">69</rank>
        <year age="18">2027</year>
        <gdppc>13600</gdppc>
        <neighbor direction="W" name="Costa Rica" />
        <neighbor direction="E" name="Colombia" />
    </country>
</data>
from xml.etree import ElementTree as ET

############ 解析方式二 ############

# 直接解析xml文件
tree = ET.parse("data.xml")

# 获取xml文件的根节点
root = tree.getroot()

############ 操作 ############

# 顶层标签
print(root.tag)

# 循环所有的year节点
for node in root.iter('year'):
    # 将year节点中的内容自增一
    new_year = int(node.text) + 1
    node.text = str(new_year)

    # 设置属性
    node.set('name', 'Kevin')
    node.set('age', '18')
    # 删除属性
    del node.attrib['name']


############ 保存文件 ############
tree.write("newnew.xml", encoding='utf-8')
data
print(open('newnew.xml', 'r').read())
<data>
    <country name="Liechtenstein">
        <rank updated="yes">2</rank>
        <year age="18">2024</year>
        <gdppc>141100</gdppc>
        <neighbor direction="E" name="Austria" />
        <neighbor direction="W" name="Switzerland" />
    </country>
    <country name="Singapore">
        <rank updated="yes">5</rank>
        <year age="18">2027</year>
        <gdppc>59900</gdppc>
        <neighbor direction="N" name="Malaysia" />
    </country>
    <country name="Panama">
        <rank updated="yes">69</rank>
        <year age="18">2027</year>
        <gdppc>13600</gdppc>
        <neighbor direction="W" name="Costa Rica" />
        <neighbor direction="E" name="Colombia" />
    </country>
</data>
# 遍历data下的所有country节点
for country in root.findall('country'):
    # 获取每一个country节点下rank节点的内容
    rank = int(country.find('rank').text)

    if rank > 50:
        # 删除指定country节点
        root.remove(country)
3、创建XML文档:
方法一:
from xml.etree import ElementTree as ET


# 创建根节点
root = ET.Element("famliy")


# 创建节点大儿子
son1 = ET.Element('son', {'name': '儿1'})
# 创建小儿子
son2 = ET.Element('son', {"name": '儿2'})

# 在大儿子中创建两个孙子
grandson1 = ET.Element('grandson', {'name': '儿11'})
grandson2 = ET.Element('grandson', {'name': '儿12'})
son1.append(grandson1)
son1.append(grandson2)


# 把儿子添加到根节点中
root.append(son1)
root.append(son1)

tree = ET.ElementTree(root)
tree.write('oooo.xml',encoding='utf-8', short_empty_elements=False)
方法二:
from xml.etree import ElementTree as ET

# 创建根节点
root = ET.Element("famliy")


# 创建大儿子
# son1 = ET.Element('son', {'name': '儿1'})
son1 = root.makeelement('son', {'name': '儿1'})
# 创建小儿子
# son2 = ET.Element('son', {"name": '儿2'})
son2 = root.makeelement('son', {"name": '儿2'})

# 在大儿子中创建两个孙子
# grandson1 = ET.Element('grandson', {'name': '儿11'})
grandson1 = son1.makeelement('grandson', {'name': '儿11'})
# grandson2 = ET.Element('grandson', {'name': '儿12'})
grandson2 = son1.makeelement('grandson', {'name': '儿12'})

son1.append(grandson1)
son1.append(grandson2)


# 把儿子添加到根节点中
root.append(son1)
root.append(son1)

tree = ET.ElementTree(root)
tree.write('oooo.xml',encoding='utf-8', short_empty_elements=False)
方法三:
from xml.etree import ElementTree as ET


# 创建根节点
root = ET.Element("famliy")


# 创建节点大儿子
son1 = ET.SubElement(root, "son", attrib={'name': '儿1'})
# 创建小儿子
son2 = ET.SubElement(root, "son", attrib={"name": "儿2"})

# 在大儿子中创建一个孙子
grandson1 = ET.SubElement(son1, "age", attrib={'name': '儿11'})
grandson1.text = '孙子'


et = ET.ElementTree(root)  #生成文档对象
et.write("test.xml", encoding="utf-8", xml_declaration=True, short_empty_elements=False)
由于原生保存的XML时默认无缩进,如果想要设置缩进的话, 需要修改保存方式:
复制代码
from xml.etree import ElementTree as ET
from xml.dom import minidom


def prettify(elem):
    """
    将节点转换成字符串,并添加缩进。
    """
    rough_string = ET.tostring(elem, 'utf-8')
    reparsed = minidom.parseString(rough_string)
    return reparsed.toprettyxml(indent="\t")

# 创建根节点
root = ET.Element("famliy")


# 创建大儿子
son1 = root.makeelement('son', {'name': '儿1'})
# 创建小儿子
son2 = root.makeelement('son', {"name": '儿2'})

# 在大儿子中创建两个孙子
grandson1 = son1.makeelement('grandson', {'name': '儿11'})
grandson2 = son1.makeelement('grandson', {'name': '儿12'})

son1.append(grandson1)
son1.append(grandson2)


# 把儿子添加到根节点中
root.append(son1)
root.append(son1)


raw_str = prettify(root)

f = open("xxxoo.xml",'w',encoding='utf-8')
f.write(raw_str)
f.close()
4、命名空间:
from xml.etree import ElementTree as ET

ET.register_namespace('com',"http://www.company.com") #some name

# build a tree structure
root = ET.Element("{http://www.company.com}STUFF")
body = ET.SubElement(root, "{http://www.company.com}MORE_STUFF", attrib={"{http://www.company.com}hhh": "123"})
body.text = "STUFF EVERYWHERE!"

# wrap it in an ElementTree instance, and save as XML
tree = ET.ElementTree(root)

tree.write("page.xml",
           xml_declaration=True,
           encoding='utf-8',
           method="xml")
logging
python logging模块提供了很完善的日志记录功能
import logging
import sys
# 获取logger实例,如果参数为空则返回root logger
logger = logging.getLogger("AppName")

# 指定logger输出格式
formatter = logging.Formatter('%(asctime)s %(levelname)-8s: %(message)s')

# 文件日志
file_handler = logging.FileHandler("test.log")
file_handler.setFormatter(formatter)  # 可以通过setFormatter指定输出格式

# 控制台日志
console_handler = logging.StreamHandler(sys.stdout)
console_handler.formatter = formatter  # 也可以直接给formatter赋值

# 为logger添加的日志处理器
logger.addHandler(file_handler)
logger.addHandler(console_handler)

# 指定日志的最低输出级别,默认为WARN级别
logger.setLevel(logging.INFO)

# 输出不同级别的log
logger.debug('this is debug info')
logger.info('this is information')
logger.warning('this is warning message')
logger.error('this is error message')
logger.fatal('this is fatal message, it is same as logger.critical')
logger.critical('this is critical message')

# 2018-03-15 10:42:49,464 INFO    : this is information
# 2018-03-15 10:42:49,464 WARNING : this is warning message
# 2018-03-15 10:42:49,464 ERROR   : this is error message
# 2018-03-15 10:42:49,465 CRITICAL: this is fatal message, it is same as logger.critical
# 2018-03-15 10:42:49,465 CRITICAL: this is critical message

# 移除一些日志处理器
logger.removeHandler(file_handler)
# 格式化输出

service_name = "Booking"
logger.error('%s service is down!' % service_name)  # 使用python自带的字符串格式化,不推荐
logger.error('%s service is down!', service_name)  # 使用logger的格式化,推荐
logger.error('%s service is %s!', service_name, 'down')  # 多参数格式化
logger.error('{} service is {}'.format(service_name, 'down')) # 使用format函数,推荐
记录异常信息:
当你使用logging模块记录异常信息时,不需要传入该异常对象,只要你直接调用 logger.error() 或者 logger.exception()就可以将当前异常记录下来。
# 记录异常信息

try:
    1 / 0
except:
    # 等同于error级别,但是会额外记录当前抛出的异常堆栈信息
    logger.exception('this is an exception message')

# 2018-03-15 10:47:27,229 ERROR   : this is an exception message
# Traceback (most recent call last):
#   File "/Users/lianliang/Desktop/yisuo-faceid/test.py", line 288, in <module>
#     1 / 0
# ZeroDivisionError: division by zero
logging配置要点:
GetLogger()方法
这是最基本的入口,该方法参数可以为空,默认的logger名称是root,如果在同一个程序中一直都使用同名的logger,其实会拿到同一个实例,使用这个技巧就可以跨模块调用同样的logger来记录日志。
另外你也可以通过日志名称来区分同一程序的不同模块,比如这个例子。
logger = logging.getLogger("App.UI")
logger = logging.getLogger("App.Service")
Formatter日志格式:
Formatter对象定义了log信息的结构和内容,构造时需要带两个参数:
- fmt,默认会包含最基本的level和 message信息
- datefmt,默认为 2003-07-08 16:49:45,896 (%Y-%m-%d %H:%M:%S)
fmt中允许使用的变量可以参考下表。
| %(name)s | Logger的名字 |
|---|---|
| %(levelno)s | 数字形式的日志级别 |
| %(levelname)s | 文本形式的日志级别 |
| %(pathname)s | 调用日志输出函数的模块的完整路径名,可能没有 |
| %(filename)s | 调用日志输出函数的模块的文件名 |
| %(module)s | 调用日志输出函数的模块名 |
| %(funcName)s | 调用日志输出函数的函数名 |
| %(lineno)d | 调用日志输出函数的语句所在的代码行 |
| %(created)f | 当前时间,用UNIX标准的表示时间的浮 点数表示 |
| %(relativeCreated)d | 输出日志信息时的,自Logger创建以 来的毫秒数 |
| %(asctime)s | 字符串形式的当前时间。默认格式是 “2003-07-08 16:49:45,896”。逗号后面的是毫秒 |
| %(thread)d | 线程ID。可能没有 |
| %(threadName)s | 线程名。可能没有 |
| %(process)d | 进程ID。可能没有 |
| %(message)s | 用户输出的消息 |
SetLevel 日志级别:
Logging有如下级别: DEBUG,INFO,WARNING,ERROR,CRITICAL
默认级别是WARNING,logging模块只会输出指定level以上的log。这样的好处, 就是在项目开发时debug用的log,在产品release阶段不用一一注释,只需要调整logger的级别就可以了,很方便。
Handler 日志处理器:
最常用的是StreamHandler和FileHandler, Handler用于向不同的输出端打log。 Logging包含很多handler, 可能用到的有下面几种
- StreamHandler instances send error messages to streams (file-like objects).
- FileHandler instances send error messages to disk files.
- RotatingFileHandler instances send error messages to disk files, with support for maximum log file sizes and log file rotation.
- TimedRotatingFileHandler instances send error messages to disk files, rotating the log file at certain timed intervals.
- SocketHandler instances send error messages to TCP/IP sockets.
- DatagramHandler instances send error messages to UDP sockets.
- SMTPHandler instances send error messages to a designated email address.
Configuration 配置方法:
logging的配置大致有下面几种方式。
通过代码进行完整配置,参考开头的例子,主要是通过getLogger方法实现。
通过代码进行简单配置,下面有例子,主要是通过basicConfig方法实现。
通过配置文件,下面有例子,主要是通过 logging.config.fileConfig(filepath)
logging.basicConfig
basicConfig()提供了非常便捷的方式让你配置logging模块并马上开始使用,可以参考下面的例子。具体可以配置的项目请查阅官方文档。
import logging

logging.basicConfig(filename='example.log',level=logging.DEBUG)
logging.debug('This message should go to the log file')

logging.basicConfig(format='%(levelname)s:%(message)s', level=logging.DEBUG)
logging.debug('This message should appear on the console')

logging.basicConfig(format='%(asctime)s %(message)s', datefmt='%m/%d/%Y %I:%M:%S %p')
logging.warning('is when this event was logged.')
备注: 其实你甚至可以什么都不配置直接使用默认值在控制台中打log,用这样的方式替换print语句对日后项目维护会有很大帮助。
通过文件配置logging
有三种配置文件类型如果你希望通过配置文件来管理logging,详细可以参考这个官方文档。
# I met a trouble here, must add a root logger, because getlogger() mothd default give a root logger.
[loggers]
keys=root, file

[logger_root]
level=INFO
handlers=baseHandler
qualname=root

[logger_file]
level=DEBUG
handlers=fileHandler
qualname=file

[handlers]
keys=baseHandler, fileHandler

[handler_baseHandler]
class=StreamHandler
level=INFO
formatter=simpleFormatter
args=(sys.stdout,)

[handler_fileHandler]
class=logging.handlers.RotatingFileHandler
level=DEBUG
formatter=multipleFormatter
args=('./test.log', 10485760, 10)

[formatters]
keys=simpleFormatter, multipleFormatter

[formatter_simpleFormatter]
format=%(asctime)s - %(name)s - %(levelname)s - %(message)s
datefmt=

[formatter_multipleFormatter]
format=%(asctime)s %(filename)s:%(funcName)s:%(lineno)d %(levelname)s %(message)s
datefmt=%Y-%m-%d %H:%M:%S %p
假设以上的配置文件放在和模块相同的目录,代码中的调用如下:
import logging
from logging import config

config.fileConfig('logging.ini')
logger = logging.getLogger()
logger.info("123")
第三方模块
内置模块是安装好python后就可以直接使用的,而第三方模块就是需要另外安装的,使用之前提到的pip 或 esay_install 安装。
requests
Requests 是使用 Apache2 Licensed 许可证的 基于Python开发的HTTP 库,其在Python内置模块的基础上进行了高度的封装,从而使得Pythoner进行网络请求时,变得美好了许多,使用Requests可以轻而易举的完成浏览器可有的任何操作。让HTPP服务人类~
1、安装模块
pip3 install requests
2、使用模块
Get请求:
# 无参数实例

import requests

ret = requests.get('http://wthrcdn.etouch.cn/weather_mini?city=北京')

print(ret.url)
print(ret.text)
http://wthrcdn.etouch.cn/weather_mini?city=%E5%8C%97%E4%BA%AC
{"data":{"yesterday":{"date":"19日星期一","high":"高温 15℃","fx":"东风","low":"低温 2℃","fl":"<![CDATA[<3级]]>","type":"多云"},"city":"北京","aqi":"26","forecast":[{"date":"20日星期二","high":"高温 10℃","fengli":"<![CDATA[<3级]]>","low":"低温 -2℃","fengxiang":"西南风","type":"多云"},{"date":"21日星期三","high":"高温 13℃","fengli":"<![CDATA[<3级]]>","low":"低温 1℃","fengxiang":"西南风","type":"多云"},{"date":"22日星期四","high":"高温 16℃","fengli":"<![CDATA[<3级]]>","low":"低温 4℃","fengxiang":"西南风","type":"多云"},{"date":"23日星期五","high":"高温 20℃","fengli":"<![CDATA[<3级]]>","low":"低温 5℃","fengxiang":"北风","type":"多云"},{"date":"24日星期六","high":"高温 21℃","fengli":"<![CDATA[<3级]]>","low":"低温 7℃","fengxiang":"北风","type":"晴"}],"ganmao":"将有一次强降温过程,天气寒冷,极易发生感冒,请特别注意增加衣服保暖防寒。","wendu":"7"},"status":1000,"desc":"OK"}
# 有参数实例

import requests

payload = {'key1': 'value1', 'key2': 'value2'}
ret = requests.get("http://httpbin.org/get", params=payload)

print(ret.url)
print(ret.text)
http://httpbin.org/get?key1=value1&key2=value2
{
  "args": {
    "key1": "value1",
    "key2": "value2"
  },
  "headers": {
    "Accept": "*/*",
    "Accept-Encoding": "gzip, deflate",
    "Connection": "close",
    "Host": "httpbin.org",
    "User-Agent": "python-requests/2.18.4"
  },
  "origin": "111.207.143.125",
  "url": "http://httpbin.org/get?key1=value1&key2=value2"
}
POST请求:
# 基本POST实例

import requests

payload = {'key1': 'value1', 'key2': 'value2'}
ret = requests.post("http://httpbin.org/post", data=payload)

print(ret.text)
{
  "args": {},
  "data": "",
  "files": {},
  "form": {
    "key1": "value1",
    "key2": "value2"
  },
  "headers": {
    "Accept": "*/*",
    "Accept-Encoding": "gzip, deflate",
    "Connection": "close",
    "Content-Length": "23",
    "Content-Type": "application/x-www-form-urlencoded",
    "Host": "httpbin.org",
    "User-Agent": "python-requests/2.18.4"
  },
  "json": null,
  "origin": "111.207.143.125",
  "url": "http://httpbin.org/post"
}
# 发送请求头和数据实例

import requests
import json

url = "http://httpbin.org/post"
payload = {'some': 'data'}
headers = {'content-type': 'application/json', "User-Agent": "Mozilla/5.0 (Macintosh; Intel Mac OS X 10_12_5) AppleWebKit/537.36 (KHTML, like Gecko) Chrome/60.0.3112.113 Safari/537.36"}

ret = requests.post(url, data=json.dumps(payload), headers=headers)

print(ret.text)
print(ret.cookies)
{
  "args": {},
  "data": "{\"some\": \"data\"}",
  "files": {},
  "form": {},
  "headers": {
    "Accept": "*/*",
    "Accept-Encoding": "gzip, deflate",
    "Connection": "close",
    "Content-Length": "16",
    "Content-Type": "application/json",
    "Host": "httpbin.org",
    "User-Agent": "Mozilla/5.0 (Macintosh; Intel Mac OS X 10_12_5) AppleWebKit/537.36 (KHTML, like Gecko) Chrome/60.0.3112.113 Safari/537.36"
  },
  "json": {
    "some": "data"
  },
  "origin": "111.207.143.125",
  "url": "http://httpbin.org/post"
}

<RequestsCookieJar[]>
其他方法:
requests.get(url, params=None, **kwargs)
requests.post(url, data=None, json=None, **kwargs)
requests.put(url, data=None, **kwargs)
requests.head(url, **kwargs)
requests.delete(url, **kwargs)
requests.patch(url, data=None, **kwargs)
requests.options(url, **kwargs)

# 以上方法均是在此方法的基础上构建
requests.request(method, url, **kwargs)
更多细节请查看requests模块官方文档
HTP请求和实例:
检测QQ账号是否在线
import requests
from xml.etree import ElementTree as ET

# 使用第三方模块requests发送HTTP请求,或者XML格式内容
qqCode = 787710500
r = requests.get('http://www.webxml.com.cn//webservices/qqOnlineWebService.asmx/qqCheckOnline?qqCode=%s' % qqCode)
result = r.text

# 解析XML格式内容
node = ET.XML(result)

# 获取内容
if node.text == "Y":
    print("在线")
else:
    print("离线")
在线
列车时刻表查询:
import requests
from xml.etree import ElementTree as ET

# 使用第三方模块requests发送HTTP请求,或者XML格式内容
train = "G82"
r = requests.get('http://www.webxml.com.cn/WebServices/TrainTimeWebService.asmx/getDetailInfoByTrainCode?TrainCode=%s&UserID=' % train)
result = r.text

# 解析XML格式内容
root = ET.XML(result)
for node in root.iter('TrainDetailInfo'):
    print(node.find('TrainStation').text,node.find('StartTime').text,node.tag,node.attrib)
贵阳北(车次:G82) 08:37:00 TrainDetailInfo {'{urn:schemas-microsoft-com:xml-diffgram-v1}id': 'TrainDetailInfo1', '{urn:schemas-microsoft-com:xml-msdata}rowOrder': '0', '{urn:schemas-microsoft-com:xml-diffgram-v1}hasChanges': 'inserted'}
怀化南 10:12:00 TrainDetailInfo {'{urn:schemas-microsoft-com:xml-diffgram-v1}id': 'TrainDetailInfo2', '{urn:schemas-microsoft-com:xml-msdata}rowOrder': '1', '{urn:schemas-microsoft-com:xml-diffgram-v1}hasChanges': 'inserted'}
长沙南 11:37:00 TrainDetailInfo {'{urn:schemas-microsoft-com:xml-diffgram-v1}id': 'TrainDetailInfo3', '{urn:schemas-microsoft-com:xml-msdata}rowOrder': '2', '{urn:schemas-microsoft-com:xml-diffgram-v1}hasChanges': 'inserted'}
武汉 12:58:00 TrainDetailInfo {'{urn:schemas-microsoft-com:xml-diffgram-v1}id': 'TrainDetailInfo4', '{urn:schemas-microsoft-com:xml-msdata}rowOrder': '3', '{urn:schemas-microsoft-com:xml-diffgram-v1}hasChanges': 'inserted'}
郑州东 14:49:00 TrainDetailInfo {'{urn:schemas-microsoft-com:xml-diffgram-v1}id': 'TrainDetailInfo5', '{urn:schemas-microsoft-com:xml-msdata}rowOrder': '4', '{urn:schemas-microsoft-com:xml-diffgram-v1}hasChanges': 'inserted'}
石家庄 16:14:00 TrainDetailInfo {'{urn:schemas-microsoft-com:xml-diffgram-v1}id': 'TrainDetailInfo6', '{urn:schemas-microsoft-com:xml-msdata}rowOrder': '5', '{urn:schemas-microsoft-com:xml-diffgram-v1}hasChanges': 'inserted'}
北京西 None TrainDetailInfo {'{urn:schemas-microsoft-com:xml-diffgram-v1}id': 'TrainDetailInfo7', '{urn:schemas-microsoft-com:xml-msdata}rowOrder': '6', '{urn:schemas-microsoft-com:xml-diffgram-v1}hasChanges': 'inserted'}
paramiko
paramiko是一个用于做远程控制的模块,使用该模块可以对远程服务器进行命令或文件操作,值得一说的是,fabric和ansible内部的远程管理就是使用的paramiko来现实。
1、下载安装
pip install paramiko
2、使用模块
执行命令(用户名+密码):
import paramiko

ssh = paramiko.SSHClient()
ssh.set_missing_host_key_policy(paramiko.AutoAddPolicy())
ssh.connect('10.201.102.199', 22, 'root', 'megvii')
stdin, stdout, stderr = ssh.exec_command('df')
print(str(stdout.read(), encoding='utf-8'))
ssh.close()
执行命令(密钥):
a. 生成密钥对
>>> ssh-keygen
b. 发送密钥给远端的主机
>>> ssh-coppy-id root@10.201.102.199
import paramiko

private_key_path = '/root/.ssh/id_rsa'
key = paramiko.RSAKey.from_private_key_file(private_key_path)

ssh = paramiko.SSHClient()
ssh.set_missing_host_key_policy(paramiko.AutoAddPolicy())
ssh.connect('10.201.102.198', 22, 'root', key)

stdin, stdout, stderr = ssh.exec_command('df')
print(str(stdout.read(), encoding='utf-8'))
ssh.close()
上传和下载文件(用户名+密码):
import paramiko

t = paramiko.Transport(('10.201.102.198', 22))
t.connect(username='root', password='megvii')
sftp = paramiko.SFTPClient.from_transport(t)
sftp.put('/root/testfile', '/root/text')  # 上传文件,目标路径要写全,写上文件名
sftp.get('/root/text', '/root/testfile1')  # 下载文件.
t.close()
上传和下载文件(密钥):
import paramiko

pravie_key_path = '/root/.ssh/id_rsa'
key = paramiko.RSAKey.from_private_key_file(pravie_key_path)

t = paramiko.Transport(('10.201.102.198',22))
t.connect(username='root', pkey=key)

sftp = paramiko.SFTPClient.from_transport(t)
sftp.put('/root/testfile', '/root/text')
sftp.get('/root/text', '/root/testfile1')
t.close()