#!/usr/bin/env python
# coding: utf-8
# # Getting Started
#
# This notebook will walk through some very preliminary steps of getting started with Jupyter Notebooks. It's part of the [The Art of Literary Text Analysis](ArtOfLiteraryTextAnalysis.ipynb). In this notebook we'll look in particular at:
#
# * [Creating a new Notebook](#Creating-a-new-Notebook)
# * [Editing modes](#Editing-Modes)
# * [Markdown cells](#Markdown-Cells)
# * [Code cells](#Code-Cells)
# * [Printing a String](#Printing-a-String)
# * [Printing Dynamic Content](#Printing-Dynamic-Content)
# ## Creating a new Notebook
#
# This _Getting Started_ notebook assumes that you've gone through the [Getting Setup](GettingSetup.ipynb) notebook and successfully installed Jupyter. It also assumes that you've [launched Jupyter](GettingSetup.ipynb#Launching-Jupyter) and navigated to the folder of your choice where you want to store your notebooks.
#
# Let's dive right in by clicking the _New_ button from our chosen directory page and selecting "Python 3" from the menu.
#
#  #
# By default this will create a new notebook with a name like "Untitled" - we can rename it immediately by clicking on the name at the top (beside the Jupyter logo) and providing another name in the dialog box that appears. This is the actual filename (without the file extension) and just to be safe we'll avoid spaces and non alphanumeric characters.
#
#
#
# By default this will create a new notebook with a name like "Untitled" - we can rename it immediately by clicking on the name at the top (beside the Jupyter logo) and providing another name in the dialog box that appears. This is the actual filename (without the file extension) and just to be safe we'll avoid spaces and non alphanumeric characters.
#
#  #
# This is probably as good a time as any to step through the "User Interface Tour" that's available from the Help menu of Jupyter (the File menu within the notebook page, not the File menu of the browser).
# ## Editing Modes
#
# We've created a new notebook and had a quick tour of the Juypter interface, now we're ready to edit. Jupyter has two main editing modes:
#
# 1. **Markdown**: this is the styled text mode that we use when we're not writing python code
# 1. **Code**: this is the default mode used for python code and we'll see it in the [next section](#Code-Cells)
# ### Markdown Cells
#
# Markdown is the format used for text (not code) in Jupyter. Markdown is intended to be more succinct and simpler to read and write than HTML (Markdown is converted to HTML for display in the browser). For instance,
#
# * we can easily **headers** by using one or more hash (#) symbols at the beginning of a line
# * have text appear in \*\***bold**\*\* or \__italics_\_
# * paragraphs are created from newlines
# * and links like http://python.org/ appear automatically as links
#
# Another powerful feature is the creation of lists. For instance, we can create a bulleted list by having an asterisk in front of every item or a numbered list by putting 1. in front of each item (the numbering will increase automatically).
#
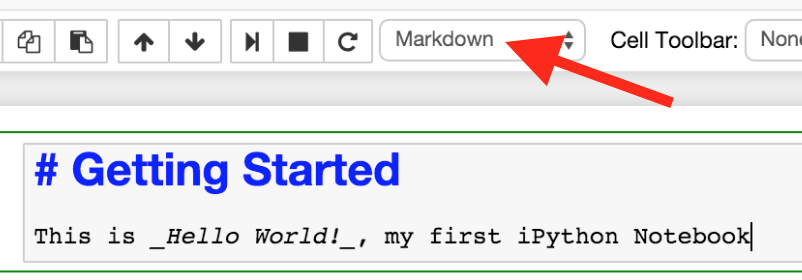
# We'll encounter more Markdown as we proceed, but for now we'll select _Markdown_ mode from the format menu. Copy the text below into the clipboard and paste it into the Markdown cell that you created:
#
# > \# Hello World!
# >
# > This is \__Hello World!_\_, my first iPython Notebook
#
#
#
# This is probably as good a time as any to step through the "User Interface Tour" that's available from the Help menu of Jupyter (the File menu within the notebook page, not the File menu of the browser).
# ## Editing Modes
#
# We've created a new notebook and had a quick tour of the Juypter interface, now we're ready to edit. Jupyter has two main editing modes:
#
# 1. **Markdown**: this is the styled text mode that we use when we're not writing python code
# 1. **Code**: this is the default mode used for python code and we'll see it in the [next section](#Code-Cells)
# ### Markdown Cells
#
# Markdown is the format used for text (not code) in Jupyter. Markdown is intended to be more succinct and simpler to read and write than HTML (Markdown is converted to HTML for display in the browser). For instance,
#
# * we can easily **headers** by using one or more hash (#) symbols at the beginning of a line
# * have text appear in \*\***bold**\*\* or \__italics_\_
# * paragraphs are created from newlines
# * and links like http://python.org/ appear automatically as links
#
# Another powerful feature is the creation of lists. For instance, we can create a bulleted list by having an asterisk in front of every item or a numbered list by putting 1. in front of each item (the numbering will increase automatically).
#
# We'll encounter more Markdown as we proceed, but for now we'll select _Markdown_ mode from the format menu. Copy the text below into the clipboard and paste it into the Markdown cell that you created:
#
# > \# Hello World!
# >
# > This is \__Hello World!_\_, my first iPython Notebook
#
#  #
# After pasting in the text, hit Shift-Enter and the Markdown cell should get rendered and the next cell created in the default coding mode.
# ### Code Cells
#
# There are typically two major challenges when programming, you need to determine
#
# 1. what do you want to do?
# 1. how are you going to do it?
#
# These notebooks are deliberately designed to introduce programming concepts and syntax gradually and as needed (as opposed to first explaining all there is to know about strings, for instance). Knowing what we want to do is in some ways more important than knowing how to do it, since it's almost always straightforward to search for how to do something.
#
# Our first program is going to follow tradition, what better place to start than the classic [_Hello World!_](http://en.wikipedia.org/wiki/%22Hello,_world!%22_program_) program. It's easy to describe what we want to do for our _Hello World!_ program: we want to write code that will display the string (or sequence of characters) "Hello World!".
#
# In python, as in many programming languages, a string can be expressed using double quotes, like this:
#
# > "Hello World!"
#
# In fact, in the simplest scenario, our code could consist of just that line because we can make use of a convenient aspect of Jypyter notebooks (and ipython): it will display the contents of the last expression in a code block, in this case our string. So let's paste the line above into our new notebook and then press Shift-Enter to execute it.
# In[1]:
"Hello World!"
# Yay, our first program! That was easy, wasn't it? :)
#
# The sequence above shows a key aspect of Jupyter code cells: there's an in(put) section and an out(put) section.
#
# If there's any doubt that we've just run our first bit of code, try removing the double quotes and re-running the code to see what happpens.
#
#
#
# After pasting in the text, hit Shift-Enter and the Markdown cell should get rendered and the next cell created in the default coding mode.
# ### Code Cells
#
# There are typically two major challenges when programming, you need to determine
#
# 1. what do you want to do?
# 1. how are you going to do it?
#
# These notebooks are deliberately designed to introduce programming concepts and syntax gradually and as needed (as opposed to first explaining all there is to know about strings, for instance). Knowing what we want to do is in some ways more important than knowing how to do it, since it's almost always straightforward to search for how to do something.
#
# Our first program is going to follow tradition, what better place to start than the classic [_Hello World!_](http://en.wikipedia.org/wiki/%22Hello,_world!%22_program_) program. It's easy to describe what we want to do for our _Hello World!_ program: we want to write code that will display the string (or sequence of characters) "Hello World!".
#
# In python, as in many programming languages, a string can be expressed using double quotes, like this:
#
# > "Hello World!"
#
# In fact, in the simplest scenario, our code could consist of just that line because we can make use of a convenient aspect of Jypyter notebooks (and ipython): it will display the contents of the last expression in a code block, in this case our string. So let's paste the line above into our new notebook and then press Shift-Enter to execute it.
# In[1]:
"Hello World!"
# Yay, our first program! That was easy, wasn't it? :)
#
# The sequence above shows a key aspect of Jupyter code cells: there's an in(put) section and an out(put) section.
#
# If there's any doubt that we've just run our first bit of code, try removing the double quotes and re-running the code to see what happpens.
#
#  #
# Jupyter auto-saves our work frequently, but it's a good idea to save contents periodically as well – we can do that from the File menu at the top or the save icon just below the File menu.
# ## Printing a String
#
# Our first *Hello World!* program may have seemed a bit *too* easy. Our technique above exploits the fact that the last expression of a code cell is displayed (if possible), but what happens if we want to print our string without it necessarily being the last line? Again, web search is our friend and we can look for how to use [python 3 to print a string](http://lmgtfy.com/?q=python+3+print+string). Your results may vary, but chances are that somewhere near the top will appear a Python 3 Documentation Tutorial on [Input and Output](https://docs.python.org/3/tutorial/inputoutput.html) which refers to the built-in [print()](https://docs.python.org/3/library/functions.html#print) function. (As an aside, the syntax changed a bit for print() between python 2 and python 3, the parentheses are now required).
#
# We can use the print function to display the contents of a string. In this case, the function print has an argument which is the actual string to print. In other words, our code says to execute print with whatever contents happen to be between the parentheses.
# In[2]:
print("Hello World!")
# A small nuance: the previous *output* (with no print function ) had single quotes surrounding the string, if we print this way there are no quotes (so it's a bit cleaner).
#
# We can have a variant of this where we first create a variable (a named identifier for a value that can change) that holds a string value – we assign the string on the right to the bare variable name on the left. Then, instead of printing a string, we print a variable (that contains the string).
# In[3]:
text = "Hello World!"
print(text)
# What's interesting is that we've created three separate _Hello World!_ programs that essentially produce the same result, we've just done it in different ways. That's an essential concept of programming: there's almost always multiple ways of doing things, and usually the best way of doing something is the way that makes the most sense to you (and hopefully others reading your code).
#
# ```python
# # technique 1
# "Hello World!"
#
# # technique 2
# print("Hello World!")
#
# # technique 3
# text = "Hello World!"
# print(text)```
#
# Note the use of the hash (#) symbol here in code that is a comment, something for humans to read, not the computer (and not to be confused with the hash symbol used for headings in a Markdown cell ).
#
# ## Printing Dynamic Content
#
# Printing a static string message is certainly an achievement, but let's say that we wanted to go beyond that and add to our program a string that indicates the current date and time.
#
# Let's add some more Markdown-formatted text to our HelloWorld notebook by selecting "Markdown" from the format menu and then typing something like:
#
# > Now let's try printing dynamic content like the current time.
#
# We can't hard-code the current date and time in a string since it will always change. So we need a way of expressing the time in a string format, let's Google [python 3 print current formatted time](http://lmgtfy.com/?q=python+3+print+current+formatted+time). One of the first results is a reference page for the [datetime](https://docs.python.org/3.4/library/datetime.html) module and in particular the [strftime()](https://docs.python.org/3.4/library/datetime.html#strftime-strptime-behavior) function. However, an even more accessible page is another of the top results at [Python: Get Today’s Current Date and Time](http://www.cyberciti.biz/faq/howto-get-current-date-time-in-python/). Part way down the page is an example that looks helpful:
#
# ```python
# #!/usr/bin/python
#
# import time
#
# now = time.strftime("%c")```
#
# We won't run this code exactly because there are a couple of differences between this code and what we want (differences that are useful to understand as we look for other tutorials and code snippets). Let's go through the parts of the code:
#
# ```python
# #!/usr/bin/python
# ```
#
# First, this assumes that we're running a Python file from the command line – the first line indicates the location of the python interpreter ```#!/usr/bin/python``` (this is called a [shebang](http://en.wikipedia.org/wiki/Shebang_(Unix%29) line). We don't need this line at all since we're using Jupyter.
#
# ```python
# import time
# ```
#
# The next line _is_ useful and introduces the notion of importing a module that contains other functions that we want to use (in this case functions for working with ```time```). Python actually has a relatively small set of built-in functions that don't require importing, especially compared to some other programming languages (like PHP). The ```print()``` function we've already seen is an example of a built-in function. The challenge can be finding the names of the modules and then finding the functions that we want to use.
#
# ```python
# now = time.strftime("%c")```
#
# This is the heart of what we want and demonstrates the use of calling a function that belongs to the ```time``` module that we imported. The ```time``` module has a ```strftime``` function and takes an argument that indicates the format to use (in this case ```%c``` is a format for a simple date and time representation). More formats are listed and explained in the [time.strftime()](https://docs.python.org/3.4/library/time.html?highlight=strftime#time.strftime) reference page.
#
# We also see in the code above another example of assigning a value to a variable name of our choice (as we did previously with _```text = "Hello World!"```_. The ```now``` on the left side of this statement isn't a built-in keyword in Python, it's a variable name that the programmer has chosen (a place-holder for a value that can change). Whatever the value of ```time.strftime("%c")``` gets assigned to the variable named ```now```. Note that just assigning a value doesn't mean that it will be displayed (printed), so we'd need to do that explicitly.
#
# Actually, we don't even need to assign a value to a variable, we can just print the value directly by adapting the example we found.
# In[4]:
import time
print(time.strftime("%c"))
# Again, other formats are listed on the [time.strftime()](https://docs.python.org/3.4/library/time.html?highlight=strftime#time.strftime) reference page, and we also see that the function can take a second, optional argument (in addition to the format argument) which is a different time value (otherwise the current time is used).
# Now we can put things together by sending multiple arguments to ```print()```, each one separated by a comma:
# In[5]:
print("Hello World! It's", time.strftime("%A %B %e, %Y"))
# Again, this is equivalent to declaring variables and sending each variable as an argument to the print function.
# In[6]:
text = "Hello World! It's"
now = time.strftime("%A %B %e, %Y")
print(text, now)
# ## Fetch URL Example
#
# The code above introduces some of the syntax of Python but in what follows we will jump to a more complex and useful example, although much of the code will not be explained in detail. The purpose here is to show a brief and powerful example, we will circle back to some of the concepts as we proceed.
#
# We will start by fetching the contents of a URL. To do that we use a built-in library called [urllib](https://docs.python.org/3/library/urllib.html) which allows us to request a URL and to read the response from the request.
# In[23]:
import urllib.request
response = urllib.request.urlopen('https://www.cbc.ca')
html = response.read()
html
# Next we will use a library called [BeautifulSoup](https://www.crummy.com/software/BeautifulSoup/bs4/doc/) to parse the document and to extract the tag named <main>.
# In[25]:
from bs4 import BeautifulSoup
soup = BeautifulSoup(html, 'lxml')
soup
# That was fast and (relatively) easy!
#
# Now, as a bonus let's look at all the headlines.
# In[21]:
for headline in soup.find_all("h3", class_="headline"):
print(headline.text)
# In other words, with something like seven lines of code we can fetch, parse, extract and show the headlines from a news source!
# ## Next Steps
# Here are some exercises to try:
#
# * Rewrite the dynamic message using a different language (French, Spanish, Chinese etc.)
# * How can you change the language ([locale](https://docs.python.org/2/library/locale.html)) of words generated by ```time.strftime()```?
# * How can you embed an image (from elsewhere on the web) in your GettingStarted notebook?
# * Write code to automatically print how many days there are until the next new year
#
# This guide is focused on text analysis (not so much hellos, worlds, and dates), so in the next module we're going to shift toward a small corpus that we can use, in other words, [Getting Texts](GettingTexts.ipynb).
# ---
# [CC BY-SA](https://creativecommons.org/licenses/by-sa/4.0/) From [The Art of Literary Text Analysis](ArtOfLiteraryTextAnalysis.ipynb) by [Stéfan Sinclair](http://stefansinclair.name) & [Geoffrey Rockwell](http://geoffreyrockwell.com). Edited and revised by [Melissa Mony](http://melissamony.com).
#
# Jupyter auto-saves our work frequently, but it's a good idea to save contents periodically as well – we can do that from the File menu at the top or the save icon just below the File menu.
# ## Printing a String
#
# Our first *Hello World!* program may have seemed a bit *too* easy. Our technique above exploits the fact that the last expression of a code cell is displayed (if possible), but what happens if we want to print our string without it necessarily being the last line? Again, web search is our friend and we can look for how to use [python 3 to print a string](http://lmgtfy.com/?q=python+3+print+string). Your results may vary, but chances are that somewhere near the top will appear a Python 3 Documentation Tutorial on [Input and Output](https://docs.python.org/3/tutorial/inputoutput.html) which refers to the built-in [print()](https://docs.python.org/3/library/functions.html#print) function. (As an aside, the syntax changed a bit for print() between python 2 and python 3, the parentheses are now required).
#
# We can use the print function to display the contents of a string. In this case, the function print has an argument which is the actual string to print. In other words, our code says to execute print with whatever contents happen to be between the parentheses.
# In[2]:
print("Hello World!")
# A small nuance: the previous *output* (with no print function ) had single quotes surrounding the string, if we print this way there are no quotes (so it's a bit cleaner).
#
# We can have a variant of this where we first create a variable (a named identifier for a value that can change) that holds a string value – we assign the string on the right to the bare variable name on the left. Then, instead of printing a string, we print a variable (that contains the string).
# In[3]:
text = "Hello World!"
print(text)
# What's interesting is that we've created three separate _Hello World!_ programs that essentially produce the same result, we've just done it in different ways. That's an essential concept of programming: there's almost always multiple ways of doing things, and usually the best way of doing something is the way that makes the most sense to you (and hopefully others reading your code).
#
# ```python
# # technique 1
# "Hello World!"
#
# # technique 2
# print("Hello World!")
#
# # technique 3
# text = "Hello World!"
# print(text)```
#
# Note the use of the hash (#) symbol here in code that is a comment, something for humans to read, not the computer (and not to be confused with the hash symbol used for headings in a Markdown cell ).
#
# ## Printing Dynamic Content
#
# Printing a static string message is certainly an achievement, but let's say that we wanted to go beyond that and add to our program a string that indicates the current date and time.
#
# Let's add some more Markdown-formatted text to our HelloWorld notebook by selecting "Markdown" from the format menu and then typing something like:
#
# > Now let's try printing dynamic content like the current time.
#
# We can't hard-code the current date and time in a string since it will always change. So we need a way of expressing the time in a string format, let's Google [python 3 print current formatted time](http://lmgtfy.com/?q=python+3+print+current+formatted+time). One of the first results is a reference page for the [datetime](https://docs.python.org/3.4/library/datetime.html) module and in particular the [strftime()](https://docs.python.org/3.4/library/datetime.html#strftime-strptime-behavior) function. However, an even more accessible page is another of the top results at [Python: Get Today’s Current Date and Time](http://www.cyberciti.biz/faq/howto-get-current-date-time-in-python/). Part way down the page is an example that looks helpful:
#
# ```python
# #!/usr/bin/python
#
# import time
#
# now = time.strftime("%c")```
#
# We won't run this code exactly because there are a couple of differences between this code and what we want (differences that are useful to understand as we look for other tutorials and code snippets). Let's go through the parts of the code:
#
# ```python
# #!/usr/bin/python
# ```
#
# First, this assumes that we're running a Python file from the command line – the first line indicates the location of the python interpreter ```#!/usr/bin/python``` (this is called a [shebang](http://en.wikipedia.org/wiki/Shebang_(Unix%29) line). We don't need this line at all since we're using Jupyter.
#
# ```python
# import time
# ```
#
# The next line _is_ useful and introduces the notion of importing a module that contains other functions that we want to use (in this case functions for working with ```time```). Python actually has a relatively small set of built-in functions that don't require importing, especially compared to some other programming languages (like PHP). The ```print()``` function we've already seen is an example of a built-in function. The challenge can be finding the names of the modules and then finding the functions that we want to use.
#
# ```python
# now = time.strftime("%c")```
#
# This is the heart of what we want and demonstrates the use of calling a function that belongs to the ```time``` module that we imported. The ```time``` module has a ```strftime``` function and takes an argument that indicates the format to use (in this case ```%c``` is a format for a simple date and time representation). More formats are listed and explained in the [time.strftime()](https://docs.python.org/3.4/library/time.html?highlight=strftime#time.strftime) reference page.
#
# We also see in the code above another example of assigning a value to a variable name of our choice (as we did previously with _```text = "Hello World!"```_. The ```now``` on the left side of this statement isn't a built-in keyword in Python, it's a variable name that the programmer has chosen (a place-holder for a value that can change). Whatever the value of ```time.strftime("%c")``` gets assigned to the variable named ```now```. Note that just assigning a value doesn't mean that it will be displayed (printed), so we'd need to do that explicitly.
#
# Actually, we don't even need to assign a value to a variable, we can just print the value directly by adapting the example we found.
# In[4]:
import time
print(time.strftime("%c"))
# Again, other formats are listed on the [time.strftime()](https://docs.python.org/3.4/library/time.html?highlight=strftime#time.strftime) reference page, and we also see that the function can take a second, optional argument (in addition to the format argument) which is a different time value (otherwise the current time is used).
# Now we can put things together by sending multiple arguments to ```print()```, each one separated by a comma:
# In[5]:
print("Hello World! It's", time.strftime("%A %B %e, %Y"))
# Again, this is equivalent to declaring variables and sending each variable as an argument to the print function.
# In[6]:
text = "Hello World! It's"
now = time.strftime("%A %B %e, %Y")
print(text, now)
# ## Fetch URL Example
#
# The code above introduces some of the syntax of Python but in what follows we will jump to a more complex and useful example, although much of the code will not be explained in detail. The purpose here is to show a brief and powerful example, we will circle back to some of the concepts as we proceed.
#
# We will start by fetching the contents of a URL. To do that we use a built-in library called [urllib](https://docs.python.org/3/library/urllib.html) which allows us to request a URL and to read the response from the request.
# In[23]:
import urllib.request
response = urllib.request.urlopen('https://www.cbc.ca')
html = response.read()
html
# Next we will use a library called [BeautifulSoup](https://www.crummy.com/software/BeautifulSoup/bs4/doc/) to parse the document and to extract the tag named <main>.
# In[25]:
from bs4 import BeautifulSoup
soup = BeautifulSoup(html, 'lxml')
soup
# That was fast and (relatively) easy!
#
# Now, as a bonus let's look at all the headlines.
# In[21]:
for headline in soup.find_all("h3", class_="headline"):
print(headline.text)
# In other words, with something like seven lines of code we can fetch, parse, extract and show the headlines from a news source!
# ## Next Steps
# Here are some exercises to try:
#
# * Rewrite the dynamic message using a different language (French, Spanish, Chinese etc.)
# * How can you change the language ([locale](https://docs.python.org/2/library/locale.html)) of words generated by ```time.strftime()```?
# * How can you embed an image (from elsewhere on the web) in your GettingStarted notebook?
# * Write code to automatically print how many days there are until the next new year
#
# This guide is focused on text analysis (not so much hellos, worlds, and dates), so in the next module we're going to shift toward a small corpus that we can use, in other words, [Getting Texts](GettingTexts.ipynb).
# ---
# [CC BY-SA](https://creativecommons.org/licenses/by-sa/4.0/) From [The Art of Literary Text Analysis](ArtOfLiteraryTextAnalysis.ipynb) by [Stéfan Sinclair](http://stefansinclair.name) & [Geoffrey Rockwell](http://geoffreyrockwell.com). Edited and revised by [Melissa Mony](http://melissamony.com).
Created January 2, 2015 and last modified January 17, 2019 (Jupyter 5.0.0)