#!/usr/bin/env python
# coding: utf-8
# This notebook was shamelessly copied from the Data Carpentry lesson on sharing your work: https://github.com/Reproducible-Science-Curriculum/sharing-RR-Jupyter
# # Sharing an interactive repository with Binder
#
#  #
#
# *(press space to continue, shift+space to go back)*
# * GitHub is a great service for sharing your code, but the materials in a GitHub repository are static.
# * How could you *run* a GitHub repository in your browser?
# ## Running code is more complicated than displaying code
#
# To run code, you need (at least) the following things:
# * Hardware on which to run code
# * All the software needed to run your code, including:
# 1. The code itself.
# 2. Hardware for running your programming language
# 3. Something to run your code (e.g., `python`, `r`)
# 4. Packages needed to run the code (e.g., `pandas`, `matplotlib`)
#
# ## Binder provides these things
#
# Binder is a service that provides your code, the hardware, and the software.
# You can create a link to a **live, interactive** version of your code.
# Here's an example of a Binder link:
#
# https://mybinder.org/v2/gh/trekhleb/homemade-machine-learning/master?filepath=notebooks%2Fanomaly_detection%2Fanomaly_detection_gaussian_demo.ipynb
#
# Clicking it will create a *live* version of the repository (a collection of notebooks
# that introduce you to machine learning). Because the link has a "filepath" argument,
# it will open the notebook on anomaly detection.
#
# Here's the repository that you've just run:
#
# https://github.com/trekhleb/homemade-machine-learning
# **Note**: The Binder link has a very similar structure to the github repository link!
# ## Build your Binder
#
# To build a Binder go to `mybinder.org` and paste in the URL of your repository, like so:
#
#
#
#
# *(press space to continue, shift+space to go back)*
# * GitHub is a great service for sharing your code, but the materials in a GitHub repository are static.
# * How could you *run* a GitHub repository in your browser?
# ## Running code is more complicated than displaying code
#
# To run code, you need (at least) the following things:
# * Hardware on which to run code
# * All the software needed to run your code, including:
# 1. The code itself.
# 2. Hardware for running your programming language
# 3. Something to run your code (e.g., `python`, `r`)
# 4. Packages needed to run the code (e.g., `pandas`, `matplotlib`)
#
# ## Binder provides these things
#
# Binder is a service that provides your code, the hardware, and the software.
# You can create a link to a **live, interactive** version of your code.
# Here's an example of a Binder link:
#
# https://mybinder.org/v2/gh/trekhleb/homemade-machine-learning/master?filepath=notebooks%2Fanomaly_detection%2Fanomaly_detection_gaussian_demo.ipynb
#
# Clicking it will create a *live* version of the repository (a collection of notebooks
# that introduce you to machine learning). Because the link has a "filepath" argument,
# it will open the notebook on anomaly detection.
#
# Here's the repository that you've just run:
#
# https://github.com/trekhleb/homemade-machine-learning
# **Note**: The Binder link has a very similar structure to the github repository link!
# ## Build your Binder
#
# To build a Binder go to `mybinder.org` and paste in the URL of your repository, like so:
#
# 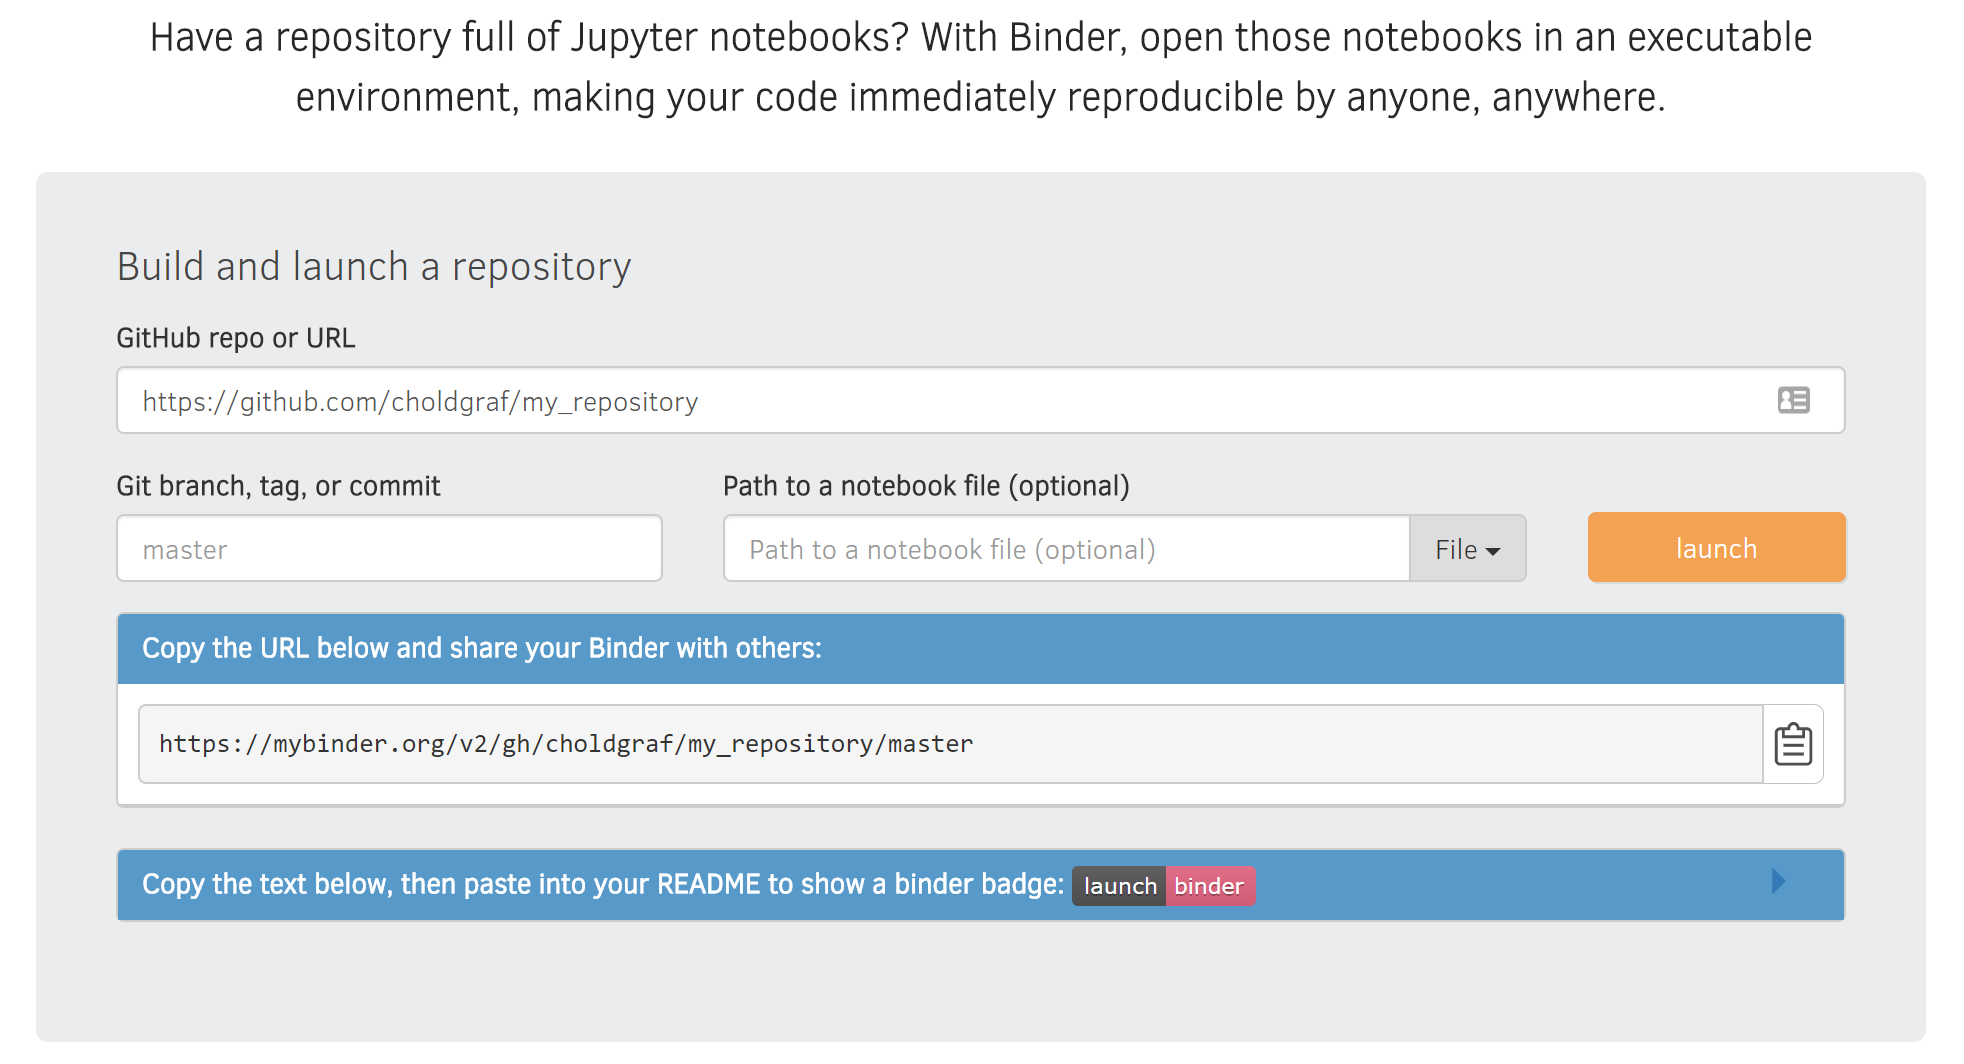 # ## Share your Binder link with others
#
# Now that you've got a Binder, you can share a link that will let others interact with it.
#
# This link is listed in the Binder GUI and should update itself as you fill in the forms. Copy the link and share it with your friends!
#
#
# ## Share your Binder link with others
#
# Now that you've got a Binder, you can share a link that will let others interact with it.
#
# This link is listed in the Binder GUI and should update itself as you fill in the forms. Copy the link and share it with your friends!
#
#  # ## A README.md for the computer
#
# If you are using other packages, you need tell Binder what to do!
# We need to create a file to specify which software we need.
#
# In python, that file is called `requirements.txt`.
#
# We also need to include any additional resources (e.g., any data files we need like `gapminder.csv`).
# ## Create a new file
#
# Using the GitHub GUI, click the "create new file" button. This will open a text editor where you can create a new file in your GitHub repository.
#
#
# ## A README.md for the computer
#
# If you are using other packages, you need tell Binder what to do!
# We need to create a file to specify which software we need.
#
# In python, that file is called `requirements.txt`.
#
# We also need to include any additional resources (e.g., any data files we need like `gapminder.csv`).
# ## Create a new file
#
# Using the GitHub GUI, click the "create new file" button. This will open a text editor where you can create a new file in your GitHub repository.
#
#  # ## Add software dependencies to this file
#
# In the "new file" GUI, we'll write down the software needed to run this code.
# In our case, this means `matplotlib` and `pandas`.
# We'll call this file `requirements.txt`, as these are the **requirements** for running the code.
#
#
# ## Add software dependencies to this file
#
# In the "new file" GUI, we'll write down the software needed to run this code.
# In our case, this means `matplotlib` and `pandas`.
# We'll call this file `requirements.txt`, as these are the **requirements** for running the code.
#
#  # ## Now build your Binder
#
# To build a Binder go to `mybinder.org` & click `launch` to build your Binder
#
# Binder will find your `requirements.txt` and provides the software for running your code.
# This may take a while!
# When it's ready, Binder will link you to a live Jupyter Notebook session running in the cloud!
# ## Wrapping up
#
# In this section we started with a static GitHub repository with Jupyter Notebooks inside. We then...
# * Created a file called `requirements.txt` that specified which software was needed to run our code.
# * Used the `mybinder.org` interface to build a Binder from this repository.
# * Created a Binder link in order to share our interactive repository with others.
# ## Next steps
#
# There are many more workflows that you can enable with Binder, and we recommend checking out a list of example Binder repositories at:
#
# https://github.com/binder-examples/
#
# Look for, and click, the Binder Badge:
#
#
# ## Now build your Binder
#
# To build a Binder go to `mybinder.org` & click `launch` to build your Binder
#
# Binder will find your `requirements.txt` and provides the software for running your code.
# This may take a while!
# When it's ready, Binder will link you to a live Jupyter Notebook session running in the cloud!
# ## Wrapping up
#
# In this section we started with a static GitHub repository with Jupyter Notebooks inside. We then...
# * Created a file called `requirements.txt` that specified which software was needed to run our code.
# * Used the `mybinder.org` interface to build a Binder from this repository.
# * Created a Binder link in order to share our interactive repository with others.
# ## Next steps
#
# There are many more workflows that you can enable with Binder, and we recommend checking out a list of example Binder repositories at:
#
# https://github.com/binder-examples/
#
# Look for, and click, the Binder Badge:
#
#  #
#
#
#
to explore the repository's Binder!