人臉辨識 - 臉部偵測、對齊 & 裁剪
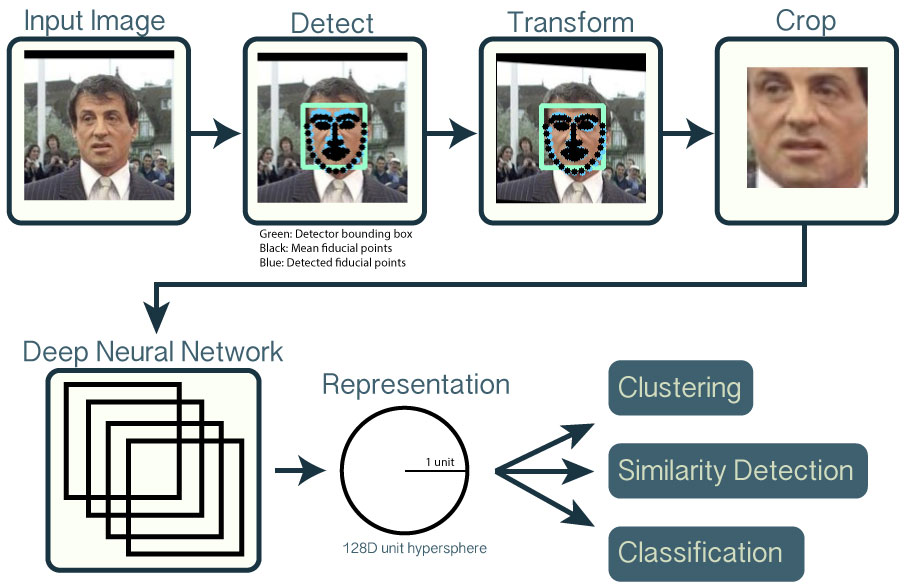
人臉辨識大致可分成四個主要的步驟:
- 人臉偵測
- 人臉轉換、對齊與裁剪
- 人臉特徵擷取
- 人臉特徵比對
在這篇文章中主要是介紹:
- 使用MTCNN來進行人臉偵測 -> Detect
- 然後進行簡單的裁剪 -> Tranform & Crop
face-recognition 專案說明
face-recognition包含了使用MTCNN與FaceNet來進行人臉辨識。
安裝
git clone https://github.com/erhwenkuo/face-recognition.git
cd face-recognition
...
資料集說明
LFW資料集是一個常見的人臉資料集,歷史非常悠久。LFW資料集中收錄了5749位公眾人物的人臉影像,總共有超過一萬三千多張影像檔案。但大部份公眾人物的影像都只有一張,只有1680位有超過一張照片,而極少數有超過10張照片。
資料集的網站: http://vis-www.cs.umass.edu/lfw
專案的檔案路徑佈局
- 使用Git從[erhwenkuo/face-recognition]https://github.com/erhwenkuo/face-recognition.git)%E4%B8%8B%E8%BC%89%E6%95%B4%E5%80%8B%E5%B0%88%E6%A1%88%E6%BA%90%E7%A2%BC
- 在
face-recognition的目錄裡產生二個子目錄data與model - 從[Labeled Faces in the Wild資料集官網]點撃All images as gzipped tar file來下 載
lfw.tgz。 - 解壓縮
lfw.tgz到face-recognition/data/的目錄下
最後你的目錄結構看起來像這樣: (這裡只列出來在這個範例會用到的相關檔案與目錄)
face-recognition/
├── xxxx.ipynb
├── detect_face.py
├── facenet.py
├── model/
│   └── mtcnn/
│       ├── det1.npy
│       ├── det2.npy
│       └── det3.npy
└── data/
    └── lfw/
        ├── Aaron_Eckhart/
        │   └── Aaron_Eckhart_0001.jpg
        ├── ...
        └── Zydrunas_Ilgauskas/
            └── Zydrunas_Ilgauskas_0001.jpg
STEP 1. 載入相關函式庫
In [1]:
# 屏蔽Jupyter的warning訊息
import warnings
warnings.filterwarnings('ignore')

# Utilities相關函式庫
from scipy import misc
import sys
import os
import random
from tqdm import tqdm

# 多維向量處理相關函式庫
import numpy as np

# 圖像處理相關函式庫
import cv2

# 深度學習相關函式庫
import tensorflow as tf

# 專案相關函式庫
import facenet
import detect_face
STEP 2. 設定相關設定與參數
In [2]:
# 專案的根目錄路徑
ROOT_DIR = os.getcwd()

# 訓練/驗證用的資料目錄
DATA_PATH = os.path.join(ROOT_DIR, "data")

# 模型的資料目錄
MODEL_PATH = os.path.join(ROOT_DIR, "model")

# MTCNN的模型
MTCNN_MODEL_PATH = os.path.join(MODEL_PATH, "mtcnn")

# 訓練/驗證用的圖像資料目錄
IMG_IN_PATH = os.path.join(DATA_PATH, "lfw")

# 訓練/驗證用的圖像資料目錄
IMG_OUT_PATH = os.path.join(DATA_PATH, "lfw_crops")
STEP 3. 取得儲存在檔案系統裡的人臉圖像資料集的圖像路徑與人臉的identity
參數:
    paths (string): 圖像資料集的檔案路徑
    has_class_directories (bool): 是否使用子目錄名作為人臉的identity (預設為True)
    path_expanduser (bool): 是否把path中包含的"~"和"~user"轉換成在作業系統下的用戶根目錄 (預設為False)
回傳:
    dataset (list[ImageClass]): 人臉類別(ImageClass)的列表與圖像路徑
In [3]:
# 檢查要儲放裁剪結果的目錄
if not os.path.exists(IMG_OUT_PATH):
        os.makedirs(IMG_OUT_PATH)


# 臉類別(ImageClass)的列表與圖像路徑
dataset = facenet.get_dataset(IMG_IN_PATH)
In [4]:
# 打印看有多少人臉的身份
print("Total face identities: ", len(dataset))
Total face identities: 5749
STEP 4. 構建MTCNN的模型來偵測人臉位置
詳細說明: 人臉偵測 - MTCNN (Multi-task Cascaded Convolutional Networks)
In [5]:
print('Creating networks and loading parameters')
with tf.Graph().as_default():
    gpu_options = tf.GPUOptions(per_process_gpu_memory_fraction=0.5)
    sess = tf.Session(config=tf.ConfigProto(gpu_options=gpu_options, log_device_placement=False))
    with sess.as_default():
        pnet, rnet, onet = detect_face.create_mtcnn(sess, MTCNN_MODEL_PATH)
Creating networks and loading parameters
設定人臉偵測模型所需的相關參數
In [6]:
minsize = 20  # 最小的臉部的大小
threshold = [0.6, 0.7, 0.7]  # 三個網絡(P-Net, R-Net, O-Net)的閥值
factor = 0.709  # scale factor

margin = 44 # 在裁剪人臉時的邊框margin
image_size = 182 # 160 + 22
In [7]:
# 將一個隨機key添加到圖像檔名以允許使用多個進程進行人臉對齊
random_key = np.random.randint(0, high=99999)
bounding_boxes_filename = os.path.join(IMG_OUT_PATH, 'bounding_boxes_%05d.txt' % random_key)
STEP 5. 人臉圖像處理
對每一張人臉圖像進行偵測並找出靠近圖像中心點的人臉邊界框來進行裁剪及調整大小。
ImageClass類別
儲存某特定人臉(Identity)的名稱與相關的人臉圖像的路徑列表的類別

    屬性:
        name (string): 人臉的Identity
        image_paths (List<string>): 人臉圖像路徑的列表

    方法:
        str(ImageClass): 取得人臉的Identity
        len(ImageClass): 取得人臉的Identity有多少圖像
In [8]:
# 使用Tensorflow來運行MTCNN
with open(bounding_boxes_filename, "w") as text_file:
    nrof_images_total = 0 # 處理過的圖像總數
    nrof_successfully_aligned = 0 # 人臉圖像align的總數

    # 迭代每一個人臉身份(ImageClass)
    for cls in tqdm(dataset):
        output_class_dir = os.path.join(IMG_OUT_PATH, cls.name) # 裁剪後的圖像目錄
        if not os.path.exists(output_class_dir):
            os.makedirs(output_class_dir)

        # 迭代每一個人臉身份的圖像的路徑 (ImageClass.image_paths)
        for image_path in cls.image_paths:
            nrof_images_total += 1
            filename = os.path.splitext(os.path.split(image_path)[1])[0] # 取得圖像檔名
            output_filename = os.path.join(output_class_dir, filename + '.png') # 設定輸出的圖像檔名
            # print(image_path)

            if not os.path.exists(output_filename):
                try:
                    img = misc.imread(image_path) # 讀進圖檔
                    # print('read data dimension: ', img.ndim)
                except (IOError, ValueError, IndexError) as e:
                    errorMessage = '{}: {}'.format(image_path, e)
                    # print(errorMessage)
                else:
                    # 將圖檔轉換成numpy array (height, widith, color_channels)
                    if img.ndim < 2:
                        print('Unable to align "%s"' % image_path)
                        text_file.write('%s\n' % (output_filename))
                        continue
                    if img.ndim == 2:
                        img = facenet.to_rgb(img)
                        print('to_rgb data dimension: ', img.ndim)
                    img = img[:, :, 0:3]
                    # print('after data dimension: ', img.ndim)

                    # 使用MTCNN來偵測人臉在圖像中的位置
                    bounding_boxes, _ = detect_face.detect_face(img, minsize, pnet, rnet, onet, threshold, factor)
                    nrof_faces = bounding_boxes.shape[0] # 偵測到的人臉總數
                    # print('detected_face: %d' % nrof_faces)
                    if nrof_faces > 0:
                        # 當有偵測到多個人臉的時候, 我們希望從中找到主要置中位置的人臉
                        det = bounding_boxes[:, 0:4]
                        img_size = np.asarray(img.shape)[0:2]
                        if nrof_faces > 1:
                            bounding_box_size = (det[:, 2] - det[:, 0]) * (det[:, 3] - det[:, 1])
                            img_center = img_size / 2
                            offsets = np.vstack([(det[:, 0] + det[:, 2]) / 2 - img_center[1],
                                                 (det[:, 1] + det[:, 3]) / 2 - img_center[0]])
                            offset_dist_squared = np.sum(np.power(offsets, 2.0), 0)
                            index = np.argmax(bounding_box_size - offset_dist_squared * 2.0)  # some extra weight on the centering
                            det = det[index, :]
                        det = np.squeeze(det)
                        bb_temp = np.zeros(4, dtype=np.int32)
                        # 取得人臉的左上角與右下角座標
                        bb_temp[0] = det[0]
                        bb_temp[1] = det[1]
                        bb_temp[2] = det[2]
                        bb_temp[3] = det[3]

                        # 進行裁剪以及大小的轉換
                        cropped_temp = img[bb_temp[1]:bb_temp[3], bb_temp[0]:bb_temp[2], :]
                        scaled_temp = misc.imresize(cropped_temp, (image_size, image_size), interp='bilinear')

                        nrof_successfully_aligned += 1
                        misc.imsave(output_filename, scaled_temp) # 儲存處理過的圖像
                        text_file.write('%s %d %d %d %d\n' % (output_filename, bb_temp[0], bb_temp[1], bb_temp[2], bb_temp[3]))
                    else:
                        # print('Unable to align "%s"' % image_path)
                        text_file.write('%s\n' % (output_filename))

print('Total number of images: %d' % nrof_images_total)
print('Number of successfully aligned images: %d' % nrof_successfully_aligned)
100%|██████████████████████████████████████| 5749/5749 [39:27<00:00, 2.43it/s]
Total number of images: 13233
Number of successfully aligned images: 13233
STEP 6. 檢查人臉圖像處理結果
In [9]:
import matplotlib.pyplot as plt

face_identity = 'Bill_Clinton'
origin_face_image = os.path.join(IMG_IN_PATH, face_identity, 'Bill_Clinton_0009.jpg')
aligned_face_image = os.path.join(IMG_OUT_PATH, face_identity, 'Bill_Clinton_0009.png')
In [ ]:
# 使用OpenCV讀入測試圖像
# 注意: OpenCV讀進來的圖像所產生的Numpy Ndaary格式是BGR (B:Blue, G: Green, R: Red)
#      跟使用PIL或skimage的格式RGB (R: Red, G: Green, B:Blue)在色階(channel)的順序上有所不同
bgr_image = cv2.imread(origin_face_image)
rgb_image = bgr_image[:,:,::-1] # 把BGR轉換成RGB

# 偵測人臉
bounding_boxes, _ = detect_face.detect_face(rgb_image, minsize, pnet, rnet, onet, threshold, factor)

# 複製原圖像
draw = bgr_image.copy()

# 被偵測到的臉部總數
faces_detected = len(bounding_boxes)

print('Total faces detected :{}'.format(faces_detected))

# 每一個 bounding_box包括了(x1,y1,x2,y2,confidence score):
#   左上角座標 (x1,y1)
#     右下角座標 (x2,y2)
#     信心分數 confidence score

# 迭代每一個偵測出來的邊界框
for face_position in bounding_boxes:
    # 把資料由float轉成int
    face_position=face_position.astype(int)

    # 取出左上角座標 (x1,y1)與右下角座標 (x2,y2)
    # 由於有可能預測出來的臉在圖像的圖邊而導致座標值為負值
    # 因此進行的負值的偵測與修正
    x1 = face_position[0] if face_position[0] > 0 else 0
    y1 = face_position[1] if face_position[1] > 0 else 0
    x2 = face_position[2] if face_position[2] > 0 else 0
    y2 = face_position[3] if face_position[3] > 0 else 0

    # 在原圖像上畫上這些邊界框
    cv2.rectangle(draw, (x1, y1), (x2, y2), (0, 255, 0), 2)

# 設定展示的大小
plt.figure(figsize=(10,5))

# 展示偵測出來的結果
plt.imshow(draw[:,:,::-1]) # 轉換成RGB來給matplotlib展示
plt.show()
以上的人臉圖像裡頭有兩個人臉被找出來,因此在圖像處理中要找到離圖像中心點比較接近的那一個來當成主要的人臉圖像並進行其它的前處理。
In [ ]:
bgr_image = cv2.imread(aligned_face_image)
rgb_image = bgr_image[:,:,::-1] # 把BGR轉換成RGB

# 設定展示的大小
plt.figure(figsize=(8,3))

# 展示偵測出來的結果
plt.imshow(rgb_image) # 轉換成RGB來給matplotlib展示
plt.show()
In [ ]: